3D Cube WorkSpace
The "PBG Module" needs to be unlocked to access this feature
The 3D Cube WorkSpace offers a 3D view that is solely focused on bottom structure. In this WorkSpace, the bathymetry is always turned ON and is automatically adjusted to provide the best view possible:
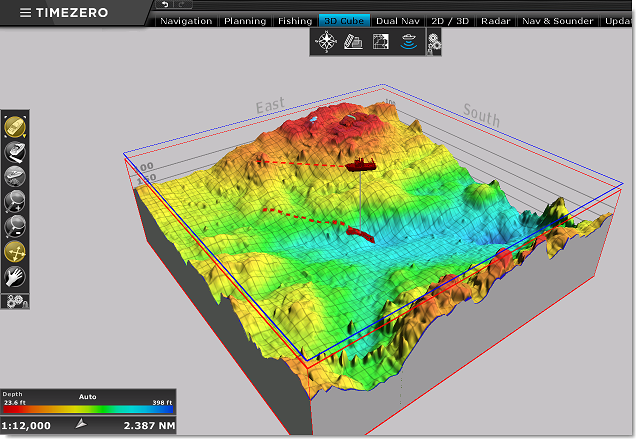
It is possible to rotate the view around the boat by left clicking and dragging the mouse over the screen. As the boat moves and changes heading, the view stays locked providing the same camera angle relative to the bow of your vessel. The mouse wheel allows you to adjust the distance in between the boat and the view point (camera).
The "Mode" button of the 3D WorkSpace offers features that allow you to set the camera angle to specific presets and also display or hide a depth scale and 3D cone:
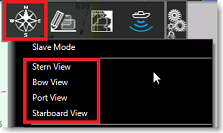
Note: Position and zoom presets can also be adjusted by right clicking on the chart
By default, the 3D Cube WorkSpace is center on the boat, but it is possible to move the view and explore various areas by selecting the "Pan" (hand) tool from the Toolbar. Once selected, left clicking and dragging the mouse will allow you to move the location of the 3D Cube view. To go back to the own ship position, click on the "Center On" button located at the top of the Toolbar.
Pressing the ESC key, will select the Orientation tool, which is the default tool of the 3D Cube WorkSpace.
Tips: While the Orientation tool is selected, it is possible to temporary switch to the Pan tool by pressing and holding the SHIFT Key.
The 3D Cube also offers a "Slave Mode" (under the "Mode" button in the Ribbon). This mode is only available when a WorkSpace contains a 3D Cube display and a Navigation display (ex: when the screen is divided in between Navigation and 3D Cube) or when using multiple screens. When the Slave Mode is available, an icon will appear on the lower right corner of the 3D Cube display allowing to link the 3D Cube center point and zoom level to the Navigation display:
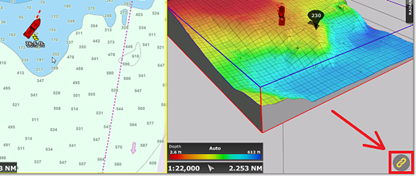
The user is able zoom and pan on the Navigation chart and the 3D Cube will automatically match the zoom and location. Note that if you manually pan the 3D Cube, then the Slave mode will be disabled automatically.
Note: Adjusting the Orientation of the 3D Cube will not disable the Slave Mode.
By default, the 3D exaggeration is automatic and is automatically adapted for the terrain displayed on the cube. However, it is possible to adjust a factor of Auto Exaggeration by adjusting the "Bathy Exaggeration" slider when "Auto Bathy Exaggeration" is selected:
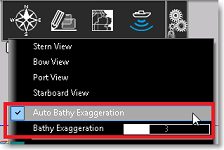
It is also possible to fix a manual exaggeration by unchecking "Auto Bathy Exaggeration". In this case, the user will more likely have to re-adjust the manual exaggeration when changing areas.
By default, a Depth Cursor is displayed when moving the mouse over the 3D Cube View. It can be disabled from the "PBG" button in the ribbon:
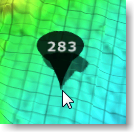
Note: For positive depth value (altitude), the cursor will turn red.
In the "3D Cube" WorkSpace, all objects (marks, tracks, ...) are displayed projected on the bottom and cannot be edited (the "Navigation" or "Planning" WorkSpace must be used to create or edit objects). When using vector charts, only the chart background is displayed (buoys and other navigational objects are not represented). Additionally, a grid is displayed by default (that can be disabled from the "Chart" button in the ribbon). All of these contribute to display a simple and uncluttered 3D view for the user.