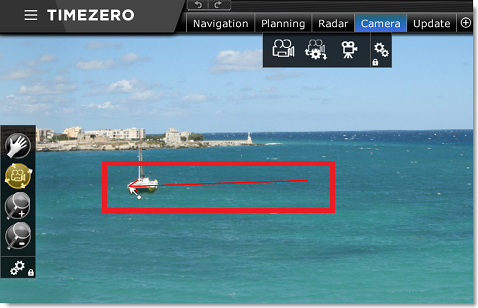
Camera WorkSpace
The Camera WorkSpace is used to display the video feed from a compatible camera. This WorkSpace contains a "Camera", "Camera Control" and "Augmented Reality" buttons located on the Ribbon and can be configured as a full screen or quarter screen.
The "Camera" button allows you to select the video source displayed in the WorkSpace.
The "Camera Control" button allows you to control specific features of the camera (Home Position, Color Palette, etc...) and to unlock the camera if it has been locked on a target or object. Note that the features available under this button vary with the type of Camera.
Note: You can also right click on the video screen to change video source and directly access features of the camera.
The "Augmented Reality" button allows you to enable and configure the various Augmented Reality features. Note that in order to be available, the camera setting "Enable Augmented Reality" must be enabled from the Camera option page.
If the camera has Pan/Tilt/Zoom function, it is possible to move the camera by:
-
using the virtual joystick available on the lower right corner of the camera WorkSpace
-
left clicking on any point on the screen to center the camera on that point
-
clicking and dragging the mouse to move the camera (see below)
-
using the arrow keys on the keyboard
The camera Zoom can be adjusted by:
-
clicking on the "-" / "+" buttons available in the virtual joystick
-
using the mouse scroll wheel
-
using the "Page Up" and "Page Down" buttons on the keyboard
Joystick Mode
Clicking and holding the left mouse button on the camera screen will display a red arrow originating from the center of the screen to your cursor. You can move the cursor around the screen to change the direction of the arrow and its length. The farther from the center of the screen your cursor is, the quicker the camera will move in that direction:
