Fishing Buoys
TimeZero is compatible with satellite buoys from various manufacturers (Satlink, Marine Instruments, Zunibal, Ryokusei, Blue Ocean Gear) and AIS transmitter installed on fishing gear. After proper configuration, TimeZero will display and record Fishing Buoys with specific icon, enable a dedicated list and offer various features (trail, drift alarm, ...).
Fishing Buoys Setup
TimeZero can import and process Fishing Buoys data in three different ways:
-
reading the content of a text file inside a folder
-
receiving information on a Serial COM Port
-
processing AIS target with a specific MMSI
Text File (Satlink, Marine Instruments and Zunibal buoys)
TimeZero can be setup to check continuously the content of a directory and look for a text file (with a name following the pattern *_PosReport*.*) containing satellite Buoys information. To be analyzed properly, the text file should contains data in a specific format that looks similar to NMEA sentences (please refer to the NMEA Sentence chapter for more information). Satellite buoys manufacturers such as Satlink, Marine Instruments and Zunibal have software that can generate text file in that format.
The first step is to create a dedicated folder somewhere on your computer (a "Buoys" folder located in "Documents" for example) and setup the satellite buoys software to write inside it. Below is an example with the Satlink software:

Note: Please refer to the documentation of your Satellite Buoys software for exact configuration steps. If the software can output in multiple formats, make sure to choose either "TimeZero" or "MaxSea" format.
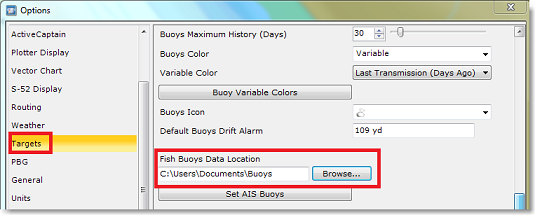
Next, select the same folder in TimeZero from the Targets Options under "Fish Buoys Data Location":
From now on, every time the satellite buoys software writes a new file into the folder, TimeZero automatically detects it, processes the data contained inside the file, and then deletes the file.
Serial COM Port (Ryokusei buoys)
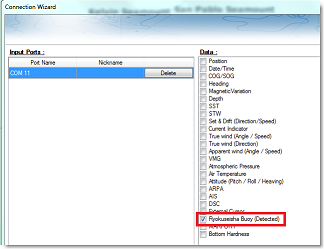
TimeZero can be setup to look for proprietary sentences on a Serial COM port (RBY or BLV sentence) that is used by the Japanese buoys manufacturer Ryokusei (or Ryokuseisha). Simply configure in the connection wizard (on a serial port) the "Ryokuseisha Buoy" data category:
You can also configure the "RBY_RBC" sentence as an output on the same port (it will allow you to request a position update directly from TimeZero by right clicking on the buoy).
AIS Buoy
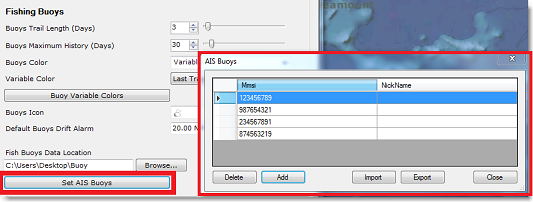
In some countries, it is allowed to attach an AIS transmitter to your fishing gear so that it can be easily located. To avoid displaying the AIS target as a vessel on the chart, it is possible to preset a list of MMSI from the Targets Options. Simply click on "Set AIS Buoys" and enter all the MMSI corresponding to all AIS transmitters that are attached to your fishing gear:
From now on, when TimeZero receives an AIS position report matching a MMSI in the list, TimeZero will convert that AIS into a Fishing Buoy.
Show and Hide Buoys
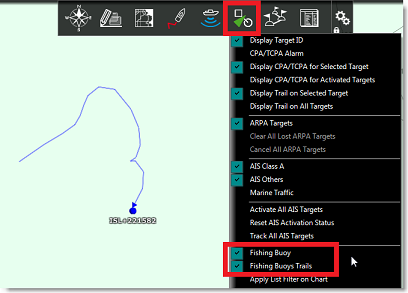
To display the fishing buoys on your screen, select "Fishing Buoys" from the "Targets" button located in the Ribbon:
By default, all fishing buoys are displayed using a small buoy icon, but you can change the default icon from the Targets Options (by changing the "Buoy Icon" setting).
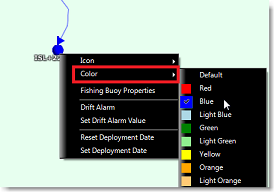
Note that you can also individually customize the icon of each buoy by right clicking on the buoy and selecting "Icon".
Buoys Color
By default, all fishing buoys are displayed in variable color: green for buoys that were updated in the last 24H, yellow for buoys that were updated in the last 4 days, red for buoys that were updated in the last 5 to 20 days and black for buoys that are older than 20 days.
It is possible to change this default color from the Targets Options by clicking on the "Buoy Variable Colors" button:
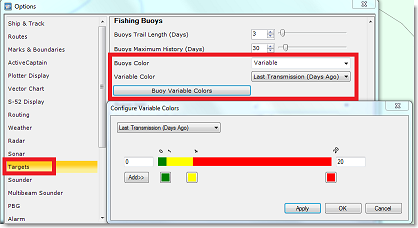
Note that you can change, add, or remove colors, but you can also change the parameter used. For example, you can change the buoys color according to their speed or according to the sea surface temperature value.
If you prefer, you can also make all buoys the same color by choosing a color under the "Buoys Color" setting instead of "Variable". You can also individually customize the color of each buoy by right clicking on the buoy and selecting "Color":
TIPS: You can select multiple buoys from the chart or from the list using the SHIFT key on your keyboard and then change the color of all the selected buoys simultaneously.
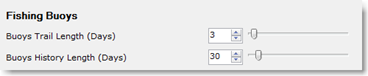
Buoys Trail and History
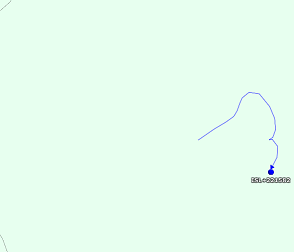
The fishing buoys history is always and automatically recorded in TimeZero. You can display a short trail behind all fishing buoys by enabling "Fishing Buoys Trails" from the "Targets" button located in the Ribbon. The trail length can be adjusted from the Targets Options ("Buoy Trail Length (days)"). However, when clicking on a buoy, a longer trail (called "history") is loaded and displayed on the chart. By default, this longer trail (that is only displayed on the selected buoy) is set to 30 days, but it can be adjusted using the "Buoy Maximum History (days)" to up to 360 days (one year):
Below is an example of a trail:
Below is the history displayed on the same buoy after clicking on it:
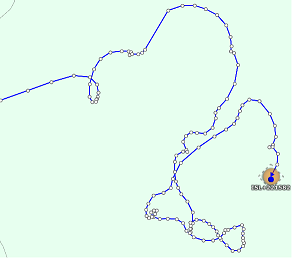
Note: When a buoy is selected, all its position report received by TimeZero are displayed with small dots. You can click on each dot to see a tooltip showing the buoy information for that report.
Buoys List
To display a list of all the buoys, select "Fishing Buoys List" from the "Lists" button located on the ribbon:

Note that you can customize the columns that are displayed in the list by clicking on the "Actions" menu and selecting "Configure List":

TIPS: This list can be sorted by double clicking on any column header. So for example, you can sort by "Date" (to see the most up to date buoy at the top), by speed or by color (if you have assigned specific color to specific buoys).
You can also display a "Fishing Buoys Detail" list that will show all the position reports of the selected buoy.
Buoys Filter
It is possible to filter items in the list by clicking on the "Filter" button displayed at the top right corner of the list. When you click on this button, a window opens allowing you to select your filter parameters:
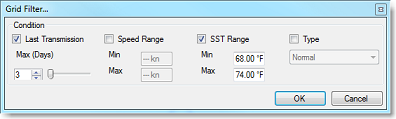
By default, the filter only operates on the list, but you can apply the same filter on the chart if you select "Apply List Filter on Chart" from the "Targets" button located in the ribbon.
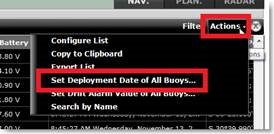
Buoys Deployment Date
By default, the trail duration and the history (when you click on a buoy) are common to all buoys according to the setting in the Targets Options. However, sometimes, you may want specific buoy(s) to display their trail or history only up to a very specific date (for example, when the buoy is deployed to a new location). In order to “clamp” the trail and history to a specific date, it is possible to adjust on one or multiple buoys a “deployment date”. Setting properly your deployment date will prevent TimeZero to draw a long line in between multiple locations (when you transport the buoy on your boat to a new location). After setting a deployment date, the trail and the history will stop at the deployment date or maximum trail/history duration (whichever comes first).
The deployment can be set individually by right clicking on a single buoy or it can be set on multiple buoys at the same time by using the multi-selection (from he list or chart). If you want to change the deployment date of all your buoys, you can use the “Actions" menu of the Buoys list:
Note: TimeZero never erases anything, it is just “filtering” the display with the deployment date information (so if you make a mistake, you could always change the deployment date to an earlier date and you will retrieve the trail or track up to that new date).
Buoys Drift Alarm
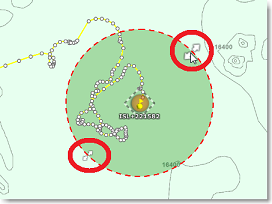
It is possible to set a Drift Alarm on any buoy by right clicking on a buoy and selecting "Drift Alarm". A circle (representing the drift alarm radius) will be displayed on screen:
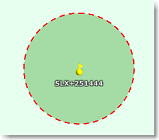
By default, the radius is set to 20NM, but you can change this default value from the Targets Options (by setting "Default Buoys Drift Alarm"). But note that you can set individual values to each buoy by right clicking on the buoy (and selecting "Set Drift Alarm Value"). You can also set the radius directly with your cursor on the chart. Simply click on the buoy and resize the radius using the modify icon:
If the buoy goes outside the Drift Alarm distance, an alarm will be triggered and logged in the Alarm list. Note that when an alarm is raised, it is easy to find the buoy that raised the alarm from the alarm list (it will indicate the buoys ID, and when you click on the alarm from the list, it will move the screen to that location):

To disable the Drift Alarm, right click on the buoy and uncheck "Drift Alarm".
Buoys Record and Replay
Buoys are always and automatically recorded in a database. This data is used to display the trail (and longer history when a buoy is selected), but it can also be used in the Planning WorkSpace to replay buoy position history by using the timeline:
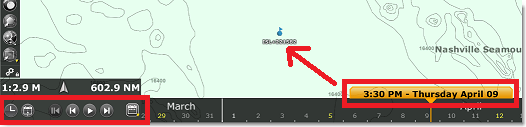
Buoys that are replayed are displayed in blue and are slightly more transparent than "real time" buoys. Note that you can also display a trail on replayed Fleet Targets (the trail for replayed targets is fixed to one day).
Note: It is not possible to display a trail or history on a replay buoy.