ARPA Auto Acquisition
TimeZero has a powerful ARPA auto-acquisition algorithm that allows you to specify boundary area(s) (or circle) where ARPA should be acquired automatically. Exclusion areas can also be specified inside an acquisition area to prevent buoy or rock to be automatically acquired.
IMPORTANT: Before creating ARPA Acquisition and Exclusion area(s), it is recommended to create Radar Mask area(s) to remove echo from landmass. This will increase the software performance and present a much clearer picture to the operator. Please note that it is not recommended to use Radar Mask to remove echo from Buoys (use ARPA Exclusion Area instead). Radar Echo on buoys is very valuable to confirm that the radar is tuned and working properly. Please refer to the Radar Mask chapter for more information.
It is highly recommended to create one or two dedicated layer (named "Acquisition" and "Exclusion" for example) on which you can attach all the boundaries that will be use for automatic ARPA acquisition/exclusion. You can create as many areas as you want with as many points as you want. Please refer to the Layer Introduction chapter to learn how to create layers and attach objects to them.
To define an ARPA Auto acquisition area:
-
Create a boundary area or circle on the chart using the Boundary Tool or by right click and select "Create Boundary"
-
Click on the chart to insert boundary points around the area you want TimeZero to look for target
-
Double click (or right click) to finish and close the area
-
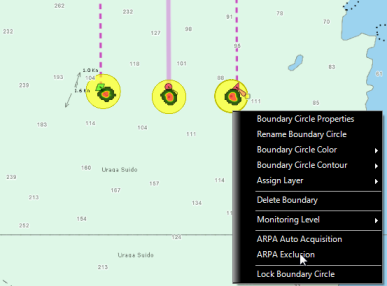
Right click on the area and select "ARPA Auto Acquisition"
Tips: You can only select and right click on a boundary if it is displayed entirely on the screen. You may have to zoom out a little in order to see the boundary on your screen. Just left click to select it (selection rectangle should be displayed), then right click on it to display its contextual menu.
-
Repeat this process if you need to create other Auto-Acquisition area
To define an exclusion area:
-
follow the same exact step as above, but select "ARPA Exclusion" to define the area or circle where you don't want TimeZero to look for target
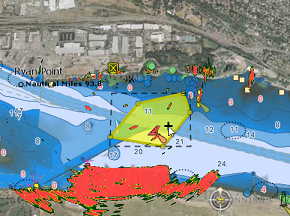
Below is an example of 3 boundary circles that are used to exclude 3 buoys inside a larger acquisition area (not shown on screen):
Activating/Deactivating ARPA auto acquisition:
To globally activate or deactivate the ARPA auto acquisition, click on the Target Ribbon button and select "ARPA auto acquisition". Note that it will take a few seconds before you see ARPA targets acquired on screen.
Note: The ARPA Acquisition or Exclusion areas are working event if they are not displayed on the chart (even if their layer is turned OFF)
Auto Acquisition Mode:
TimeZero provides two Automatic Acquisition modes. The mode of operation can be selected from the Radar Options under the "Advanced ARPA Settings" by selecting or not "Restrict ARPA to acquisition area".
-
Default Mode ("Restrict ARPA to acquisition area" set to OFF): ARPA targets acquired within an Acquisition Area can continue to be tracked even if they move outside of it. In this mode, the acquisition areas serve to start tracking, but once tracking begins, a target can leave the area and remain tracked. The same principle applies to Exclusion Areas: while a target cannot be initiated (or created) within an exclusion area, it can pass through one once tracking has already started. Typically, the exclusion areas (shown in red in the example below) are used to exclude buoys or other fixed obstructions within an acquisition area (represented in green in the example below):

-
Restricted Mode ("Restrict ARPA to acquisition area" set to ON): ARPA targets can only exist inside an Acquisition Area(s). If a target goes outside an acquisition area or enter in any exclusion area, the tracking will be stopped and the target will be immediately dropped.
The mode you select varies according to your application. If you want to track targets in a very specific area surrounded by lots of obstacle (land, piers, etc...) such as a river, it might be better to setup one or multiple acquisition area and restrict the tracking and existence of ARPA targets to those areas. If you want to track target in an open area (for example around an Oil Platform), it might be easier to only use the acquisition area to setup the track initiation, but allow TimeZero to track the target outside the area.