FAR15x3 & FAR15x8 Connection
Configure the Radar
Check and Assign Radar Hostname(s)
When multiple radars are networked or inter-switched together, a unique "Radar Number" (and IP address) must be assigned to each radar processor. Note that for TimeZero to correctly detect the radar, the IP address must match the NavNet IP address 172.31.x.x (172.31.3.17 by default).
The Radar number can be adjusted from the Radar Installation Menu. To access the Installation menu on a FAR15xx, press and hold the "HL OFF" button while pushing 5 times the "MENU" button. This should bring the "Radar Installation" menu on screen. Select "Installation" and adjust the "RADAR NO" (4).
Note: Whenever a network change is made, it is recommended that all radars are powered down and restarted.
IMO Mode
When TimeZero is interconnected to the FAR15xx via the network, the radar should be set to the "non-IMO" mode. From the same "Installation" menu, set "Type" (7) to "non-IMO".
SIO LAN Output
The FAR15xx SIO LAN Output has to be turned OFF (which is the default setting on the FAR). To make sure this setting is OFF, right click on the “[OS POSN]” box on the FAR and select OFF for the “SIO Data LAN Output” (3).
Configure the computer
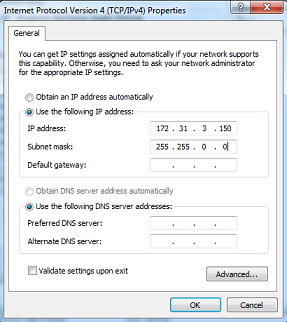
TimeZero connects to a Furuno FAR15xx radar through an Ethernet connection (100Base-T). The computer must be assigned an IP address that matches the Furuno network (172.31.x.x / 255.255.0.0) in order to communicate with the FAR radar. We strongly recommend configuring the computer with a fixed IP address of 172.31.3.150 and a subnet mask of 255.255.0.0.
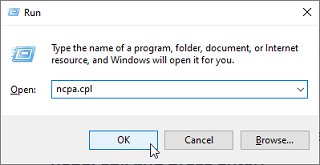
To set a static IP address, open the Network Connections control panel on your computer. In Windows 10/11, press Windows Key + R (or right-click the Windows Start button) to open the Run dialog. Type ncpa.cpl and click OK:
Double click on the Network Adapter connected to the radar (usually “Local Area Connection”).
Note: If your computer has multiple network adapters and you’re unsure which one is connected to the radar, temporarily unplug the Ethernet cable from the computer and observe which network icon shows a red cross. This will identify the LAN that was disconnected and therefore the one that needs to be configured.
Select "Properties" from the "Local Area Connection Status" window. Double click on “Internet Protocol Version 4 (TCP/IPv4)”. Use the fixed IP address 172.31.3.150 with a subnet mask of 255.255.0.0:
Once the IP address of the computer has been assigned, launch TimeZero in Navigation Mode.
Configure Instruments
Instruments (GPS, Heading, AIS, ...) need to be connected directly to the computer via NMEA0183 or NMEA2000. When connecting instruments to TimeZero, it is very important to make sure that the same GPS and Heading sources connected to the FAR radar are also used and connected to TimeZero. Connecting a different GPS and/or Heading source will result in radar overlay issue.
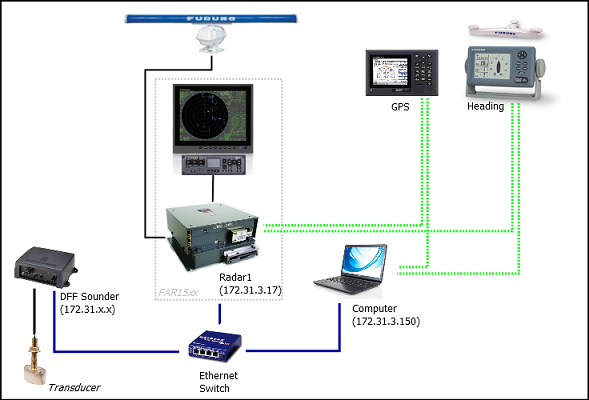
Note that it is possible to connect NavNet sensors (such as a DFF1-UHD sounder) to the same network so that TimeZero can display Radar and Sounder Echo:
Note: The FAR "SIO LAN Output" can interfere with other NavNet sensors (such as Ethernet Sounders) that may be present on the network, and thus, it should be turned OFF.
ARPA Configuration
TimeZero can operate in two modes for ARPA processing. It can either use the ARPA data processed by the Radar (default), or use its own local ARPA processing. This setting is adjusted from the Radar Options using the "ARPA Processing" option. If you want TimeZero and the FAR to share the same ARPA data, make sure to leave this option to "Radar Antenna" and configure the FAR radar and TimeZero with the instructions below.
FAR15xx Configuration:
The ARPA target output must be setup through the LAN from one Radar. Hold “HL OFF” and press the “OFF CENTER” key 5 times to display the "Factory" menu. Select "Back", select “Other” and set “INS” to “LAN”. Select "Back" two times to display the "Radar Installation" menu. Select "TT PRESET", select "TT DATA OUTPUT" and set "Select Sentence" to "TTM" and "TTM Reference" to "True".
TimeZero Configuration:
In order for the ARPA target to be received over the network, you need to configure it manually in the software:
-
Open the Connection Wizard
-
Select "Manual Port Configuration" and click on "Next"
-
Select "Add/Configure UDP Connection" and click on "Next"
-
Select the IP address that begins with 172.31.x.x from the "Network Adapter" drop down menu and type "10028" for the "UDP Port". Click on "Next"
-
When TimeZero is done analyzing the port, select “UDP 10028” in the list on the left and make sure that “ARPA” is checked in the list on the right. Click "Next" then "Finish".
Note: You can only use the ARPA data from one FAR radar on the network.
Important Note about the Use of Managed Switches on Furuno Networks causing "No Sweep" radar error:
Managed or “smart” Ethernet switches are becoming increasingly common. However, when used on a Furuno network, these switches can cause communication issues due to features such as IGMP Snooping. In the absence of a proper IGMP Querier (which is not present on a Furuno Network), the IGMP Snooping feature of the switch may prevent UDP multicast data from being forwarded correctly. This can result in symptoms such as a Radar “No Sweep” status on the Radar Screen, even though the radar appears correctly detected. While some managed switches allow IGMP Snooping to be disabled, others enable this feature internally with no option to turn it off. In such cases, the only reliable solution is to replace the switch with a truly unmanaged Ethernet switch that does not implement IGMP Snooping or any traffic optimisation/QoS.