FCV1150 Sounder
The "Furuno Sounder Module" needs to be unlocked prior to configure a Furuno Ethernet Sounder in TimeZero.
Computer Setup
The FCV1150 connects to the PC through an Ethernet connection (100Base-T). All the Furuno Ethernet sensors (including Ethernet sounders) only operate on the 172.31.x.x / 255.255.0.0 network. You will have to setup your computer IP address to match that network. We highly recommended using 172.31.3.150 as a fixed IP address for the computer with a subnet mask of 255.255.0.0.
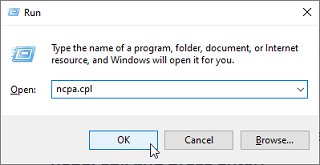
Open the "Network Connections" control panel of your computer to adjust the IP address. Under Windows 10/11 you can press the combination shortcut Windows Key + R to open the Run dialog box. Type "ncpa.cpl" and click on "OK":
Double click on the Network Adapter connected to the sounder (usually “Local Area Connection”).
Note: If you have multiple Area Connections (multiple Ethernet Cards) and if you don’t know which one is connected to the sounder, you can temporary disconnect the Ethernet Cable connected to the sounder from the computer and look at which icon will display a red cross. This will indicate the LAN that has been disconnected from the computer, and thus the one that needs to be configured.
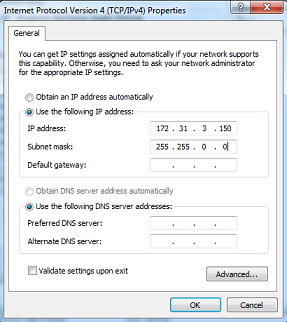
Select "Properties" on the "Local Area Connection Status" window. Double click on “Internet Protocol Version 4 (TCP/IPv4)”. Use the fix IP address 172.31.3.150 with a subnet mask of 255.255.0.0:
Sounder Setup
IMPORTANT: In order to connect properly to TimeZero, the FCV1150 internal software must be v3.02 or above
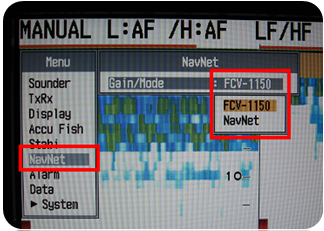
Make sure that the FCV1150 is in "NavNet" mode (in order to enable the network connection of the FCV1150). To access the setup menu, power ON the FCV1150 while pressing the [MENU] key:

Once the NavNet mode has been enabled restart the FCV1150.
The FCV1150 can be used in "FCV1150" or "NavNet" control mode. This setting can be adjusted from the "NavNet" menu:
When the FCV1150 is setup in "NavNet" mode, the hardware knobs located on the FCV1150 will be disabled and TimeZero will have full control over the various settings (Gain, Mode, Range, etc...). When the Sounder is setup in "FCV1150" mode, TimeZero will only be able to control the Range and Shift of the FCV1150 (all the other controls such as gain and mode will have to be adjusted using the hardware knobs on the FCV1150 itself). Most users will want to setup the sounder in "FCV1150" mode in order to be able to use the knob of the sounder.
Configure all the initial Sounder settings directly from the FCV1150 (please refer to the FCV1150 installation guide).
TimeZero Setup
Launch TimeZero in Navigation Mode. Select the Connection Wizard and perform an "Automatic Detection". TimeZero will automatically detect the depth available on the network (sent by the Ethernet Sounder on the "NavNet NMEA" port).
If the sounder is not sending depth information while performing the Automatic Detection, you will have to manually add a NavNet Port:
-
Select "Manual Port Configuration" from the Connection Wizard
-
Select "Add/Configure NavNet Connection" and click on "NMEA & AIS"
-
Make sure that "Depth" is checked for the "NavNet NMEA" port
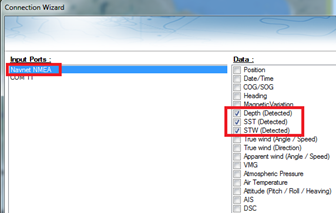
Note: If the transducer has a temperature and speed sensor, you will also receive Speed Through Water (STW) and Sea Surface Temperature (SST) through the network.
IMPORTANT: The resolution of the Sounder might be greatly degraded in TimeZero if you start the software while the FCV1150 Display Mode is set on "User 1" or "User 2" (knob on the front). It is recommended to set the FCV1150 to a regular display mode (such as Single or Dual Frequency display) when starting TimeZero.
Bottom Hardness Setup (NMEA0183)
The "Bottom Hardness Module" needs to be unlocked prior to configure Bottom Hardness in TimeZero.
How to connect
Bottom Hardness information is sent over NMEA0183 through a RS-422 (opto-isolated) cable. Bottom hardness data is not sent over Ethernet with the FCV1150. It is important to select the appropriate com port in TimeZero for both depth and hardness in the event there are multiple sounders on-board.
Note: Bottom Hardness requires firmware v4.03. You can see what firmware version is on the sounder at startup. To upgrade the sounder firmware please contact your Furuno Dealer
Transducer Requirements
The bottom hardness output has been officially tested with the CA 1T 50k/200k transducer. Although it will output some information with other transducers it is necessary to select a named transducer. Hardness output will not operate with a manual frequency input.
To adjust the transducer settings on the FCV1150, hold down [POWER] and [Menu] buttons, then, release [POWER] button while continuing to hold [Menu] to enter the XDR setup mode. Make sure that the proper named transducers are selected. Restart the sounder to store the settings.
Initial Setup
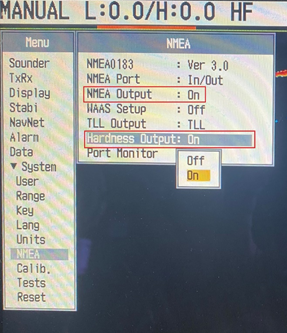
Make sure that the bottom hardness sentence is turned on from the menu:
Connect the sounder to TimeZero via serial COM port (RS232) and open the Connection Wizard. Add a new input and double check that you can see the $PFEC,SDbhr sentence (bottom hardness data):
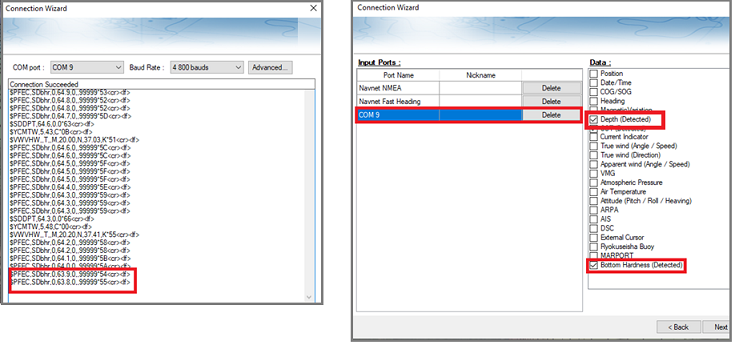
It is recommended to select both "Bottom Hardness" and "Depth" from the COM port and set this depth source as master (on the next page of the connection wizard). After closing the Connection Wizard, you should see Bottom Hardness in TimeZero (please refer to the Bottom Hardness chapter for more information).
Recommendations
It is recommended to pick one frequency per depth area:
- In HF mode the sounder uses the HF for bottom hardness
- In LF mode the sounder uses the LF for Bottom Hardness
- In Dual Frequency mode the sounder uses the LF for bottom hardness.
It is recommended to disable "Auto-Power" (Auto power will change by depth and thus change Hardness values). It is also recommended to fix the transmit rate. For initial setup start out with the Power at 10 and the TX rate at 20.
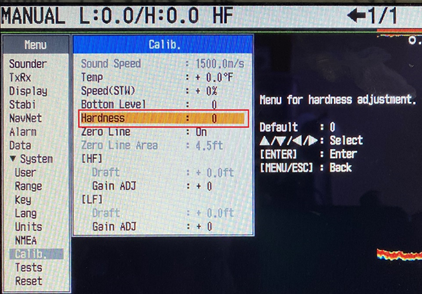
The hardness offset allows you to raise or lower the minimum or maximum value sent by the sounder. This is useful if the sounder is reporting numbers close to 0 or 100 as any hardness reading above or below those numbers will be clipped:
Note that after adjusting the Hardness Offset, it is recommended to erase previously recorded data.