
All the Furuno Ethernet sensors (including the Ethernet sounders) only operate on the 172.31.x.x / 255.255.0.0 Class B network. The Nobeltec InSight Radar operates on a different network (usually 192.168.0.x / 255.255.255.0 if there is no router on the network).
In order for the computer to communicate with both the Furuno Ethernet Sounder and the Nobeltec InSight radar at the same time, the computer needs to be manually assigned two IP addresses:
- The IP address to communicate with the Furuno Sounder must be set to 172.31.3.150/255.255.0.0
- The IP address to communicate with the InSight Radar varies according to the network setup:
If there is no router on the network (just HUB or Switch), the IP address must be manually set to 192.168.0.100 / 255.255.255.0
If there is a router (DHCP Server) on the network, the IP address must be manually set to something compatible with the Router. To determine a compatible IP address, leave the computer IP in automatic mode and look at the IP address assigned automatically by the router (using the IPCONFIG command or by looking at the Status of the Ethernet Connection). Once you know the IP address given automatically by the router (for example 192.168.1.17), manually assigned the same IP address by just changing the last digit to a higher number (safer) such as 192.168.1.200
Note: If the router is used to access the Internet, make sure to enter the IP address of the router for the default gateway and DNS server. Usually the IP address of the router will end with “1” (192.168.1.1 in this example).
Open the "Network Connections" control panel of your computer to adjust the IP address. Under Windows 8.1 and Windows 10 you can press the combination shortcut “Windows Key” + X and select directly the "Network Connections". Under Windows 7, click on the Windows “Start” menu and search for “Network”. Under the “Control Panel” category, click on “Network and Sharing Center”. Once the Network and Sharing Center window is opened, click on "Change Adapter Settings".
Double click on the Network Adapter connected to the sounder (usually “Local Area Connection”).
Note: If you have multiple Area Connections (multiple Ethernet Cards) and if you don’t know which one is connected to the sounder, you can temporary disconnect the Ethernet Cable connected to the sounder from the computer and look at which icon will display a red cross. This will indicate the LAN that has been disconnected from the computer, and thus the one that needs to be configured.
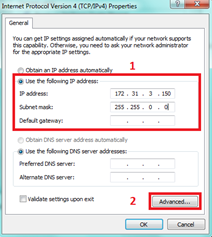
Select "Properties" on the "Local Area Connection Status" window. Double click on “Internet Protocol Version 4 (TCP/IPv4)”. Use the fix IP address (172.31.3.150) and subnet mask (255.255.0.0) corresponding to the Furuno network then click on “Advanced”:
Click on “Add”:
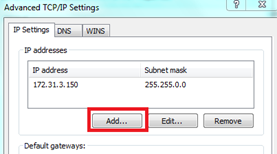
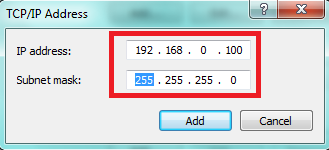
Enter the fix IP address of the InSight radar (192.168.0.100 or the one that has been identified if a Router is used) and subnet mask (255.255.255.0) then click on “Add”:
Note: If you use a router to access the Internet, enter the router IP address for the default gateway and DNS server
Your computer will now be assigned with two IP addresses and will be able to talk on both networks (the Furuno Network and the InSight Radar network):

Click on “OK” to save the changes and close the various windows.
Continue the configuration of the InSight Radar and Furuno Sounder as usual (refer to corresponding chapter)
Important: If you need to configure two computers on the same network, simply increment the IP addresses of the second computer: 172.31.3.151/255.255.0.0 and 192.168.0.101/255.255.255.0
Copyright © 2022 TimeZero - All rights reserved - User Guide version 4.2