Layers
TimeZero allows you to create "layers" that can be used to categorize your data. By default, TimeZero creates a "TimeZero" layer that stores all your User Objects. This layer is automatically synchronized with all compatible TimeZero Platforms (TZ Navigator, TZ Professional, TZ iBoat, and compatible Furuno MFDs). Because the default "TimeZero" layer is synchronized, there is a limitation about the number of User Objects it can hold:
-
Marks = 30,000 maximum
-
Route = 200 with up to 500 waypoints per route
-
Boundary (Areas and Lines) = 100 with up to 50 vertices per object
-
Circle = 100 maximum
-
Annotation = 100 maximum
-
Photo = 1,000 maximum
-
Catch = 1,000 maximum
Note: There is no limit about Tracks as they are not synchronized among devices.
If you need to store more user objects and/or if you want to organize your data, you can create additional "custom" layers. You can create as many layers as you want and give them custom names.
Custom layers you create are not subject to any limitation, but they cannot be synchronized with small platforms (TZ Navigator, TZ iBoat and Furuno MFDs).
Note: if you do not care about smaller platforms and would like to only synchronize user objects among other TimeZero, you can enable the option "Synchronize All Layers" from the Device List Options. When this option is checked, all layers and all user objects will be synchronized, but only with other TimeZero (you will lose the synchronization with TZ Navigator, TZ iBoat and Furuno MFDs). This option must be checked on all the TimeZero.
Managing Layers
Select "Manage Layers..." from the "User Objects" ribbon button. This opens a window that allows you to perform various actions on Layers:

-
Rename: Click on this button to rename the layer selected in the list
-
Lock/Unlock: Click on this button to lock or unlock the layer selected in the list. Locking a layer prevents accidental change to any objects assigned to that layer
Note: To prevent a user to unlock a layer, it is possible to Lock the User Interface and protect it with a password. When the User Interface is locked, various advanced options of the software cannot be changed and it is not possible to unlock a layer.
-
Activate: Click on this button to set the layer selected in the list as the Active Layer. The "Active Layer" is the default layer on which the objects will be assigned to when they are created
-
Merge: Click on this button to transfer all the objects assigned to the layer selected in the list over a new layer (a pop up window will appear allowing you to select the target layer)
-
Delete: Click on this button to delete all the objects assigned to the layer selected in the list
Note: You cannot delete the default "TimeZero" layer. The "TimeZero" layer is used for the synchronization of User Objects.
-
New Layer: Click on this button to create a new layer
Using Layers
When you select a tool to create an object (Mark, Route, Annotation, Boundary,...) the "Active Layer" name will be displayed on the top of the screen:

The "Active Layer" is the default layer assigned to any object created. Note that you can change the layer of a mark or object at any time after creating it by right clicking on the Mark and selecting "Assign Layer". This will display a contextual menu with the list of all the layers available:

Note: You can only assign one layer per object.
Once your objects are categorized with layers, you can configure your screen to only show objects that belongs to specific layer by adjusting the "Visible Objetcs" from the "User Object" button:
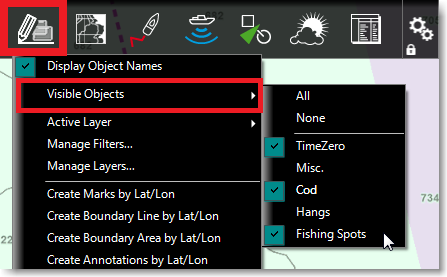
The "Visible Object" selection is independent per WorkSpace. You could have one WorkSpace display a set of layers and have another WorkSpace display another set of layers or no layer at all.
Note: By default, all layers are set to invisible on the Radar WorkSpace.
If you manage large quantity of objects and layers, it is also possible to use "Preset" of layer (by enabling the Advanced Mode of the Layer Management window). Layer Presets can be used to bundle a specific group of layers together and hide the one you are not using (the layers that are not part of the currently selected Layer Preset).
TIPS: You can lock specific layer(s) to prevent editing the objects it contains.
Enabling/Disabling Layers
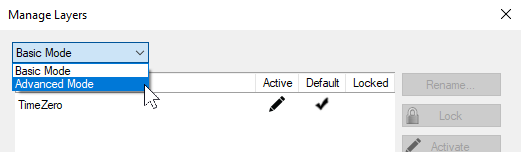
If you have lots of layers and decide not to use some of them temporarily, you can disable them. By default, layer management is set to "Basic Mode", but for advanced users who need to handle a large number of layers, TimeZero offers an "Advanced Mode" layer management system.
When you disable a layer, the objects it contains will no longer be displayed on the chart and you will not be able to activate it or use it as a default layer.
Note: You cannot disable the default "TimeZero" layer. The "TimeZero" layer is used for the synchronization of User Objects.
Locking Layers
If you want to prevent accidental changes to specific objects (for example boundary areas), group them on a layer(s) and lock that layer(s) by selecting the layer(s) in the list and pressing the "Lock" button.
If the User Interface has been locked from the main menu, the user will not be able to unlock Locked Layers. In order to unlock layers, the User Interface needs to be unlocked. Refer to Lock the User Interface for more information.
Default Layers
By default, all the Marks, Boundaries, Annotations and Tracks you create are assigned to the Active Layer. The "Default Layers" window allows you to force specific type of objects to be assigned to different default layers when they are created:
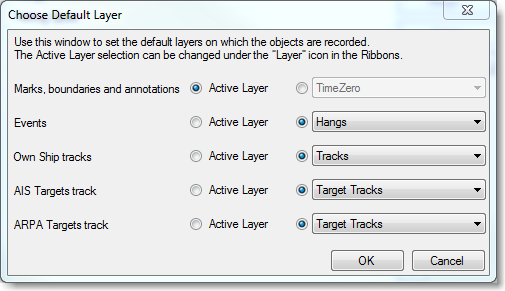
For example, you may want to create a dedicated layer for all the ARPA tracks and select it as a default layer (instead of the Active Layer). When you enable the Track Recording on an ARPA target, that track will automatically be assigned to the "Target Tracks" layer (regardless of the Active Layer selection).