Radar Controls
The "Furuno Radar Module" needs to be unlocked and the radar configured to access this feature
Most of the Radar Controls can be found under the "Radar" Ribbon button or from one of the Radar NavData.
Radar Source
When having two radars on the network, the "Radar Host" selection from the Radar Options allows to select which Radar is being selected, displayed and controlled in TimeZero.
IMPORTANT: When changing Radar Source, it takes approximately 10 seconds before the selected radar becomes fully operational.
Transmit /Standby
When the Radar is powered ON and warmed up, you can view the radar image on screen by putting the Radar in Transmit mode. You can transmit the radar by:
-
selecting the "Transmit" options from the "Radar" Ribbon button
-
by clicking on the "Stand-By" text located at the center of the radar screen
-
by clicking on the Radar Range Scale on the lower right of the screen (on the "StdBy" status)
To stop the Radar, you can:
-
uncheck "Transmit" from the "Radar" Ribbon
-
click on the "TX" located on the Radar Range Scale on the lower right of the screen.
Note that in Standby mode, the Radar is still ON but does not rotate and does not send magnetic pulses. Usually a Radar is never turned completely off in navigation because it takes a while to warm-up (1 to 2 minutes).
Note: If the Transmit button is greyed out, make sure that the radar is powered and that a correct Radar Hostname is selected from the Radar Options.
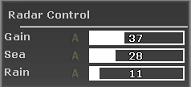
Gain / Sea (STC) / Rain (FTC)
The Gain, Sea and Rain controls can be adjusted from the Radar Ribbon button or directly from the Radar Control NavData (displayed by default in the Radar NavData Panel):
TIPS: If you have a scroll wheel, you can rollover the bar graph or setup shortcut that temporary allow you to use the wheel to adjust Gain/Sea/Rain
Gain: This control adjusts the receiver sensitivity. Increase the gain to increase sensitivity and display radar echoes on the screen. Reduce the gain if you see too much noise on the screen and if the picture gets overly cluttered with random "speckles". The Gain can also be setup in "Auto" mode on some radar models by selecting the corresponding option in the Radar Ribbon button or by clicking on the "A" in the Radar Control NavData.
Sea: Sea control, also called STC (Sensitivity Time Constant), suppresses reflections from waves near your own ship, especially at short range. In rough seas the reflected echoes from wave crests are very strong, producing a mass of echoes which cover the central part of the display. This is called sea clutter. Any echoes within the clutter will be partially or totally obscured. Increase this control to reduce the clutter and distinguish echoes. The proper setting should be such that the clutter is suppressed and echoes become distinguishable. If the control is set too high, both sea clutter and echoes will disappear from the display. When there is no sea clutter visible on the display, decrease the value. The Sea can also be setup in "Auto" mode on some radar model by selecting the corresponding option in the Radar Ribbon button or by clicking on the "A" in the Radar Control NavData.
Rain: The Rain control, also called FTC (Fast Time Constant), suppresses the reflected echoes from rain, hail and snow to clear the display. The echoes from legitimate contacts can become lost in the echoes from precipitation, called rain clutter. When rain clutter masks the display, increase this control to break up the clutter and distinguish echoes. Adjust the control so that the clutter just disappears; too much Rain action may shrink or erase the echoes from legitimate targets. If there is no precipitation, leave that setting to 0 (minimum). The Rain can also be setup in "Auto" mode on some radar models by selecting the corresponding option in the Radar Ribbon button or by clicking on the "A" in the Radar Control NavData.
How to adjust manually the Gain, Sea and Rain controls:
The Gain, Sea and Rain can be adjusted from the Radar Control NavData or from the Radar Ribbon button. If your Radar model is capable of “Auto” mode (from the Radar Ribbon), the auto features will work well for most situations. If you want to adjust the Radar manually try the following:
-
Transmit the Radar to a medium range (around 3NM)
-
Set the Sea and Rain control to the minimum (0)
Note: While initially adjusting the Gain/Sea/Rain, it is recommended to turn OFF all the radar filters (Echo Averaging, Echo Stretch etc...)
-
Set the Gain control to maximum (the screen should show mostly Radar noise)
-
Now decrease the gain control until the radar picture show a very small amount of noise (only a few noise spots on the screen) from 1.5NM to 3NM (it is alright to have noise near the center of the screen in between 0 and 1.5NM)
-
Without disturbing the gain control select the appropriate working range (1.5NM for example)
-
Increase the Sea control as desired until the noise that is present near the center on the screen disappears
-
Only increase the Rain control if there is precipitation.
Automatic Clutter Elimination - ACE (FAR3xx0, FAR2xx8 & FAR15x7/x8 only)
This setting is available from the "Radar" Ribbon button or from the "Advanced Radar Control" NavData.
ACE is an automatic filter that reduces noise caused by sea and rain clutter. When ACE is activated, the Sea and Rain adjustments are disabled (because automatically adjusted by the ACE algorithm). When ACE is enabled, the operator can only adjust the gain.
Pulse Length
Pulse Length is the length of time of each transmission of radar waves by the transceiver. Typically a longer pulse length produces better long range target detection and a shorter pulse length is for better target range discrimination. The pulse lengths are pre-set for each range so you are not typically required to change this setting. However, if you are not satisfied with the current pulse length setting, it is possible to toggle between a shorter or longer pulse length from the "Radar" Ribbon button.
Note: The Pulse Length is not available on MDS1/8-R Radars
Echo Trail
This feature requires the computer to be connected to a Heading sensor.
This feature available from the "Radar Ribbon" "button continuously shows the movements of other ships in afterglow. It is useful for assessing overall target movement. Echo trails show the movements of radar echo overtime relative or true to your vessel. The trails disappear overtime (according to the "Trail Length" parameter). When set to "True" mode, only objects that are moving in reference to the water (such as another ship) will show a trail on the screen. Fixed objects on the water (such as buoys or a rock) will not show a trail even if your own ship is moving. When set to "relative" mode, any objects that move relative to your boat will leave a trail on the screen. So if your own ship is moving toward a stationary target (buoys for example), the target will leave a trail (smearing):

The following Trail options are available from the "Radar" Ribbon button or from the Radar Options:
-
Trail Shade: "Single" displays the trail with one color intensity. "Multi" decreases (fades) the trail color intensity over time
-
Trail Level: Adjusts the way the trail picture is merged with real time radar echo. The higher the number, the more emphasis there will be on the trail.
-
Trail Length: Adjust the trail length.
To clear (reset) the trail, use the "Clear Trail" option of the "Radar" Ribbon button.
It is possible to change the color of the trail from the Radar Options.
Note: If you want more precise information for a specific radar echo, you can right click on it and acquire it as an ARPA target. The radar will precisely look at the echo and extract Course and Speed.
Interference Rejection
This setting is available from the "Radar" Ribbon button or from the "Advanced Radar Control" NavData.
If intermittent “Streaks” or “spiral lines” show up on your Radar display, it is most likely Radar interference received from another Radar. The Interference Rejection reduces or eliminates interference received from another ship’s Radar. Turn it off when no Radar interference exists.
Echo Stretch
This setting is available from the "Radar" Ribbon button or from the "Advanced Radar Control" NavData.
This function ‘stretches’ small echoes to make them easier to see. It stretches not only small echoes but also returns from sea, rain clutter and Radar interference. For this reason, make sure clutter and interference are sufficiently suppressed before using echo stretch.
Echo Averaging
This setting is available from the "Radar" Ribbon button or from the "Advanced Radar Control" NavData. Echo averaging requires the computer to be connected to a Heading sensor.
The echo averaging uses multiple consecutive radar pictures to create an “average picture”. This filter is very effective at removing noise (that has a tendency to have random position in between two pictures). Note that a side effect of the echo averaging is that it makes target that are moving quickly weaker on screen.
Noise Rejection
This setting is available from the "Radar" Ribbon button or from the "Advanced Radar Control" NavData.
This function removes the "white noise" (random "speckles") that can sometimes spread over the entire radar picture.
Target Analyzer (DRS-NXT only)
This setting is available from the "Radar" Ribbon button or from the "Advanced Radar Control" NavData.
DRS-NXT radar uses the new Furuno exclusive Target Analyzer function, where targets that are approaching your vessel automatically change color. Green targets are targets that stay stationary, or are moving away from you, while red targets are moving towards your vessel. Target Analyzer works independent of vessel speed, both your own vessels and target vessels, with minor limitations. Echoes dynamically change colors as targets approach, or get farther away from your vessel. Target Analyzer can increase safety, as well as improve situational awareness.
When the Target Analyzer is set to "Target", all moving targets (approaching your vessel) will be displayed in red while all other echoes will be displayed in green.
When the Target Analyzer is set to "Rain", the radar will attempt to recognize rain and will display it in blue.
Bird Mode (DRS-NXT & DRSAX only)
This setting is available from the "Radar" Ribbon button or from the "Advanced Radar Control" NavData (hidden by default).
The DRS-NXT and DRSAX (DRS "X-Class") feature a new bird mode that helps you identify birds gathering around schools of fish at the sea surface. Bird mode adjusts the gain and sea settings automatically for optimal visibility.
RezBoost (DRS-NXT & DRSAX only)
This setting is available from the "Radar" Ribbon button or from the "Advanced Radar Control" NavData (hidden by default).
RezBoost allows to improve the azimuth resolution of the radar echoes. When set to "High" the horizontal beamwidth resolution is improved by a factor of 2. Note that using RezBoost can make target "smaller" on screen.
Video Contrast
This setting is available from the "Radar" Ribbon button or from the "Advanced Radar Control" NavData (hidden by default).
This advanced functions slightly alters the way the radar echoes are drawn on the screen. The settings from 1 to 4 adjusts a "gate" (1 = no gate, 4 = maximum gate).
The setting from A to C adjusts the dynamic curve. When set to "A", the mid-level in the curve is low, so this setting is suitable for reducing rain clutter. When set to "C" the mid-level in the curve is high, so this setting is suitable for detecting distant targets.
The graphics below plots the video intensity received by the radar on the X coordinate and the resulting echo intensity as seen on screen on the Y coordinate:
