Network Setup
The Remote Architecture requires the following components:
-
TZ Coastal Monitoring (Single or Dual Radar) or TZ Professional (with the TZ Host output module) loaded on a computer connected locally to sensors (Radar, AIS, Camera, Weather Station). This computer acts as a "server" (collects data, processes data, and sends data to the TZ Host) and may or may not be used by a local operator.
-
TZ Coastal Monitoring Remote loaded on a computer. This computer will act as the "client" and display all the data coming from all the stations connected to the network by connecting to the TZ Host. This computer will also be able to control the Radar and Camera of the local station(s).
-
One TZ Host loaded on a computer that acts as the "virtual HUB". The TZ Host is a small software that can be loaded on any computer on the network (usually on the Supervision Center). Its role is to gather and distribute all the data to all the computers. The TZ Host is similar to a Web Server where all stations push their data to and where all remote centers retrieve the data from.
TZ Host
To optimized data transfer, all the information is sent and retrieved to/from a central location called the “TZ Host”. The TZ Host is a small software that is launched automatically at startup and that is dedicated to retrieve all the information from the stations and distribute it to all the clients. Each server pushes the data to the TZ Host. When new data has been uploaded, the TZ Host sends a notification to all the clients to ask them to initiate a download. This means that the clients only download data when there is new information available.
Note: The “TZ Host” is not licensed (no serial number, no activation). The TZ Host is provided as a Standalone installer available online.
The TZ Host can be installed on any computer and can run in parallel of TZ Coastal Monitoring (it can run on the same computer). When selecting the TZ Host location, keep in mind:
-
Install the TZ Host where the Internet connection is the fastest and the most reliable.
Note: If the TZ Host receives data from 6 servers at 320Kbps each, it needs a 2Mbps network download speed. If there are multiple clients connected to the TZ Host, each of them will use 2Mbps of upload speed (this does not apply when the client and the TZ Host are running on the same computer).
-
If an Internet connection is used to transfer data to and from the TZ Host, install the TZ Host on a computer that can be accessed from the “outside” (this computer should be accessed by the "public" Internet). A NAT rule needs to be created on the router in order to redirect traffic coming from the public Internet on port 8080 (default port number) to the IP address of the computer running the TZ Host.
When installed on a computer, the TZ Host automatically runs at startup in the background. A small icon is displayed in the Windows Tray Bar and when the user right clicks on it and selects “Open”, a basic user interface is displayed with the list of all the server(s) that are currently connected to the TZ Host. The total amount of Radar, AIS, ARPA and Camera that are “cached” into the TimeZero Host is also displayed:

Note: The clients will also appear in the list of "Connected Clients" but only if they issue a command (like changing a parameter of the radar or controlling a camera).
All data sent and retrieved to and from TZ Coastal Monitoring and the TZ Host is performed over a single TCP port (8080 by default) using SSL (encrypted connection). When installing the TZ Host on the computer, it will automatically install a self signed certificate and add a rule to the Windows Firewall to allow traffic on that port. It is possible to change the default TCP port used by the TZ Host by clicking on the "Configure" button:
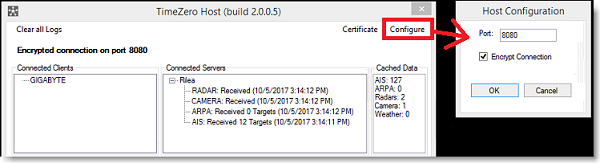
IMPORTANT: It is highly recommended to leave "Encrypted Connection" selected. If you have to uncheck this option (because the Self Signed Certificate cannot be installed on the computer for example), you have first to disconnect all servers and clients from the TZ Host (so that nothing is connected to the TZ Host) and then, you can uncheck this option from the TZ Host. Note that, you will also have to enable "Unencrypted TZ Host Connection" from all TZ Coastal Monitoring (station and remote) available from the "Initial Setup" Options under the "Advanced Settings" buttons.
To test that the TZ Host is properly installed and can be accessed by other computers, you can type in any browser "https://" followed by the IP address of the computer, followed by ":8080". You should see a web page with the TZ Host status.
Ex: https://71.237.237.146:8080
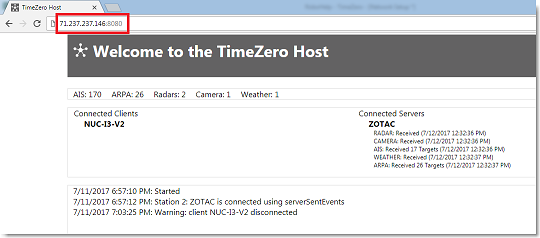
Note: Since the connection is encrypted, make sure to type https (secured HTTP)
IMPORTANT: It is normal to get a warning when connecting to the TZ Host in secure mode (encrypted). This is because the default certificate installed with the TZ Host is self signed. The web browser is doing its job by alerting you that the certificate cannot be trusted (because the self signed certificate was not specifically issued for your computer by a valid authority). Simply click on "Advanced" and "Proceed Anyway" to disregard the browser warning and access the TZ Host web page:

Note: It is possible to replace the default Self Signed Certificate installed by the TZ Host with a real certificate (issued by a trusted authority for your domain name). Please refer to Install a Trusted Certificate Chapter.
Station Configuration
The computer loaded with TZ Coastal Monitoring Single Radar or Dual Radar (or TZ Professional with TZ Host output module) must have two Ethernet cards. One Ethernet card is used to connect to the "Sensor Network" (Radar, Camera, AIS...), and the second Ethernet card is used to connect to the "Global Network" in order to send the data to the TimeZero Host. In the example below, the sensors are connected to LAN1 using a fix IP address (172.31.x.x). LAN2 is being used to connect to a global network that links all the computers to the TZ Host. Usually, this global network is the Internet (but a private LAN or WAN can also be used):
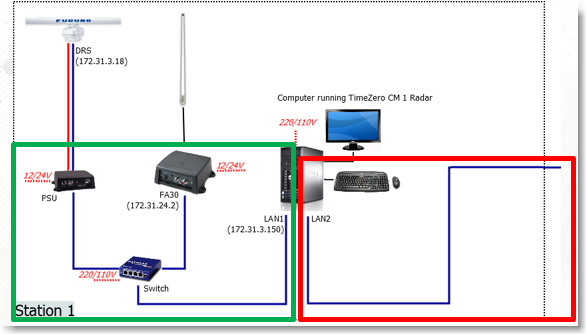
This architecture isolates the "Sensor Network" (in green above) where Camera, Radar and AIS are connected, from the "Global Network" (in red above) used to send the data to the TZ Host. The computer on the station acts as a "bridge" and forward the data from the "Sensor Network" (on the left) to the "Global Network" (on the right) after compressing it.
Note: The cameras can be installed on either the "Sensor Network" or "Global Network". In some cases, you may want the cameras to be accessed directly by third party software and it might make more sense to install them on the "Global Network".
Once TZ Coastal Monitoring has been properly configured to connect to the Radar, Camera, AIS and Weather Station (follow the corresponding installation chapters for instructions), select the TZ Host Options to enable sending data to the TZ Host.
Note: If the computer located on the station is used without a local operator (as a Black Box), and if no monitor is connected to the computer, it is recommended to connect a "dummy plug" to the computer monitor output. Some computers may not boot up properly or initialize the graphic card properly without a monitor (or dummy monitor) plugged.
The first step is to assign a unique Station ID and Station name to every stations. In case you are sending data from multiple stations, MAKE SURE to select a different Station ID for each TZ Coastal Monitoring. Once the Station ID and Station Name have been setup, enter the IP address (or domain name) of the computer where the TimeZero Host is installed.
Note: If the TimeZero Host is installed on the same computer, use "127.0.0.1" for the IP address.
Then, select the type of data you want to send, and when applicable, the quality and resolution (for Radar and Camera) and then press on the "Connect" button:

All selected data will be available to the various TZ Coastal Monitoring Remote that will be connected to the same TZ Host.
Control Center Configuration
The computer loaded with TZ Coastal Monitoring Remote (the client) only needs one Ethernet card to access the TZ Host.
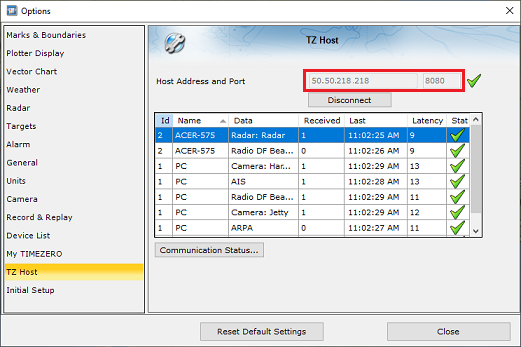
Select the TZ Host Options and enter the IP address (or domain name) of the computer where the TZ Host is installed.
Note: If the TimeZero Host is installed on the same computer, use "127.0.0.1" for the IP address.
Once you click the "Connect" button, all data (Radar, Camera, AIS, ARPA and Weather) coming from all stations connected to this particular TimeZero Host will be discovered and configured automatically:
Local Network Setup Example
When all the computers are located on the same local network, you just need to know the IP address of the computer where the TimeZero Host is installed. In the example below, the TZ Host is installed on the computer located in the supervision center (same computer where TZ Coastal Monitoring Remote is installed). All computers are on the same local network with IP address 192.168.1.x:
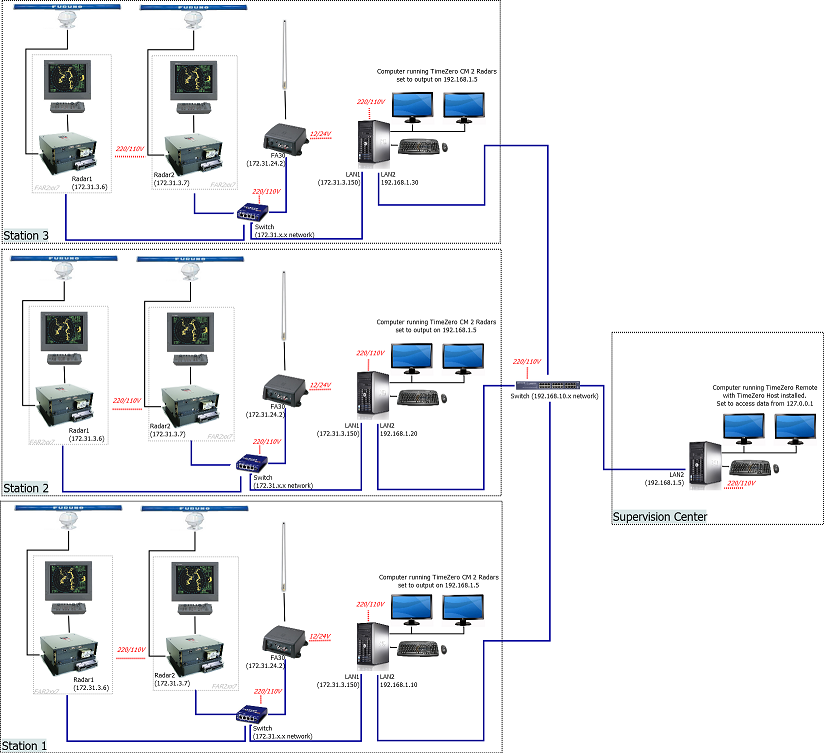
In the example above, the computer with the TZ Host installed has an IP address of 192.168.1.5. This is this IP address that must be used on all the computers.
Note: On the supervision center where the TZ Host is installed, it is possible to enter either 127.0.0.1 (loop back IP address) or 192.168.1.5 for the IP address
Internet Network Example Setup
In the example below, Internet is used to connect all the Stations and the Control Center together. The TZ Host is installed on the Control Center, where the Internet connection is the fastest and most reliable. The Router of the Control Center must be setup to redirect all incoming traffic on port 8080 (from the Stations) to the local IP address of the computer loaded with the TZ Host.

The first step is to choose and fix a local IP address for the computer located in the Control Center (192.168.0.10 in the example above). It is important to fix the IP address of the computer running the TZ Host in order to create a NAT rule in the router to that specific IP address.
Create a "NAT" rule (or "Port Forwarding" rule) in the Router that will redirect any WAN traffic on port 8080 to 192.168.0.10:

Finally, configure all stations with the public IP address of the router (12.13.14.15 in the diagram above). Note that the public IP address of the router located on the Control Center needs to be fixed (it should not change overtime). If the Internet provider of the Control Center cannot provide a fix public IP address, services like DynDns can be used. In that case, instead of entering the public IP address in all the stations, a domain name would be used (like "example.dyndns.org")
Note that the IP addresses of the computers located in the Stations can be set to automatic (DHCP). The only IP address that needs to be fixed on the global network is the one hosting the TZ Host.