Creating Zone Monitoring Rules
Zone Monitoring allows you to set up boundaries (either Areas or Circles) to monitor specific target behaviors. TimeZero features a powerful rule engine that lets you define conditions, apply optional filters, and configure actions to be triggered when those conditions are met.
For most applications, Zone Monitoring uses user-drawn boundaries fixed to the chart (ground referenced). However, Guard Zones can also be attached to a Fleet Target so that the monitored area moves with it. This is especially useful when rules need to be triggered based on a moving target, such as in autonomous or semi-autonomous vessel monitoring scenarios.
Creating a Zone Monitoring rule is a two-step process: first, you define its conditions, filters, and actions. Second, you draw one or more boundaries on the chart and associate them with the rule by matching the Monitoring Level.
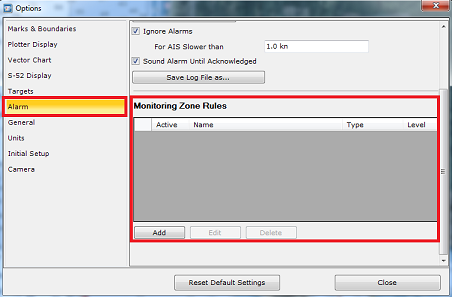
To create a rules, open the Alarms Options, scroll down to the "Monitoring Zone Rule" section and click on the "Add" button:
The Rule configuration window appears:
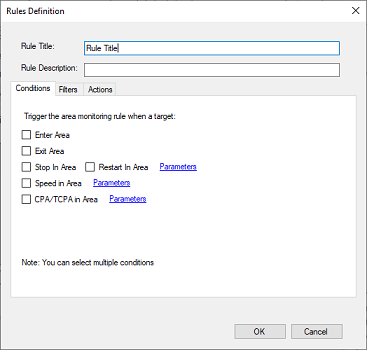
The configuration window includes three tabs: Conditions, where you define what triggers the rule; Filters, where you apply any optional restrictions; and Actions, where you specify what happens when the rule is triggered.
Conditions
Use the Conditions tab to select the type of target behavior that will trigger the rule. You can also combine multiple conditions if needed:
-
Enter Area: Triggers when a target enters the defined area. This includes ARPA targets or AIS SART that appear within the area upon acquisition (for example, when the same area is configured both to trigger the rule and as an Automatic Acquisition Area).
-
Exit Area: Triggers when a target leaves the area. Note that an ARPA target lost inside an area will not trigger an exit event.
-
Stop in Area: Triggers when a target stops within the area (speed falls below the threshold defined in the Parameters settings).
-
Restart in Area: Requires the target to first stop inside the area (below the stop speed threshold in Parameters), then restart either by exceeding the restart speed threshold or by moving beyond a set distance from the stop position (useful for drifting targets). Stop and restart speed thresholds are configured separately.
-
Speed in Area: Triggers when a target exceeds, falls below, or moves in/out of a specified speed range. These settings can be adjusted in Parameters.
-
CPA/TCPA in Area: Triggers when a target within the area meets the CPA (Closest Point of Approach) and TCPA (Time to Closest Point of Approach) thresholds defined in Parameters. This condition is useful for detecting potential collision courses with either the reference position or a fixed location (latitude/longitude which cabe entered manually in Parameters).
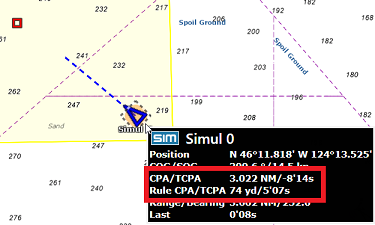
Note that this rule-based CPA/TCPA is different from the CPA/TCPA settings that can be found at the top of the Alarms Options (which always use the reference position) and that is used solely to mark a target as dangerous (displayed in red) and provide information in the target properties (tooltip and list). When viewing a target tooltip, if a rule-based CPA/TCPA is active, it will appear separately in the tooltip, labeled as “Rule CPA/TCPA”:
Filters
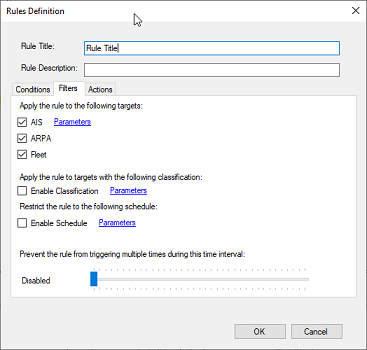
Use the Filters tab to set optional criteria that limit when the rule can be triggered. Begin by selecting the target types eligible to activate the rule. For AIS targets, click Parameters to narrow the type of target further—such as restricting it to specific vessel types or navigation statuses (as transmitted by the AIS):
You can then enable different types of filters:
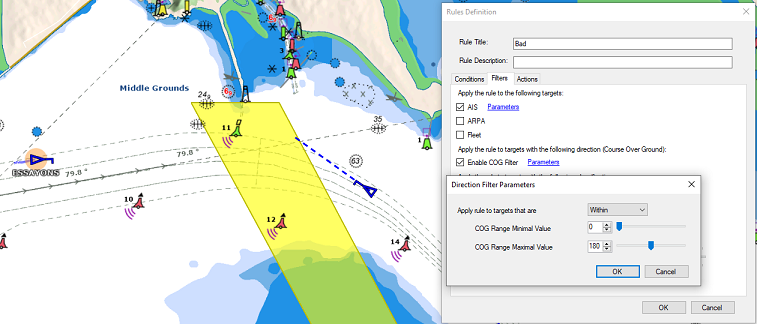
COG (Direction) Filter:
This filter uses the target’s Course Over Ground (COG) to determine whether the rule should trigger. Click Parameters to define a sector and specify whether the target’s course must be inside or outside that sector to activate the rule. For example, in the scenario below, only the vessel Essayons will trigger the rule because its COG is approximately 80°, which falls within the defined sector of 0° to 180°. The vessel on the right will not trigger the rule, as its COG is around 300°.
Classification Filter
You can restrict the rule to specific target classifications (see the Target Classification chapter for more details). This is useful for excluding certain targets by deselecting the classifications you do not want to trigger the rule.
TIPS: The AIS Favorite feature lets you predefine the classification of known vessels using their MMSI. For instance, if you have a list of vessels permitted to cross a certain area without activating the rule, assign them the classification "Friend" in the AIS directory, and then exclude the “Friend” classification from the rule.
Schedule Filter
Rules can be allowed to only trigger on specific days and/or during certain times. This is useful for scenarios such as activating rules exclusively at night or on weekends.
To configure scheduling, select Enable Schedule and click Parameters:
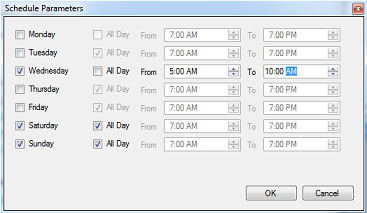
Select the day(s) on which the rule should be active. For each selected day, choose All Day to have the rule run from 12:00 AM to 11:59 PM, or uncheck All Day and specify a custom time range.
Note: If you set a time range where the start time is later than the end time, the rule will remain active into the following day. For example, if you configure a rule to run on Sunday from 5:00 PM to 7:00 AM, it will operate continuously from Sunday 5:00 PM to 11:59 PM, and then from Monday 12:00 AM to 7:00 AM—even if Monday is not selected.
Triggering Delay Filter:
You can introduce a delay before triggering the rule. This enables users to determine how long the condition must remain valid before triggering the rule, which may help reduce false alarms. A practical example is the CPA/TCPA trigger. If a vessel is maneuvering and briefly meets the CPA/TCPA threshold, you may not want the rule to activate immediately. Instead, you could require the threshold to be met for a set duration (ex: 30 seconds) before the rule is triggered.
Re-triggering Filter:
Finally, you can define an interval during which the rule cannot be re-triggered a second time. This is especially useful with ARPA targets to help prevent multiple false alarms.
Note: Regardless of the interval set, the same target cannot trigger the same rule more than once within 10 seconds. This safeguard prevents repeated triggers when a target is positioned near a boundary limit or close to a speed threshold, which could otherwise cause consecutive activations in a short time.
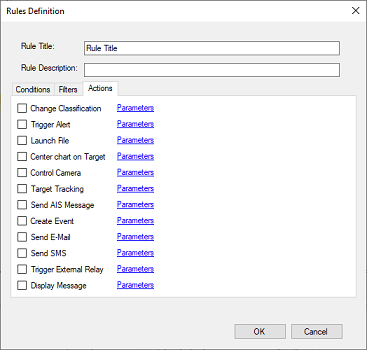
Actions
Use the Actions tab to choose the action(s) that will be performed when the rule is triggered:
-
Change Classification: Automatically assign a classification to the target that triggers the rule conditions. Refer to Target Classification for more information.
-
Trigger Alert: Displays a message in the Status Bar showing either the rule name or a custom message (supports dynamic tags).
Click Parameters to adjust the alert settings, such as selecting a sound, setting the alert priority (High = red, Medium = yellow, Low = green), and choosing whether the alert should time out automatically. By default, the time-out is set to 30 seconds, meaning the notification remains in the Status Bar for 30 seconds unless the user acknowledges the alarm by clicking on the status bar or from the Alarm List beforehand. If the time-out is set to None, the notification will remain until manually acknowledged (via the Alarm List or Status Bar). The alert text defaults to the rule title but can be customized. You can also insert Smart Tags to dynamically display details such as the target ID, target name, or the name of the boundary area that triggered the alert.
-
Launch File: Open a file (.exe, .cmd or .bat) and pass the following argument in parameter (in order):
- Type of Target ("ARPA" or "AIS")
- Target ID (MMSI for an AIS targets and ID for ARPA)
- Lat/Lon
- UTC Date
- UTC Time
- Rule Name
- Target Name (ARPA will repeat the ID)
- Name of Area that triggered the rule
User can select if the program or script is ran normally (pop up window in front of TimeZero), minimized (does not appear) or maximized (pops up a full window in front of TimeZero)
Example of argument output (with an AIS): Ais 206124607 35-12.9448-N,139-46.7543-E 2012-06-22 00:38:18 "Rule Name" "M/V Vessel"
-
Center Chart on Target: Center the chart on the target that triggers the rule condition. If you select "Zoom" (under Parameters), the chart scale will automatically adjust to display both the target and the reference point on the screen. If you select "Keep Target on Screen", TimeZero will automatically pan the chart to follow the target. Note that when this action is executed, the target is automatically selected (highlighted in the lists and in the Target Information NavData), but you can disable this behavior by unchecking the option.
-
Control Camera: Move the camera to focus on the target that triggers the rule condition. The camera can be set to "Lock on Target" (continuously follow it) or simply "Move to Target" once (without tracking). You can choose which camera to control: the closest camera (relative to where the target triggered the rule), the active camera, or one or more specific cameras (selected by name). When controlling the closest or a specific camera, you can also choose to Activate it by checking Activate Camera. Activating a camera is especially useful if a Camera display (NavData or Camera WorkSpace) is set to show the Active camera—this ensures the relevant camera not only tracks the target but also switches the video feed automatically, drawing the operator’s attention.
If the selected camera is already tracking another target, you can define how the rule should respond:
- Do nothing
- Overwrite the existing tracking
- Use classification as a priority factor
- Switch to another camera.
-
Target Tracking: Turns the target track for any target that triggers the rule condition ON or OFF (click Parameters to configure). Enabling this action may generate a large number of tracks on the chart. For better management, it is strongly recommended to create a dedicated layer in the Manage Layer window and set it as the default layer. This allows you to easily show or hide all tracks, and to purge (delete) the layer when needed.
-
Send AIS Message: Send a Text message to the AIS target (Class A only) that triggers the rule condition. Note that the "ABM" sentence must be selected as an output (on the cummunication port where the AIS transmitter is connected) for this action to work properly. Click on "Parameter" to type the message to send.
IMPORTANT: The "Send AIS Message" action requires a local connection to an AIS (AIS Base Station or AIS Class A). This action cannot be triggered from a TZ Coastal Monitoring Remote.
-
Create Event: Create an Event in the time line and in the Event list when you have the Record and Replay module. This can be useful to mark and retrieve specific occurrence of events and display the full situation at that time thanks to the recorded data. By default, the event will be named after the rule title, but this can be changed by clicking on the "parameters" button and selecting "User Defined". A description can also be added.
-
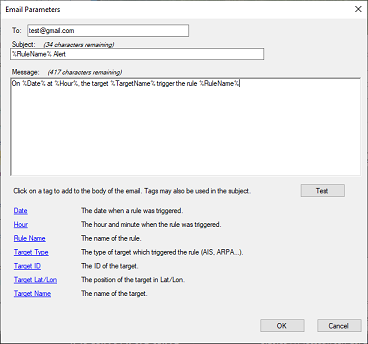
Send E-Mail: Automatically sends an email to the specify e-mail address. It is possible to customize the message and use "smart-tags" that will replace dynamically their content with the target information:
-
Send SMS: Automatically sends a SMS to the specify phone number (international format). It is possible to customize the message and use "smart-tags" that will replace dynamically their content with the target information.
IMPORTANT: Both email and SMS require TimeZero to be logged into a My TimeZero account. SMS usage is limited to a maximum of 30 per day and 100 per month. If you need to send more SMS beyond this free quota, please contact us.
-
Trigger External Relay: Trigger an external relay using a SeaLevel Network IO (110E/120E). The network relay can be toggled, turned ON or OFF, or be set to a temporary state (ex: Turn ON for 15 seconds, and then turn OFF).
-
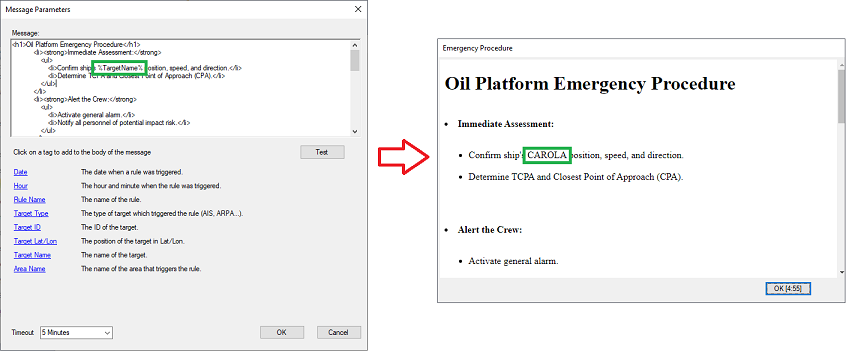
Display Message: Display a message in a dedicated window to the operator. The message can be formatted using HTML tags and can contain "smart-tag that will replace dynamically their content with the target information. This is useful when you want to display detailed instructions or workflow procedure to an operator when a rule is triggered:
-
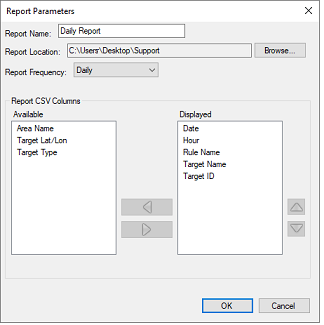
Add Info to CSV Report: Adds an entry to a CSV file to create reports containing rule and target information. You can define a file name prefix and choose which CSV columns to include in the report. The report generation frequency can be set to Daily, Weekly, or Monthly. Each report file is created with a short date appended to its name. When a new report is generated based on the selected frequency, the previous file’s name is updated to include "completed", indicating that this report is safe to open with Excel or edit.
Note: Daily reports roll over at midnight local time, while weekly reports roll over on Monday, with Sunday being the final day of the weekly report.
Once all the parameters are defined, click on OK to close the window and add the rule to the rule list.
Link Rules to Boundaries
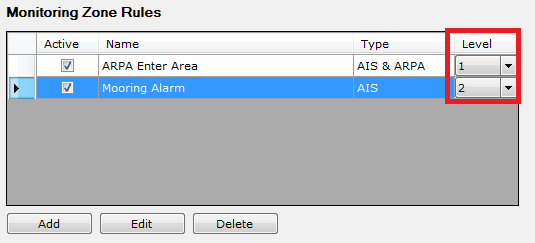
After creating a rule, you need to select its level (1 to 10) from the Rules list:
The Level acts as a link between the rule and boundaries. To attach a boundary to a rule, right-click on the boundary and choose the corresponding Monitoring Level:

Note that multiple monitoring levels can be assigned to the same area. When an area is configured with one or more monitoring levels, it will trigger all corresponding rules. Multiple boundary areas (in various locations) can also be set to trigger the same rule if assigned the same monitoring level.
IMPORTANT: Boundaries that are set up to trigger rules are always active even if they are not displayed on the chart (when their layer is turned OFF).
Link Rules to Guard Zones (using Fleet Target)
Fleet Targets can also trigger Zone Monitoring rule(s) when monitoring an area relative to the Fleet Target (an area that moves with the target). To set this up, right-click on the Fleet Target and choose Set Guard Zone. Then, right-click on the Guard Zone and assign a Monitoring Level, just as you would with regular boundaries.
Using a Guard Zone as a trigger for Zone Monitoring rules is particularly useful for autonomous vessels setup with TZ Professional—for example, to trigger an alarm whenever another target (AIS or ARPA) approaches the Fleet Target, or to automatically control the camera mounted on the Fleet Target from TZ Coastal Monitoring.
For more information about Fleet Target, please refer to the Fleet Tracking chapter.