Creating & Editing Marks
TimeZero allows for the creation of up to 30,000 Marks. Marks are used to plot specific locations such as fishing spots, harbors or preferred anchorages. All Marks are displayed on the chart and in the Marks List.
Note: The 30,000 marks limitation only applies to the default "TimeZero" layer (which is automatically synchronized with all your TimeZero devices). You can create more than 30,000 marks if you create new layer(s). For more information about how to organize large quantity of user objects into layers, please refer to the Layer Introduction chapter.
Creating Marks graphically
Click on the Mark tool located in the Toolbar and click on the Chart to drop a Mark.
You can also right click anywhere on the Chart and choose "Create" -> "Mark".
The default icon and color setup in the Marks & Boundaries options will be used.
Tips: You can right click on the "Mark" tool to select a color and icon before dropping a mark with the Mark tool.
Note: When using the Mark tool from the Toolbar, the software will automatically revert back to the Panning tool (Hand tool) after the Mark is dropped. To add several Marks without having to select the Mark Tool each time, deselect “Enable Auto Hand Tool Selection” from the "General" options. When you are finished creating Marks with the tool, the Panning Tool must then be manually selected.
Creating Marks Manually
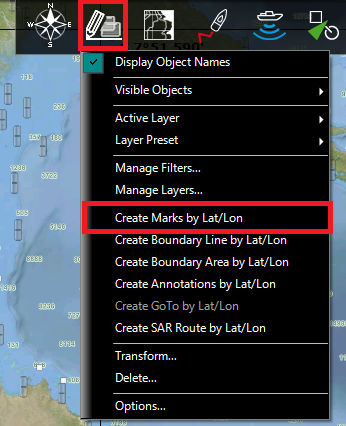
To create a Mark by entering the Latitude/Longitude, double click on the Mark Tool located in the Toolbar. This will display a window to enter the Latitude/Longitude numerically. You may also click on the "Marks" Ribbon button and select "Create Mark by Lat/Long":
Moving a Mark
To move a mark, you have to select it first by left clicking on it with your cursor. Once selected, you can drag it to the new desired location.
If you want to manually adjust the mark coordinates (using lat/lon numbers), double click on it (or right click and choose "Mark Properties") to display its Property window. Enter the new coordinates in the corresponding fields.
Changing Marks Icon and Color
You can right click on the mark to adjust directly some of its properties such as icon and color.
You can also double click on a mark (or right click and choose "Mark Properties") to display the Property window. Change the color and/or icon from the corresponding fields.
Tips: If you want to assign the same color or icon to multiple marks, use the "Select" tool to select multiple marks then right click on one of the selected marks.
Adjusting Marks Size
The Marks Size is a global setting (found under the Marks & Boundaries Options) that will affect all marks displayed on the screen.
Delete or Rename Mark
Right click on a mark and choose the corresponding option (Rename Mark or Delete Mark) from the drop down menu.
Lock and Unlock Mark
Right click on a Mark and choose "Lock Mark" to lock a Mark. When a Mark is locked, you will not be able to move it and a confirmation window will appear if you try to erase it. Use the same process to unlock a Mark.\
Hiding Marks
You can hide marks that belong to specific layers by selecting "Visible Layers" from the "Layers" Ribbon Button.
You can automatically hide all the marks when switching in 3D mode by deselecting "Display Marks in 3D" from the "Plotter Display" Options. This can be used to reduce clutter when switching in 3D mode.