Direct DRS Connection
Power Supply Unit Connection (optional on some models)
Some newer DRS (such as the DRS4D-NXT) do not need any Power Supply Unit and can be connected directly to the main 12v or 24v battery (refer to your Furuno DRS installation guide for more information).
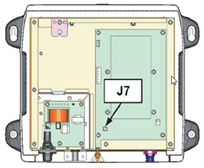
If the DRS model you use requires the PSU012 or PSU013 (Power Supply Unit) to power the antenna (48v), make sure to insert the “J7” jumper inside the PSU (under its cover). If the jumper is not inserted, the PSU will not power ON (the LED will remain OFF) even when 12 or 24v is provided
Network Connection
To connect the DRS Ethernet port to the computer, we highly recommend installing a HUB/Switch in order to be able to add additional Ethernet sensors easily (such as a network sounder) and to be able to monitor and troubleshoot network traffic (by looking at the activity LED of the HUB):
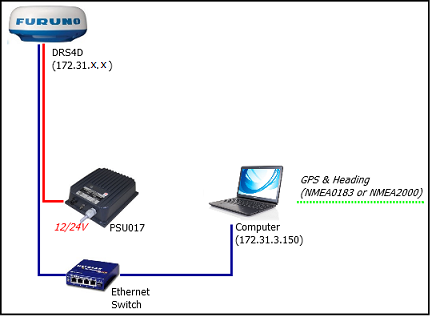
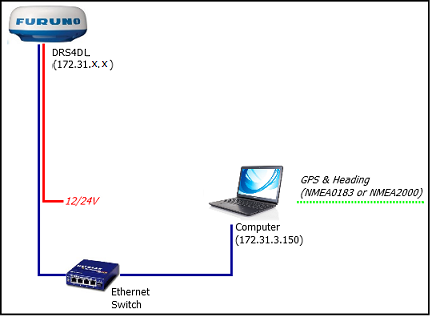
Connect GPS, Heading and optional additional instruments to the computer using one or multiple COM ports (through a USB to Serial adapter if needed) or through NMEA2000 via the Actisence NGT-1 or NGX-1 Gateway.
Important information regarding heading: If you want to overlay radar on the chart, acquire ARPA targets or use the North-Up Orientation of the Radar WorkSpace, you have to provide Heading to TimeZero. For reliable ARPA, the heading refresh rate must be 10Hz or more (the heading sentences must be received 10 times per second or more). If TimeZero only receives heading once per second, ARPA reliability is not guaranteed.
Note: If you connect the Heading Sensor using NMEA2000 the refresh rate is always 10Hz.
Set the IP of the Computer
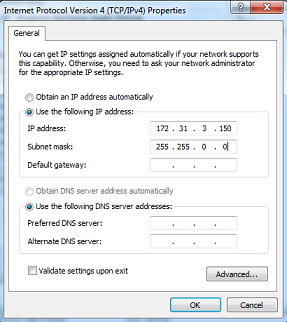
The computer must be assigned an IP address that matches the Furuno network (172.31.x.x / 255.255.0.0) in order to communicate with the DRS. We strongly recommend configuring the computer with a fixed IP address of 172.31.3.150 and a subnet mask of 255.255.0.0.
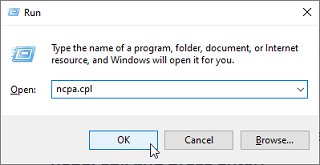
To set a static IP address, open the Network Connections control panel on your computer. In Windows 10/11, press Windows Key + R (or right-click the Windows Start button) to open the Run dialog. Type ncpa.cpl and click OK:
Double click on the Network Adapter connected to the radar (usually “Local Area Connection”).
Note: If your computer has multiple network adapters and you’re unsure which one is connected to the radar, temporarily unplug the Ethernet cable from the computer and observe which network icon shows a red cross. This will identify the LAN that was disconnected and therefore the one that needs to be configured.
Select "Properties" from the "Local Area Connection Status" window. Double click on “Internet Protocol Version 4 (TCP/IPv4)”. Use the fixed IP address 172.31.3.150 with a subnet mask of 255.255.0.0:
Once the computer's IP address has been assigned, launch TimeZero in Navigation Mode. Open the "Options" by clicking on the "TimeZero" logo (located at the top left corner) and select Device List. Make sure the Radar is listed inside the "Local Device List". Do not proceed to the next step until all Furuno Ethernet sensors are properly listed.
Note: It is always recommended to turn ON the DRS before starting TimeZero.
ARPA Configuration
ARPA Target (Automated Radar Plotting Aid) is a feature that can track vessels using radar data. It calculates their speed, course, and closest point of approach, helping users to assess collision risk and make safe maneuvering decisions.
For ARPA processing, users can choose whether targets are computed by TimeZero or directly by the radar antenna. This setting is available in the Radar Options under ARPA Processing:
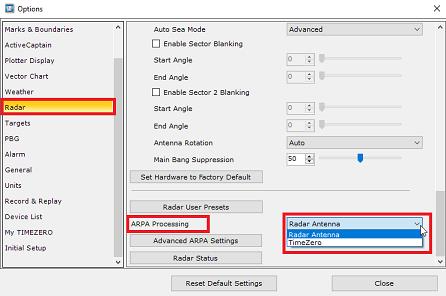
By default, "Radar Antenna" is selected, meaning ARPA targets are generated by the antenna itself (using the Furuno algorithm). In this configuration, the NavNet ARPA connection must be added to the Connection Wizard so TimeZero can receive the targets from the network (being sent by the radar).
To add the NavNet ARPA connection, open the Connection Wizard:
-
Select "Manual Port Configuration" and click on "Next"
-
Select "Add/Configure NavNet Connection" and click on "ARPA" if you want to use the ARPA target generated from the Radar Antenna.
-
Click on "Next" and "Finsih"
If TimeZero processing is selected instead, NavNet ARPA does not need to be configured in the Connection Wizard and should ideally be disabled for a cleaner setup.
The optimal choice depends on the system configuration. Radar Antenna should be used if the user wants to take advantage of the DRS-NXT Auto Acquire by Doppler feature, which automatically detects moving targets. For DRS X-CLASS or DRS Classic radars (which do not support Doppler), either option can be used, though the TimeZero ARPA algorithm is generally more capable.
Important Note about the Use of Managed Switches on NavNet Networks causing "No Sweep" radar error:
Managed or “smart” Ethernet switches are becoming increasingly common. However, when used on a Furuno network, these switches can cause communication issues due to features such as IGMP Snooping. In the absence of a proper IGMP Querier (which is not present on a Furuno Network), the IGMP Snooping feature of the switch may prevent UDP multicast data from being forwarded correctly. This can result in symptoms such as a Radar “No Sweep” status on the Radar Screen, even though the radar appears correctly detected. While some managed switches allow IGMP Snooping to be disabled, others enable this feature internally with no option to turn it off. In such cases, the only reliable solution is to replace the switch with a truly unmanaged Ethernet switch that does not implement IGMP Snooping or any traffic optimisation/QoS.
DRS Configuration
Open the Radar Options in TimeZero. Under "Radar Initial Setup", select the DRS Hostname and adjust the DRS initial settings just like you would from a NavNet MFD.
Note: There is no feedback when pushing the “Radar Optimization” button. This is normal!