WASSP Multibeam Sounder (Gen 3)
The "PBG Module" and "WASSP Module" needs to be unlocked to access these features.
Introduction
TimeZero is compatible with the WASSP Multibeam sounders (generation 3):
| WASSP Models Gen 3 |
S3 |
F3 |
F3X |
F3XL |
| Minimum WASSP DRX Software |
v3.1 |
v3.1 |
v3.1 |
v3.1 |
| Type |
Survey |
Fishing |
Fishing |
Fishing |
| Frequency |
160 kHz |
160 kHz |
160 kHz |
80 kHz |
| Beam Width |
224 beams over 120° |
|||
| Maximum Depth |
200m |
200m |
500m |
1000m |
| Multibeam Depth |
Yes |
Yes |
Yes |
Yes |
| Section |
Yes |
Yes |
Yes |
Yes |
| BackScatter |
No |
Option |
Option |
Option |
| Multi-Beam Sounder |
No |
Yes |
Yes |
Yes |
| Fish Target |
No |
Option |
Option |
Option |
| Sidescan |
No |
Option |
Option |
Option |
| Navigation Data |
Yes |
Yes |
Yes |
Yes |
Network Configuration
The third generation of WASSP uses a black box concept (similar to a regular Furuno Ethernet sounder) that does not need any extra computer to process the data. You can connect the "DRX" (WASSP Black Box) to the TimeZero computer directly or via a switch:
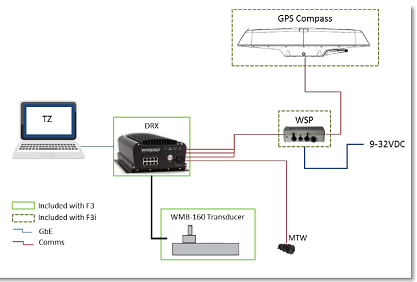
TimeZero not only receives Bathymetry and Backscatter data from the WASSP DRX, but can also display Multibeam Echo data (Section view, Multibeam Sounder, and Sidescan), as well as Fish Targets (water column data). Please note that the availability of certain data types may vary depending on the WASSP DRX licensing options.
With WASSP Generation 3, navigation data (GPS and heading) is also transmitted from the DRX via the Ethernet network. There is no need to connect GPS or heading sensors directly to the TimeZero computer through a Serial COM port or via NMEA2000.
Note: Instruments can still be connected directly to TimeZero via Serial COM port or NMEA2000 to receive additional data (such as AIS) or when the WASSP DRX is not powered on.
WASSP Processor Configuration
To connect the WASSP DRX to TimeZero, you must first assign a fixed IP address to the WASSP DRX. This is done through the DRX web interface.
To access the DRX web interface, connect your computer to the DRX, either directly or through a network switch. If there is no router on the network, both the WASSP DRX and the PC will automatically use a default IP address in the range 169.254.x.x. To identify the DRX’s IP address, use the “Find My DRX” tool included with the WASSP software package.
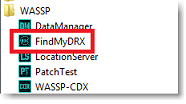
Install the WASSP software on the TimeZero computer. This installation includes the WASSP CDX (WASSP Viewer) and additional tools required to perform the initial WASSP setup and to locate the DRX on the network. After installation, you can access “Find My DRX” from the Windows Start menu under WASSP:
If the computer is connected to the same network as the DRX, the unit will appear in the list along with its IP address:
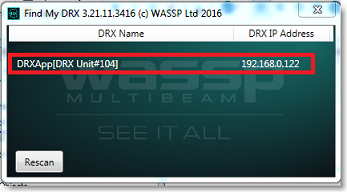
You can click on the listed DRX to open its configuration page in a web browser.
IMPORTANT: It is strongly recommended to use Google Chrome when performing the initial DRX setup and adjustments.
Once the DRX configuration page opens, go to “System” and then select “Network”:
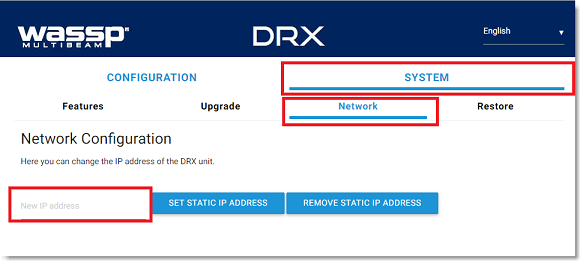
IMPORTANT: If you do not see a "Network" menu under "System", this usually means that the DRX firmware needs to be upgraded. The minimum DRX firmware that can be used with TimeZero is 3.1.109
Enter a fix IP address and press "Set Static IP Address". Note that you can use any IP address as long as you set the DRX and TimeZero computer on the same network.
Example:
- 192.168.1.10 /255.255.255.0 for the DRX
- 192.168.1.20 /255.255.255.0 for the Computer
After changing the DRX IP address, you will also need to update the computer’s IP address so that it remains on the same network range and can access the DRX web configuration page again.
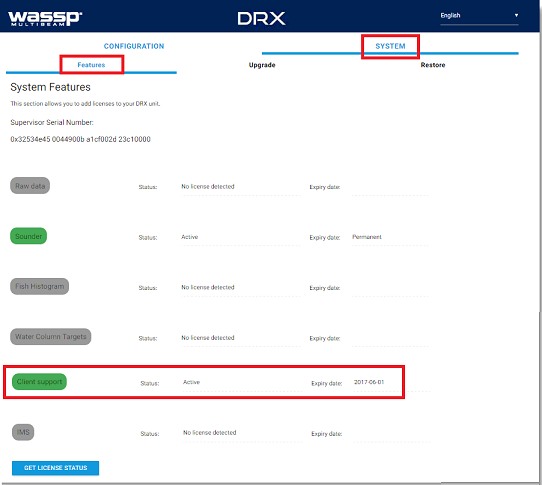
For TimeZero to connect to the DRX, the “Client Support” module must be unlocked within the DRX. This module is independent of the TimeZero PBG and WASSP modules. The DRX Client Support option must be purchased through your WASSP dealer. To verify that the Client Support module is unlocked, open the DRX web interface, go to “System”, then select “Feature.” Confirm that “Client Support” is active (displayed in green):
Continue with the WASSP initial configuration by following the WASSP installation guide. It is recommended to use CDX (WASSP Viewer) to verify that all settings are correctly configured and that the system is operating properly.
TimeZero Configuration
Note: Before configuring WASSP into TimeZero, it is recommended to "ping" the WASSP DRX IP address to make sure that the network configuration is setup properly. Please refer to How To Ping for more information.
Open the Connection Wizard by clicking on the button on the upper left of your screen. Select "Manual port configuration" then "TCP WASSP Connection":

Note: If don't see WASSP Connection from the Connection Wizard, ensure that the WASSP module is configured in TimeZero.
Enter the WASSP DRX IP address and the Port number ("55555" for S3/F3X/F3XL):
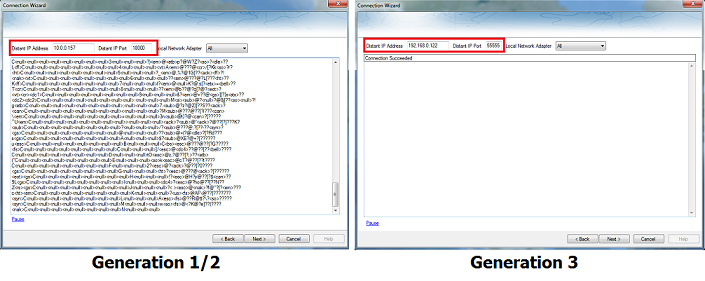
Note: When configuring a WASSP Generation 3 system, it is normal not to see any data scrolling. Simply confirm that “Connection Succeeded” is displayed to ensure the connection is properly established.
Click on "Next" and wait for the Connection Wizard to analyze the Port.
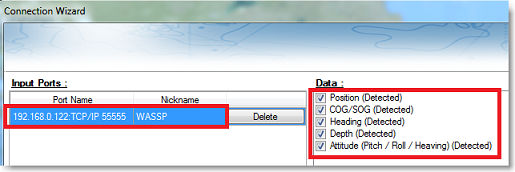
Make sure that the Navigation data is detected and selected:
IMPORTANT: If the WASSP is not transmitting during the analysis of data, it is normal for TimeZero to not automatically detect some data. Simply manually check the data in that case.
Click on "Next". Select the "Master" Data Source (in case TimeZero is connected to multiple sensors) then click on "Next" then "Finish" to close the Connection Wizard.
Select "Options" by clicking on the TIMEZERO button on the upper left of your screen. Select the Multibem Sounder Options and click on "Multibeam Sounder Monitor". A window will open where you can confirm the DRX License information and the data being received by TimeZero:
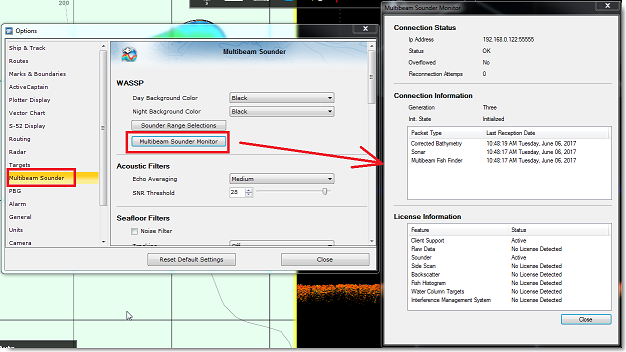
Note: The “Sonar” category will only display incoming data when the “Section” WorkSpace is actively shown on the screen.
TIPS: When connecting a WASSP Generation 3 system, the “Multibeam Sounder” options in TimeZero allow you to adjust most DRX settings directly from within the software. However, certain initial configurations—such as offsets, sensor setup, patch test, and backscatter calibration—must be completed through the DRX web configuration page or using CDX. As a best practice, perform the initial WASSP setup following the WASSP installation guide and using CDX, then finalize and operate the system in TimeZero.
Select the PBG Options. From there, you can configure various settings that affect Bathymetry and Backscatter recording, as well as apply critical filters to help mitigate the recording of poor or invalid data:
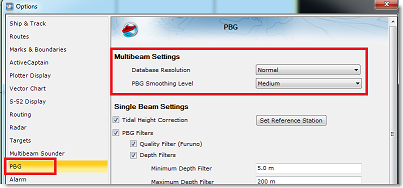
Database Resolution:
The database resolution is automatically adjusted by TimeZero based on depth. As depth increases, the spacing between points becomes larger, and TimeZero automatically selects a larger grid size to optimize disk space usage.The Database Resolution setting (Fishing or Survey) determines the maximum resolution used in shallow water. When set to “Normal,” the maximum resolution is 30 cm. When set to “High Resolution,” the maximum resolution is 8 cm.
Overwrite Previous Data:
By default, when navigating over an area that has already been surveyed, TimeZero blends the new data with the existing data. Beams closer to the vessel’s vertical axis are given greater weight than beams at the outer edges to ensure a smooth and continuous result. If you prefer to replace the existing data with the newly recorded data, simply enable this setting to overwrite the previous data.
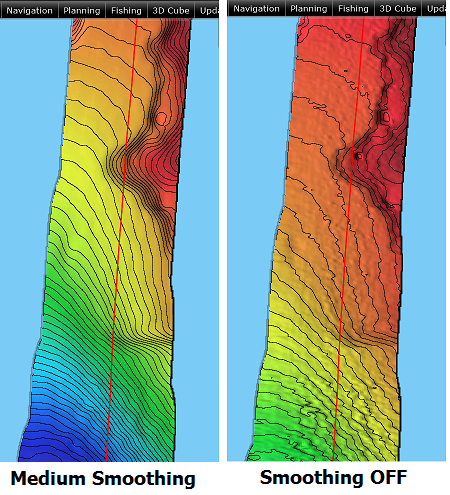
Smoothing Level:
The PBG Smoothing level controls how TimeZero post-processes WASSP Bathymetry and Backscatter data. Increasing the smoothing level helps reduce minor inaccuracies and noise in the data, resulting in cleaner results and improved contour line rendering:
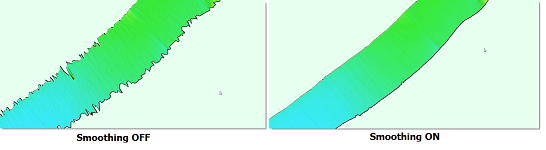
When smoothing is enabled, an additional post-processing algorithm is applied to smooth the edges of the swath, resulting in more consistent and visually seamless data coverage:
Filters
TimeZero provides several post-processing filters designed to reduce the recording of poor-quality data. The Deviation Filter helps reject data collected while the vessel is maneuvering or reversing, as these movements often create turbulence and result in distorted or unreliable swath data. The Speed Filter is also effective, as higher vessel speeds can generate turbulence beneath the transducer, leading to degraded data quality—particularly when steaming to the fishing grounds. For more information, please refer to the PBG Filters chapter.
Imported Backscatter Database Offset
This slider allows you to apply an offset to all backscatter values stored in the Imported Backscatter Database (when Backscatter is displayed and “Imported 3D Database” is enabled in the PBG menu). This feature is useful when upgrading or changing your WASSP hardware (for example, moving to a newer generation system). In such cases, older backscatter data can be transferred from the user database to the Imported Database to keep it separate from newly recorded data.
The slider enables you to adjust (offset) the older backscatter data so it matches the new data after recording backscatter with the upgraded hardware.
When importing Bathy/Backscatter data from a previous installation (using the .tzpbg file format), the data will be imported into the Imported Database, ensuring it remains separate from new uder data and allowing an offset to be applied if necessary.
Trandsducer Draft (to display correct depth in NavData):
Finally, click on the "Initial Setup" Options and enter the same "Transducer Draft" as the WASSP Processor. Please note that the value for "Transducer Draft" is always a positive value (enter the distance in between the water line and the position of the transducer).
Click on "Close" to close the "Options".
You should now receive navigation data and be able to record Multibeam depth data and BackScatter data by clicking on the "PBG" button in the Toolbar.
Note: To confirm that data is being recorded, you may need to perform a sea trial so the vessel’s position changes. In some cases, especially when the GPS position is very stable, bathymetry data may not appear to record until the vessel begins moving.