WorkSpaces
TimeZero is designed to perform multiple navigation tasks such as planning a voyage, navigating a route, downloading weather information , and viewing and controlling a Radar. These activities require different tools and options. The WorkSpaces are our way of separating and differentiating different activities that occur on a navigation system, so the user interface is not cluttered with unnecessary functions and buttons that are not useful to the primary task. Also, since the WorkSpace configurations are independent, users can keep their navigation mode 100% intact while they plan the next phase of their journey and instantly snap back to their desired navigation view without needing to undo or re-configure the software.
-
"Navigation" WorkSpace: This WorkSpace is selected by default when TimeZero is started in "Navigation" mode. This WorkSpace intentionally has limited functionality to simplify operation while underway. To access more advanced planning functions such as animation, route simulation or managing a list of objects, select the Planning WorkSpace.
-
"Planning" WorkSpace: The Planning WorkSpace is selected by default when TimeZero is started in "Home Planning" mode. This WorkSpace allows you to plan and simulate routes, display weather forecast, display tidal height and current predictions and replay data that has been previously recorded. The Planning WorkSpace has a timeline at the bottom of the screen that allows you to change the date/time to perform various animations and simulations.

-
"Fishing" WorkSpace (requires PBG module): The Fishing WorkSpace offers specific tools and buttons that are useful while fishing. It also displays large sliders on the right side that allows to customize depth shading and contour lines. Note that this WorkSpace will only appear when the PBG Module has been unlocked.
-
"3D Cube" WorkSpace (requires PBG module): The 3D Cube WorkSpace offers a dedicated 3D view that allows you to display bottom structure with great detail. The altitude of the camera and bathymetry exaggeration are automatically adjusted to provide the best view possible. It is possible to rotate the view around the boat by left clicking and dragging the mouse over the screen. As the boat moves and changes heading, the view stays locked providing the same camera angle relative to the bow of your vessel. Please refer to the 3D Cube WorkSpace chapter for more information. Note that this WorkSpace will only appear when the PBG Module has been unlocked
-
"Trips" WorkSpace: This WorkSpace offers a dedicated view to all the trips you have recorded and allows you to list and modify each trip. The trip function records all your navigation data (such as position, speed, depth, wind,...) and combines them with photos, catches and events you may have created during you navigation. This WorkSpace has a timeline by default at the bottom of the screen that allows you to change the date/time to perform various animations and simulations.
-
"Update" WorkSpace: The Update WorkSpace allows you to download TZ Maps charts and Weather Forecasts. This WorkSpace has two modes: Weather and TZ Maps. In weather mode, the "Update Area" tool in the Toolbar defines the Weather Forecast area and the panel on the right side allows you to select the weather parameters. In TZ Maps mode, you can click on cells to manage the download of TZ Maps data.
-
"Camera" WorkSpace: The Camera WorkSpace allows you to display a full screen video stream.
Tips: A video stream can also be displayed in a small window using the "Camera" NavData
-
"Radar" WorkSpace: The Radar WorkSpace allows the user to display and control the Radar. This WorkSpace provides all the Radar tools and controls such as Gain, Sea Clutter and Rain Clutter. Note that this WorkSpace will only appear when the Radar Module has been unlocked and a Radar has been detected.
-
"Sounder" WorkSpace (requires Furuno Sounder module): The Sounder WorkSpace allows the user to display and control the Sounder. This WorkSpace provides all the Sounder controls. Note that this WorkSpace will only appear when the Sounder Module has been unlocked.
-
"Section" WorkSpace (requires WASSP module): The Section WorkSpace allows to display the real time echo sonar below your vessel (requires WASSP Generation 3)
-
"MultiBeam" WorkSpace (requires WASSP module): The MultiBeam WorkSpace allows to display the sounder echo and its history (requires WASSP Generation 3)
-
"3D History" WorkSpace (requires WASSP module): The 3D History WorkSpace allows to display the water column data and its history (requires WASSP Generation 3)
-
"Side Scan" WorkSpace (requires WASSP module): The Side Scan WorkSpace allows to display the Side Scan echo and its history (requires WASSP Generation 3)
-
"Ocean-O" WorkSpace (requires Oceanography service subscription): The Ocean-O WorkSpace allows to display high resolution oceanography data
Creating a Custom WorkSpace
New WorkSpaces and Split Screen configurations can be created by clicking on the "+" icon  . This opens the WorkSpace configuration window below:
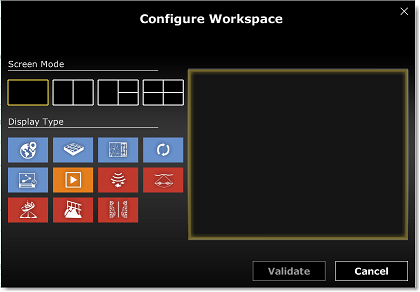
Start by selecting the Screen Mode (full screen or split screen) and then the type of display you want to include in your WorkSpace configuration. Note that for full screen configuration, the default name of the WorkSpace will adopt the type of display selected (but you can rename it if you want). For split screen configuration, the default name will be set to "Custom" but it is highly suggested to rename it to something more meaningful to you.
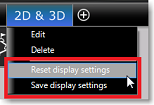
Once a WorkSpace has been created, it will be displayed just below the status bar. You can re-order the WorkSpace position by clicking and dragging on a WorkSpace tab. To delete or edit and existing WorkSpace, simply right click on it:

Note: You can only “Edit”, “Reset/Save Display Setting” on the current WorkSpace (the WorkSpace that is currently selected)
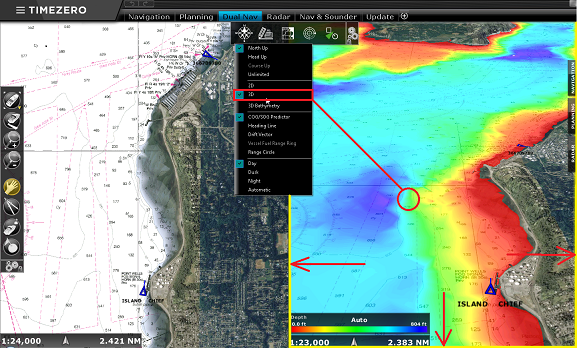
When the screen is split, the Toolbar and Ribbon selection applies to the active display which is surrounded by a yellow frame. For example, if your screen is split in two and if you want to change a property of the display located on the right, make sure to click on the right side (to make it the active display), then select the corresponding action from the Toolbar or Ribbon :
Saving and Recalling WorkSpace configuration
A WorkSpace configuration can be saved and then recalled at a later time:
The following parameters are saved:
-
Toolbar configuration
-
Ribbon configuration
-
Undocked NavData (NavData that have been "pulled off" from the NavData bar)
-
State of the display (Zoom Level, chart selection, ...)
For example, you could adjust the Navigation WorkSpace to be centered on your vessel, zoomed in on the chart without any additional layers (no depth shading, no contour lines...) with only the tools you need for Navigation (Pan, Go To,...). Once you are satisfied with your WorkSpace configuration, right click on the WorkSpace tab ("Navigation" in that case) and select "Save display settings".
If for whatever reason you (or another user) start cluttering your Navigation WorkSpace with useless layers, tools or set a zoom level not appropriate for navigationmonitoring, you can always right click on the "Navigation" WorkSpace and select "Reset display settings". This will revert the WorkSpace to its previously saved state.
WorkSpace configuration can also be recalled using Quick Access NavData or Shortcuts.