AXIS IP Camera & Converter
Introduction
TimeZero is compatible with any AXIS IP Cameras and any AXIS IP Converters. If the Camera has Pan/Tilt/Zoom (PTZ) abilities, TimeZero can control the camera from the Camera WorkSpace, the Camera NavData virtual joystick, and from the chart (if the camera is set to be used for tracking).
Note: For TimeZero to recognize a camera as PTZ, it must be capable of physical panning and tilting, as well as providing feedback to the system. “Digital PTZ,” commonly used with fisheye cameras that rely solely on digital zoom, is not supported.
Installation Overview
In order to view (and control) an AXIS IP camera or converter from TimeZero, it is necessary to:
-
Assign a fixed IP Address to the camera or converter using the AXIS IP Utility Program
-
Setup the camera or converter with credentials (it is recommended to use the default "pass" password for the "root" account)
-
Adjust some settings such as maximum frame-rate and resolution (according to how many cameras you have on the network and the CPU of computer)
-
Add and configure the Camera in TimeZero from the Camera Options
Note: Video feed decoding (H264) can take lots of CPU and requires a powerful computer if you connect multiple HD cameras. In some situation, you might have to reduce the frame-rate (FPS) and/or resolution of the camera for "smooth" operation in TimeZero.
Setting the IP of the computer
You can select any IP address you want for the AXIS IP Camera or Converter as long as the computer is on the same network. In the following example, we will configure the Cameras and computer addresses to use the IP network 172.31.x.x / 255.255.0.0 (same Network as Furuno sensors):
-
Open the “Control Panel” from the Windows “Start” menu (under Windows 8 or Windows 10, right click on the "Start" button, then select "Settings" and "Network & internet")
-
Select “Change Adapters”
-
Right click on the Local Area Connection corresponding to the Ethernet card where the network is connected and choose “Properties”
-
Select “Internet Protocol version 4 (TCP/IP v4)” then click on “Properties”
-
Select “Use the following IP address” then enter the appropriate IP address and Subnet Mask for the computer
In this example, we will use the NavNet IP network, so we will set the IP address of the computer to 172.31.3.150 with a subnet mask of 255.255.0.0
Setting the IP of the camera(s)
In this example, we will set up 3 IP cameras:
-
One Pan/Tilt/Zoom IP camera (AXIS 212PTZ)
-
One fixed (non PTZ) IP Camera (AXIS 207)
-
One fixed (non PTZ) IP Camera (AXIS 207)
Download the AXIS IP Utility from AXIS website:
https://www.axis.com/en-us/support/downloads/axis-ip-utility
Right click on the “AXIS IPUtility” software and choose “Run as Administrator”. If the Windows Firewall appears when opening the tool, make sure to click on “Unblock” to allow the software to detect and configure correctly the IP Camera(s).
The AXIS IP utility will detect all the IP cameras connected on the network:
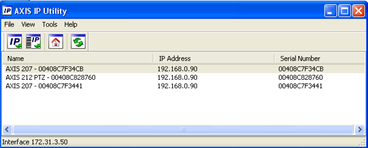
Note: If you use the same camera models in multiple locations, be sure to write down the Camera serial number (which can be found on the back of the camera) with the intended location to help assign the correct camera.
To change the IP address of the Camera, select the camera in the list and click on the button “assign new IP address to selected device”. Enter the correct IP address and click on “Assign”:
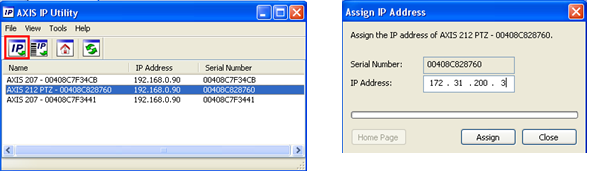
Wait 30 seconds. If you don’t get a confirmation message within 30 seconds, you will need to restart (power OFF and ON) the camera while leaving the tool running. After restarting the camera, wait for 3 minutes. You may have another Windows Firewall warning during the process. Simply accept it.
Note: If you do not get a confirmation message after 3 minutes, close the AXIS IP Utility tool and repeat the entire process.
If applicable, repeat the process with other cameras (to assign the IP of the other cameras).
Configuring the camera
The cameras need to be initially configured using a Web browser. When you connect to the camera the first time, it will ask you to create the Root account. It is recommended to set the password of the IP camera to “pass” and click “OK”.
Note: If the camera is also used by a Furuno NavNet MFD, the Root account password MUST be setup to "pass"
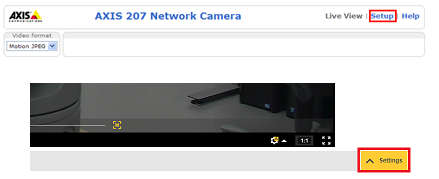
Once the page of the camera appears, open the settings page. Click on the "Setup" button located on the top right corner (on older AXIS Cameras) or click on the "Setting" button located on the bottom right corner (for newer AXIS IP Cameras):
RECOMMENDATION: To achieve better performance and optimize network bandwidth, it is recommended to limit the camera resolution to a maximum of 720p and the camera frame rate (fps) to 15 fps. On older AXIS IP Cameras, select “Video ->Video Stream” and adjust the "Resolution" and "Maximum Frame Rate” settings found under the "Image" tab. On newer AXIS IP Camera, those settings can be found directly under the "Stream" tab.
Note: If you have a PTZ camera with the “Control Queue” option (under “PTZ Configuration-> Control Queue”), make sure to leave the Control Queue setting OFF as it is not supported by TimeZero (or NavNet MFD).
Configuring TimeZero
Open TimeZero, select the Camera Options, click on the “Add” button and select AXIS. TimeZero will scan for any AXIS IP cameras that are connected on the local network.
Note: If the camera is not automatically detected (which can happen if the computer is connected to multiple networks), click on the button "My camera is not in the list" in order to manually enter its IP address.
After selecting the camera from the list (or after manually entering its IP address), TimeZero will ask you to enter the camera's credential (login/password). After validating the login and password, TimeZero will display the configuration window. The parameters you can edit will vary according to the camera capabilities (fixed vs. PTZ) and features you want to enable (Tracking and/or Augmented Reality):
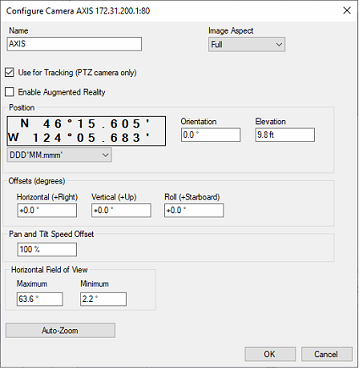
Enter a user friendly name for the camera, then select the Image Aspect:
-
"Full" will zoom the picture to fill the screen without changing the aspect ratio of the camera
-
"Fit" will display the entire picture while keeping the aspect ratio of the camera and add a black border to fill the screen if needed
If you enable "Use for Tracking" (only available with AXIS PTZ Cameras) or "Augmented Reality", you will need to enter the camera position.
Enter the position of the camera using Lat/Lon (note that you can select the format just below). For the horizontal offset (orientation of the camera from North), please refer to the chapter Align the Camera which provide an easier way to enter the horizontal offset.
For the Vertical and Roll offset (mainly used for Augmented Reality), it is easier to adjust those settings from the Camera WorkSpace directly. Please refer to the "Augmented Reality Setup" paragraph of the Augmented Reality chapter for more information.
You will also have to enter the horizontal Field of View of the camera. If the camera has Zoom capability, you will have to enter two values: the Maximum FOV (when the camera is zoomed out) and the minimum FOV (when the camera is zoomed in). Note that TimeZero will attempt to extract those values from the camera. However, some AXIS cameras do not support this feature and you should double check those values using the camera specification.
If you are using an AXIS IP Converter with multiple inputs, you can select a specific input or a view that will mix the 4 inputs as one camera. If you want to add another channel from the same converter, repeat the process by adding another converter with the same credential and IP address but with another channel selected (each channel is seen as an independent camera in TimeZero).

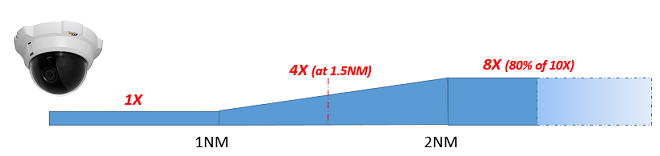
If the camera is PTZ and if you enabled the Tracking feature, you can configure the "Auto-Zoom" if you want the camera to adjust its zoom automatically when tracking an object. In the example below, the camera will start to zoom when the point or object to track reaches 1NM. The adjusted maximum zoom (80% of camera zoom maximum capacity) will be reached at 2NM. In between 1NM and 2NM, the zoom will be adjusted linearly (in between 1X and adjusted maximum zoom):
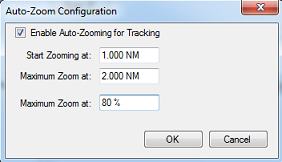
Note: Limiting the maximum zoom (in %) is useful if you don't want the camera to zoom at its full value (because it becomes "too blurry").
The diagram below illustrates the zoom value according to distance with a 10X zoom camera that has been restricted to 8X (80% of maximum zoom value):
Click on "OK" to validate the settings and add the camera to the configuration.