ONVIF Camera
Introduction
TimeZero can control a camera that supports the ONVIF Profile S protocol. ONVIF is a popular control protocol used in the CCTV industry. In order for TimeZero to successfully control the camera, specific ONVIF capabilities must be supported. Please refer to the ONVIF Protocol Requirement chapter to make sure the camera is compatible.
Setting the IP of the computer
You can select any IP address you want for the ONVIF Camera as long as the computer is on the same network. In the following example, we will configure the camera and computer addresses to use the IP network 172.31.x.x / 255.255.0.0 (same Network as Furuno sensors):
-
Open the “Control Panel” from the Windows “Start” menu (under Windows 8 or Windows 10, right click on the "Start" button, then select "Settings" and "Network & internet")
-
Select “Change Adapters”
-
Right click on the Local Area Connection corresponding to the Ethernet card where the network is connected and choose “Properties”
-
Select “Internet Protocol version 4 (TCP/IP v4)” then click on “Properties”
-
Select “Use the following IP address” then enter the appropriate IP address and Subnet Mask for the computer
In this example, we will use the NavNet IP network, so we will set the IP address of the computer to 172.31.3.150 with a subnet mask of 255.255.0.0
Setting the IP of the camera(s)
Please follow the manufacturer's instructions to fix the IP address of the ONVIF Camera. In this example, we will use an IP address of 172.31.200.1 for the camera. Make sure that "HTTP" is enable on the camera (TimeZero is not compatible with ONVIF over HTTPS).
Configuring TimeZero
Open TimeZero, select the Camera Options, click on the “Add” button and select ONVIF. TimeZero will scan for any ONVIF IP cameras that are connected on the local network.
Note: If the camera is not automatically detected (which can happen if the computer is connected to multiple networks), click on the button "My camera is not in the list" in order to manually enter its IP address (172.31.200.1 in this example) and the ONVIF port number (usually 80).
After selecting the camera from the list (or after manually entering its IP address), TimeZero will ask you to enter the camera's credential (login/password) if applicable. After validating the login and password, TimeZero will display the configuration window. The parameters you can edit will vary according to the camera capabilities (fixed vs. PTZ) and features you want to enable (Tracking and/or Augmented Reality):
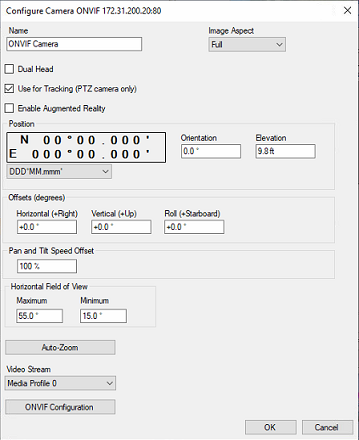
Enter a user friendly name for the camera, then select the Image Aspect:
-
"Full" will zoom the picture to fill the screen without changing the aspect ratio of the camera
-
"Fit" will display the entire picture while keeping the aspect ratio of the camera and add a black border to fill the screen if needed
If you enable "Use for Tracking" (only available with PTZ Cameras) or "Augmented Reality", you will need to enter the camera position.
Enter the position of the camera using Lat/Lon (note that you can select the format just below). For the horizontal offset (orientation of the camera from North), please refer to the chapter Align the Camera which provide an easier way to enter the horizontal offset.
For the Vertical and Roll offset (mainly used for Augmented Reality), it is easier to adjust those settings from the Camera WorkSpace directly. Please refer to the "Augmented Reality Setup" paragraph of the Augmented Reality chapter for more information.
You will also have to enter the horizontal Field of View of the camera. If the camera has Zoom capability, you will have to enter two values: the Maximum FOV (when the camera is zoomed out) and the minimum FOV (when the camera is zoomed in). Check the manufacturer's specification for the maximum and minimum FOV values.
If the camera is PTZ and if you enabled the Tracking feature, you can configure the "Auto-Zoom" if you want the camera to adjust its zoom automatically when tracking an object. In the example below, the camera will start to zoom when the point or object to track reaches 1NM. The adjusted maximum zoom (80% of camera zoom maximum capacity) will be reached at 2NM. In between 1NM and 2NM, the zoom will be adjusted linearly (in between 1X and adjusted maximum zoom):
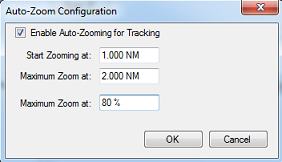
Note: Limiting the maximum zoom (in %) is useful if you don't want the camera to zoom at its full value (because it becomes "too blurry").
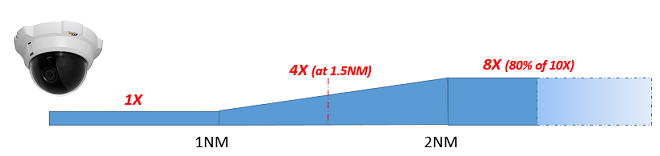
The diagram below illustrates the zoom value according to distance with a 10X zoom camera that has been restricted to 8X (80% of maximum zoom value):
TimeZero will automatically detect the streaming profile that are advertised by ONVIF. You can select the streaming profile you would like ti use from the drop-down menu.
ONVIF Advanced Configuration
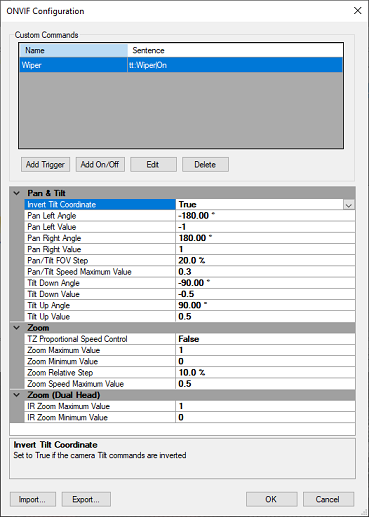
Click on the "ONVIF Configuration" button to adjust the ONVIF protocol settings. The top part of the window allows you to configure custom actions that can be performed by the camera. Any action(s) configured on this page become available under the "Camera Control" button in the ribbon (when the corresponding camera is active) or when right clicking on the video of the camera. "Trigger" and "On/Off" actions can be configured. A trigger will only send one command and will not remember its state. Triggers are usually used for "one shot" actions that do not require any status to be displayed in TimeZero. "On/Off" requires two ONVIF actions and it is displayed as checkbox (one for the "ON" state and another one for the "OFF" state). TimeZero remember the ON/OFF state (checkbox) and this can be used to control Auxiliary sensor (Wiper, Spotlight...).
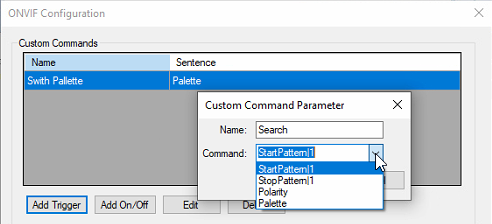
The bottom part of the window allows to configure advanced ONVIF parameters and can be useful if the camera does not behave properly with the default ONVIF configuration:
Please refer to the ONVIF Protocol Requirement chapter for an explanation of these parameters and guidelines on how to test the camera in TimeZero.