Replay Data
The "Record & Replay" module needs to be unlocked to access this feature.
The Analyze WorkSpace contains a Time Line or "Virtual Time Control" at the bottom of the screen. It is used to Animate Weather Forecast when shifting the time in the future, but it can also be used to replay data that has been previously recorded with the "Record & Replay" module (up to 30 days) when shifting the time in the past.

Create a WorkSpace with a Time Line
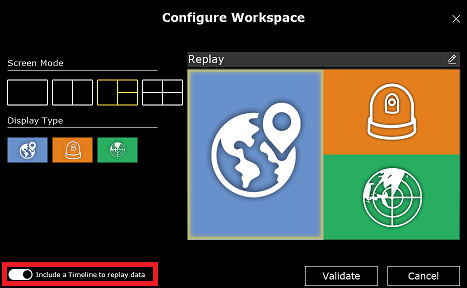
By default, TimeZero configures the Analyze WorkSpace with a Time Line so that it can be used to replay data out of the box. However, you can create and name your own WorkSpace (with a Time Line) that may contain one or multiple displays (such as a split screen in between chart, camera, and radar). To create a new WorkSpace, click on the "+" icon  located at the top right of the screen. This opens the WorkSpace configuration window. Select your screen configuration (full screen or split-screen), the type of display you would like to replay, and turn ON "Include a Timeline to replay data". Make sure to only select displays that can be replayed (for example, the video input or update displays cannot be configured in a WorkSpace with a Time Line):
Use the Time Line to replay data
Time Line Operation Mode:
The Time Line has two modes of operation:
-
In "Live" mode, the WorkSpace displays real time data. The date and time marker are displayed in blue (updated continuously with the current date/time) and the "Actual Time" button is displayed in yellow:

-
In "Virtual Time" mode, and when the time is shifted in the past, the WorkSpace displays recorded data. The date and time marker are displayed in yellow:

Note: Before replaying data, make sure that the appropriate information is displayed on screen. For example, if you want to replay radar echo on the chart, you will have to enable "Radar Overlay" from the "Radar" button in the ribbons.
Time Line Scale:
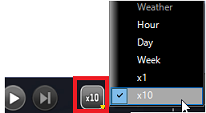
The Time Line offers various time scales that can be selected to replay data at various speed. Simply left click on the button below to select your time scale:
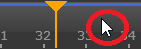
After selecting the scale, you can scroll through time by dragging your mouse over the Time Line:
TIPS: You can also use the mouse wheel to scroll through time: put your cursor over the time line and use the scroll wheel.
Time Line Control:
The Time Line includes various controls to replay recorded data:
-
If you want to replay a specific amount of time from the current play head position, click on the "Replay Last" button:
 . You can change the amount of time (default 1 min.) by right clicking on the "Replay Last" button (1, 2, 5, 10, or 15 minutes). Note that when clicking on this button, the TimeLine scale will change to either X1 (when replay last is setup for 1 minute) or X10 (for all other values).
-
To reset the virtual time to current time, click on the "Now" button:
 . This will set the Time Line to real time and live data will be displayed.
 -
To step forward and backward through the various Events, click on the "Step Back/Forward" buttons:

-
To set the play head to a specific date, click on the "Calendar" button:

Time Line Recording indication:
A blue line on the Time Line indicates the presence of recorded data for radar or camera or audio:

Time Line Audio Playback:
If one or more audio channels are configured for recording, extra lines will appear in the Time Line to indicate the presence of audio recordings:

Note: To save disk space, TimeZero only records channels that are active—that is, channels whose audio level exceeds the adjustable recording threshold (set in the Audio Channel settings of the Record & Replay options).
You can enable or disable (mute) individual audio channels by right-clicking on the timeline and selecting Audio Playback:

Retrieve Specific Events
Using Events
Events act as bookmarks for important moments, making them easy to locate from the Event List or directly on the Time Line.
Some events are created automatically by TimeZero and are categorized as System Events (for example, when the software starts or stops, or when an alarm is triggered). Events can also be generated by Rules, known as Rule Events (such as when an AIS enters a restricted area). Additionally, you can create events manually by pressing the "Manual Event Log" button, which can be added to the toolbar. These User Events are useful for noting external occurrences, such as receiving a VHF distress call. Finally, Audio Events are automatically added when TimeZero detects activity on the audio channel(s). These events are dynamic—you can enable or disable them, and adjust their detection threshold (minimum audio activity duration) from the Record & Replay options so they appear in the Event List only when desired.
Events are displayed on the Time Line with small white dots:

User can "jump" from event to event by using the "Step Forward" and "Step Backward" button available in the Time Line.
Event List
The Event List can be open from the "Lists" button in the Ribbon:

By default, Events are sorted by date with the newest events at the top of the list, but you can sort using any column (by clicking on the column header). The rows displayed in the list can be customized by clicking on the "Action" button (available on the right side of the List header) and choosing "Configure List".
Note: The Event List can be exported in a file (text format) or copied to the clipboard by selecting "Export List" or "Copy to clipboard" under the "Action" menu. The fields in the text file are delimited using Tabs. We recommend using Windows Excel to open the file or paste the content of the clipboard (for proper formatting).
The "Filter" button (available on the right side of the List header) allows you to filter the events that are displayed in the list using various criteria:

When the list is filtered, a green check-mark will be displayed in front of the Filter button. Simply click again on the same button to remove the filter.
Once you have found the event you are looking for, you can click on it from the list and TimeZero will automatically adjust the date of the Time Line to match that event.
Using Trail and Track
When the play back is paused in the past, it is possible to click on any recorded target to show its trail. This will automatically display the target past positions on the chart using small trail icons:
If you click on one of the trail icons, TimeZero will automatically adjust the Time Line to that date.
Note: The trail length is using the same settings as real time target trail from the Targets Options
Note that if you have a track displayed on the chart (that might have been recorded manually or automatically), it is possible to set the time line to the date at which this specific track was created (time embedded in the track under the cursor):
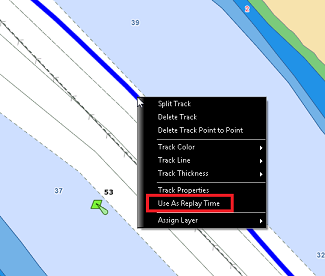
This is very useful to find and see the target that created the track originally for post analysis.