Fleet Tracking
In addition to standard AIS and ARPA targets, TimeZero can display Fleet Targets, which are private targets generated by other compatible TimeZero platforms, as well as AIS-based fleet members added directly by MMSI through the TZ Cloud AIS service.
It is possible to send and receive TimeZero Fleet targets using two different methods, each with its own advantages and limitations:
Fleet Targets sent & received via TZ Cloud
Transmission of the fleet target data is done via an Internet connection using TimeZero's own servers (TZ Cloud) and is compatible with TZ Professional, Furuno NavNet TZT2/TZT3/TZTXL/TZTE, TZ Coastal Monitoring, and AIS targets added by MMSI via the TZ Cloud AIS server. Fleet members can therefore include fully interactive TimeZero systems as well as AIS Members that are tracked directly from the TZ Cloud AIS database without requiring TimeZero software onboard.
For interactive fleet participants, each vessel must use either TZ Professional software or a Furuno NavNet TZT2/TZT3/TZTXL/TZTE. The operating center displaying fleet target data must use TZ Coastal Monitoring for advanced applications or TZ Homeport for basic applications. AIS Members, added by MMSI, do not require onboard configuration and are displayed as non-interactive fleet targets.
Vessel position, and optionally wind and depth data, can be transmitted at intervals as frequent as every 5 seconds, with the default set to 30 seconds. The TZ Cloud Fleet Tracking solution allows participants to send text messages, user objects such as routes, marks and areas, and Radio Direction Finder bearings for MOB detection, except on NavNet TZT2/TZT3/TZTXL/TZTE where RDF is not available. Depending on the permission level configured in the Extranet, a vessel may operate in Emit Only mode. In this configuration, it continues to transmit its position but does not see other fleet members and cannot send messages or user objects.
The TZ Cloud Fleet Tracking solution has been optimized for slow and intermittent Internet connections. It supports store and forward for up to 7 days or 10,000 positions per vessel. If a vessel loses its Internet connection, even for several days, its past positions will automatically be uploaded to the TZ Cloud once connectivity is restored, allowing other participants to display a complete and continuous trail without gaps. AIS Members also benefit from server-side position history, with up to 7 days of retrievable AIS data.
The Fleet Target via TZ Cloud is the ideal solution for customers who need to upload basic data such as position, wind and depth, or who do not want to deploy their own server infrastructure, as no dedicated server setup is required and only a basic Internet connection is needed. The flexibility to include AIS-only vessels and to configure Emit Only permissions enables hierarchical fleet structures and passive tracking scenarios. Typical customers include Search and Rescue operations sending SAR routes from a command center to multiple vessels, fishing fleets monitoring their vessels and distributing boundary areas, or organizations requiring supervisory visibility without reciprocal access.
Note that the Fleet Target solution via TZ Cloud requires an annual subscription, with pricing depending on the number of vessels in the fleet.
Fleet Targets sent & received via TZ Host
Transmission of the fleet data is done via the self-managed TZ Host (Remote Architecture) and is only compatible with TZ Professional and TZ Coastal Monitoring. It requires each vessel to use TZ Professional with the TZ Host output module (not compatible with NavNet TZT2/TZT3/TZTXL/TZTE), and it requires the operating center (that would display the fleet targets) to use TZ Coastal Monitoring Remote. This solution allows to send to the operating center (TZ Coastal Monitoring Remote) not only the vessel position (including wind and depth) but also the vessel AIS and ARPA targets together with Radar echo and Camera picture (including remote control ability for Radar and Camera). The TZ Host Fleet Tracking solution allows to send text messages, user objects (routes, marks, areas...), but also remote commands ("remote shortcut"), but only from the operating center to the vessels (from TZ Coastal Monitoring Remote to TZ Professional). In addition, any route that are activated on the vessels (on TZ Professional) can be monitored by the operating center (TZ Coastal Monitoring Remote). TZ Coastal Monitoring Remote also has the ability to remotely activate or cancel any active route of any fleet target (if the setting to control and monitor the activate route is enabled on the vessel). With the TZ Host Fleet tracking solution, vessels do not see each other. Only the operating center (TZ Coastal Monitoring Remote) is able to see and interact with all the vessels in the fleet.
The trade-off of the TZ Host solution is that a permanent connection must be established in between TZ Professional (the vessels) and TZ Coastal Monitoring Remote (operating center) via the TZ Host (there is no "store & forward" capability due to the amount of data). Note that this connection does not need to be an Internet connection: the TZ Host can operate on a private LAN or a private WAN.
The Fleet Target via TZ Host is the perfect solution for customers that want to monitor (and control) remotely a vessel (Radar, Camera, Active Route, Remote Commands). Typical application would be one or multiple autonomous / semi-autonomous vessels (loaded with TZ Professional and the TZ Host output module) which require monitoring from the office (using TZ Coastal Monitoring Remote). Another application would be a land-based TZ Coastal Monitoring solution that needs some vessels to be part of the surveillance operation (mixing land-based stations with mobile assets).
Fleet Target via TZ Host is self-managed and does not require a subscription.
Note: It is not possible to combine both solutions (Fleet Tracking via TZ Host and Fleet Tracking via TZ Cloud).
Setup of Fleet Tracking via TZ Cloud
It is possible to subscribe to the My TIMEZERO Fleet Tracking service through your dealer. When this service is activated, you can configure multiple vessels under a "fleet" account (your private group of vessels). Each vessel can report its own position and receive the position of other vessels in the fleet using an Internet connection. In addition to vessels running TZ Professional or compatible Furuno NavNet systems, a fleet can now also include AIS Members added simply by entering their MMSI number, allowing tracking of AIS-equipped vessels without requiring TimeZero software onboard.
The secure communication with the TimeZero server has been optimized to use minimal bandwidth, making the service suitable for satellite connections. Fleet permissions can be managed per user and per fleet, including the ability to configure a vessel in Emit Only mode. In this mode, a vessel continues to transmit its position but does not see other fleet members and cannot send messages or user objects, enabling hierarchical or passive tracking scenarios.
In addition to position reporting, members inside the fleet can exchange User Objects such as Marks, Routes, Boundaries and Photos very easily, depending on their permission level.
Setup Vessels with TZ Professional:
Each vessel must have an Internet connection and be set up and logged in with a different My TIMEZERO account. Then, contact your dealer to activate the service with the list of vessels (the list of My TIMEZERO accounts) to include in your fleet. Once the fleet has been created on the TZ Cloud, enable the "Report my position automatically to My TIMEZERO" from the My TIMEZERO Options. Enabling this option will allow TimeZero to send your position, but also retrieve the positions of all other vessels in the fleet. The reporting frequency can be adjusted (as often as every 5 seconds to once every hour). You can choose to only send your Position (+ COG/SOG) or also include Depth and Wind data (speed/direction).
Note: The size of one message is less than 450 bytes for position (+ COG/SOG) and about 500 bytes (0.5KB) when it includes the additional Depth and Wind data. With the default option (set to report every 30 seconds), the upload bandwidth will be approximately 1.5MB/day and the download bandwidth will be the same number multiplied by the number of vessels in the fleet (so about 7.5 MB/day for 5 vessels). The bandwidth can be dramatically reduced by setting slower reporting interval (down to 12KB/day!).
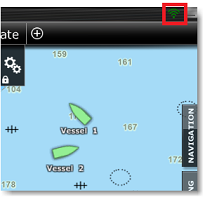
When the position report is enabled, a status icon will appear in the top right corner (next to the minimize button) to indicate when TimeZero has a proper connection to the Fleet Tracking server. Green means that the connection is working and red signify that TimeZero is not connected (usually when the Internet connection is lost):
Note that it is highly recommended to setup the "Boat MMSI", "Boat Name", and optionally "Boat Registration Number" from the Initial Setup Options:
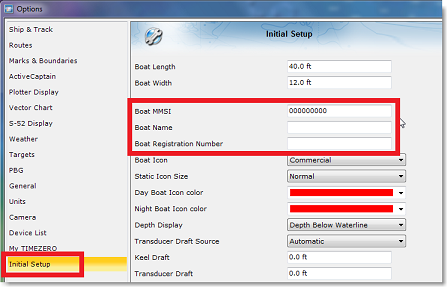
The boat MMSI is especially important if the same My TIMEZERO account is used on multiple vessels. In that case, make sure to use different MMSI numbers so that the position reporting does not "jump" in between two vessels that are logged with the same account. You should also setup the boat name because it will be displayed on all the other TimeZero that are in the same fleet as you. The boat registration number and boat size are optional and for information only (they would be displayed in the vessel properties).
TIPS: If you are connected to an AIS transmitter (Class A or B), the boat MMSI and boat name will be automatically set up from the AIS feed through the VDO sentence.
Setup Vessels with MMSI (MMSI-Based Tracking):
Fleet Tracking via TZ Cloud also supports AIS Member type. This allows a vessel to be added to a fleet using only its MMSI number, without requiring TZ Professional or a Furuno NavNet device onboard.
When an AIS Member is added, the vessel’s position is retrieved directly from the TZ Cloud AIS database. This enables fleet configurations that include AIS-only targets and allows tracking of vessels that are not actively transmitting through the TimeZero Fleet Tracking system.
Compared to standard TZ Cloud AIS targets, AIS Members provide enhanced functionality. Target Trail is available and Target Track can be enabled. Positions are updated near real time whenever new AIS data is received by the server, rather than depending on on-screen polling. The vessel appears in the Fleet List for quick access and centering, and continues to be updated even when not displayed on screen. Up to 7 days of position history can be retrieved thanks to server-side store and forward, even if TimeZero has been turned off during that time.
AIS Members are displayed with a dedicated icon and are classified as “TZ Cloud AIS” in both the Tooltip and the Fleet target list:
These targets are non interactive. It is not possible to send them messages, routes or user objects. They are intended strictly for tracking and monitoring purposes.
To add an AIS Member, simply enter the vessel’s MMSI when configuring fleet members. The vessel will appear in the Fleet List as soon as AIS data is available in the TZ Cloud database.
Emit Only Permission:
An "Emit Only" restriction can be configured on users that are using TZ professional to report their position.
When this restriction is enabled for a specific user inside a fleet his vessel continues to transmit its position to that fleet, including Depth and Wind data if selected. However, the user no longer sees other vessels of that fleet and cannot send messages, routes or user objects to the fleet or to individual vessels. Note that a user configured as “Emit Only” can continue to receive messages and user objects from other fleet vessels as well as from the fleet group.
Permissions are managed independently for each fleet and are assigned per user. This allows flexible configurations, including passive tracking scenarios. If a user belongs to multiple fleets, the visibility and interaction rules apply separately within each fleet. Full visibility granted in another fleet remains effective within that fleet’s context.
The Emit Only restriction provides enhanced control for fleet management and any operational scenario where selective visibility is required.
Setup the Supervision Center with TZ Homeport:
For basic applications (just displaying the fleet targets on a chart), TZ Homeport can be used. Simply connect the computer to the Internet and log in with a different My TIMEZERO account. Once setup, contact your dealer to add the My TIMEZERO account of the TZ Homeport to the fleet. Then, enable the "Get Fleet Targets from TZ Cloud" from the My TIMEZERO Options. Enabling this option will allow TZ Homeport to retrieve the positions of all other vessels in the fleet. Note that with TZ Homeport, you are not able to send your position. As such, vessels in the fleet will not be able to send text messages or user objects to TZ Homeport (only TZ Homeport will be able to send text messages or user objects to the vessels).
Setup the Supervision Center with TZ Coastal Monitoring:
For advanced applications (alarms, two-way communication...), TZ Coastal Monitoring can be used (TZ Coastal Monitoring Single/Dual Radar or TZ Coastal Monitoring Remote). Simply connect the computer to the Internet and log in with a different My TIMEZERO account. Once setup, contact your dealer to add the My TIMEZERO account of the TZ Coastal Monitoring to the fleet. Then, enable the "Get Fleet Targets from TZ Cloud" from the My TIMEZERO Options. Enabling this option will allow TZ Coastal Monitoring to retrieve the positions of all other vessels in the fleet. You can also optionally send the TZ Coastal Monitoring position back to the TZ Cloud. This will allow TZ Coastal Monitoring to be seen by the vessels on their chart (displayed using a square icon) and allow the vessels to interact (send text messages or user objects) with the supervision center.
TIPS: If you do not enable "Report my Position" from TZ Coastal Monitoring, then, Coastal Monitoring will be "invisible" to the vessels in the Fleet.
Setup of Fleet Tracking via TZ Host
Setup Vessels with TZ Professional:
Each vessel you want to track and get data from (AIS, ARPA, Radar, Camera) must be loaded with TZ Professional V5 (or superior) and have the TZ Host Output module unlocked. You will need to set up a TZ Host and a way for each vessel to communicate with the TZ Host (internet connection or private LAN/WAN). For more information about the network setup, please refer to the TZ Host Architecture Network Setup.
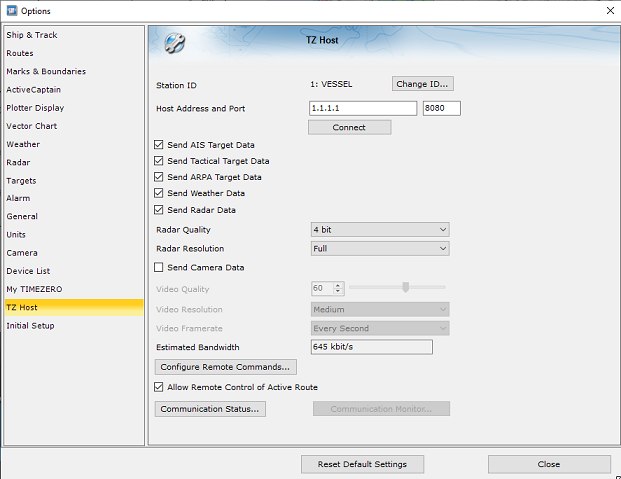
Once the network and the TZ Host have been setup, choose a unique Station Name and Station ID (used to identify the vessel on the TZ Host network), enter the IP address of the computer running the TZ Host, select which type of data you would like to send (and their quality) and click on "Connect":
TIPS: You can also enter additional vessel information (like Vessel Name, Size, MMSI, and Registration Number) from the Initial Setup Options
Note that in addition to sending AIS targets, Tactical Targets (with OEM Module), ARPA targets, Weather Data, Radar Data (with Radar Module) and Camera Data (with Camera Module), you have the option to configure remote commands and to allow or not TZ Coastal Monitoring to see and control the Active Route remotely.
If you would like to configure remote commands (similar to shortcuts, but that can be triggered from the operating center), click on "Configure Remote Commands..." on the TZ Professional vessels where you would like that command to be executed:
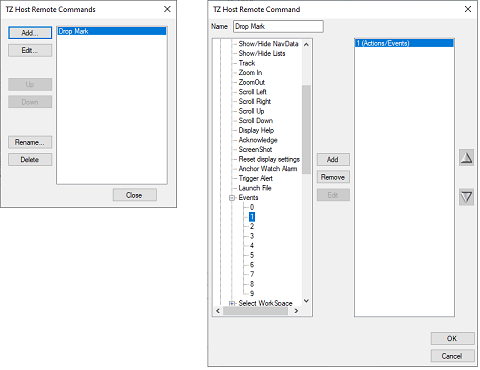
Note: You can set up up to 12 remote commands per vessel. Remote Commands are set up individually on each vessel (on TZ Professional) allowing to have a different set of remote commands per vessel.
Once configured on each vessel, remote commands can be accessed from TZ Coastal Monitoring Remote by right clicking on the fleet and selecting the corresponding remote command from the "Execute Remote Command" contextual menu:

Setup the Supervision Center with TZ Coastal Monitoring:
In order to monitor the vessel(s), you will need to use TZ Coastal Monitoring Remote which will connect to the TZ Host to get all the data (vessel position, AIS, ARPA, radar and camera).
Note that with the TZ Host solution, the fleet targets will only be visible on TZ Coastal Monitoring Remote (vessels will not see each other and vessels will not be able to interact with the supervision center).
Show and Hide Fleet Targets
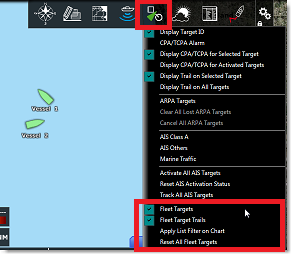
To display the fleet targets on your screen, select "Fleet Targets" from the "Targets" button located in the Ribbon:
By default, all Fleet targets are displayed in green, but you can change the default color from the Targets Options (by changing the "Fleet Color" setting). Note that you can also individually customize the color of each target by right clicking on the target and selecting "Target Color":
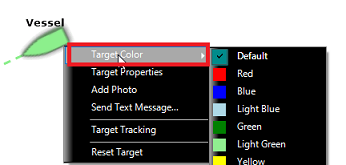
Changing the color of specific target can be useful to highlight specific vessels in your fleet.
By default, the text label displayed below the target icon will be the vessel name (as received by the Fleet Tracking server).But if you prefer, you can set a custom Nickname (either from the list or from the target properties) that will be used instead.
Note: If you customize the color and the nickname on specific target(s), TimeZero will remember these settings, even after restarting. You can revert to the default color by selecting "Default" (under target color) and revert to the name transmitted by the vessel by erasing the nickname.
Because the Fleet reception is not always real-time (especially with the TZ Cloud solution when the sender and/or receiver lose their Internet connection or when they setup a longer position update interval to save bandwidth), Fleet targets have a much longer timeout than AIS or ARPA targets. A Fleet target will no longer be displayed on the screen (and inside the Fleet list) if its last update is older than the "Fleet Timeout" setting available in the Targets Options (12 hours by default). Note that, if you would like to remove a fleet target before waiting for this timeout, you can right click on a fleet target and select "Reset Target". This will get rid of the fleet target until a new position report is received again.
If you want to reset and erase all Fleet Targets at once, select "Reset all Fleet Target" from the "Targets" button located in the ribbon.
Fleet Target Trails
Fleet Target Trail
The Fleet Target trails are always and automatically recorded in TimeZero. The Fleet target trails behavior is slightly different than AIS or ARPA target trail. If you have selected to display the trail on all targets (from the Target Ribbon button), then the fleet target trail length will match the AIS or ARPA trail length (which is setup using the "Target Trail Length" setting from the Targets Options). However, when selecting (clicking on) a Fleet target, a longer trail is loaded and displayed on the chart. This longer trail (that is only displayed on the selected target) matches the "Fleet Timeout" setting of the Targets Options.
Note: The trail is automatically cut (split) if there is a gap of more than 50Km or if a position report was not received for more than 2 hours.
Fleet Target Track
Target Tracking can be enabled on Fleet targets by right clicking on a target and selecting "Target Tracking". From that moment, TimeZero will stop displaying the trail and start recording a track. Just like trail, the track line has the same color as the target (this can be changed by right clicking on the target or the track at a later time).
Target Track Recall
It is possible to create a target track after the fact from a target trail. This is useful if you do not want to enable Target Tracking systematically (to avoid creating lots of tracks) but decide at a later time to create a track from a trail. Simply right click on the target or on the trail itself and select "Recall Track". All the trail points will be displayed and the cursor will change allowing you to click once to set a start position and click a second time to set the end point.
Fleet Target List
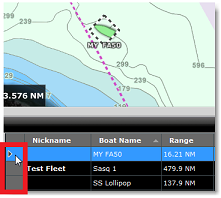
To display a list of all the vessels in your fleet, select "Fleet Target List" from the "Lists" button located on the ribbon. If the list window is already open at the bottom of your screen, you can also select "Fleet List" from the list category:

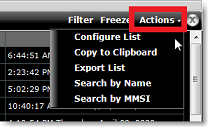
Note that you can customize the columns that are displayed in the list by clicking on the "Actions" menu and selecting "Configure List":
TIPS: This list can be sorted by double clicking on any column header. For example, you can sort by "Last" date (to see the most up to date fleet target at the top), by speed or by color (if you have assigned specific color to specific targets).
The action menu can also be used to search for a specific Fleet Target by Name or by MMSI. Once you have located a target in the list, TimeZero can center on it if you just click on the row header:
TIPS: If you have sorted the list by a parameter that is often updated and can vary a lot (speed for example), individual items in the list might jump around and be difficult to select. To temporarily stop the list from refreshing, you can click on the "Freeze" button.
Fleet Target Filter
It is possible to filter items in the list by clicking on the "Filter" button displayed at the top right corner of the list. When you click on this button, a window opens allowing you to select your filter parameters:
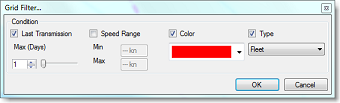
By default, the filter only operates on the list, but you can apply the same filter on the chart if you select "Apply List Filter on Chart" from the "Targets" button located in the ribbon.
Send and Receive User Objects and Text Message
This feature is available for fully interactive fleet members using TZ Professional or compatible Furuno NavNet systems. AIS Members added by MMSI are non-interactive targets and cannot send or receive text messages or user objects
Send User Objects:
To send a user object, simply right click on a user object and select "Send To". You will have the option to select a specific vessel inside the fleet or send the user object to the entire fleet at once.
IMPORTANT: With the TZ Cloud solution, any member of the fleet can send user objects to any other member of the fleet (since all fleet members can see each other's). However, with the TZ Host solution, it is only possible to send user objects from TZ Coastal Monitoring Remote to a vessel (not the other way around). This is because, with the TZ Host solution, vessels do not see each other's and do not see the supervision center.
Note: Sending a Route or a Boundary area containing about 20 points will only take 2kB via the TZ Cloud. Sending user objects with the Fleet service is much more efficient and practical than sending user objects by e-mail (using TZX file format).
Note that if you lock the object or set it as an "Own Ship Alarm" area (in case of boundaries) before you send the object, these settings will be transferred as well with the user object.
If you modify the same user object (for example change its color, or add a waypoint to a route...) and send it again, it will NOT create a duplicate on the receiver (it will update the same User Object as well).
TIPS: It is possible to send the Planning Route directly to a Fleet Target by right clicking on it and selecting "Send Planning Route".
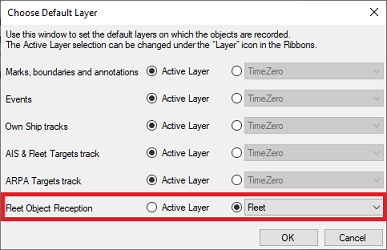
When you receive a User Object that was sent to you via Fleet Tracking, the User Object will be saved on your TimeZero layer by default. If you prefer, you can create a new layer and set it as a Default Layer for Fleet Object Reception:
For additional information on how to manage Layers, please reger to the Layer Chapter.
Note: Routes and Pictures are always saved on the TimeZero layer.
Send Text Message:
To send a message to a specific vessel, simply click on the fleet target you would like to send a message to and select "Send Text Message...". A window will appear allowing you to type a text message (maximum 150 characters):
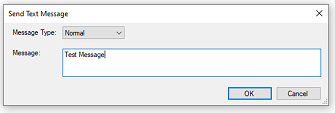
Note that you can set the message type to "Normal" or "Important". When a message is sent with the "Normal" priority, the receiver will get a notification (yellow) with the message displayed in the status bar. When a message is sent with the "Important" priority, the receiver will get an alarm (red) with the message displayed in the status bar, and a window will automatically pop-up displaying the message to draw attention:
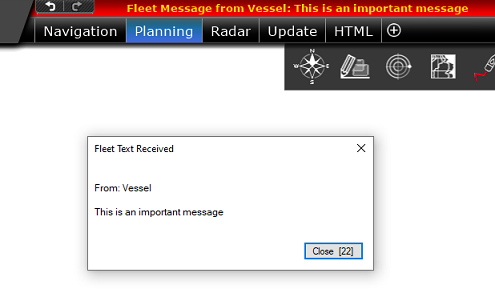
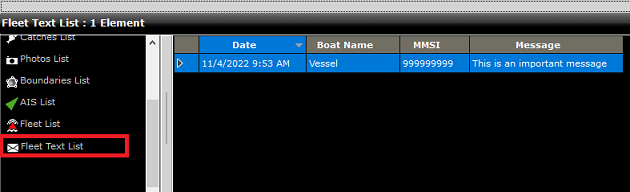
All the text messages you receive are kept and can be read at any time from the "Fleet Text List":
IMPORTANT: With the TZ Cloud solution, any member of the fleet can send text messages to any other member of the fleet (since all fleet members can see each other's). However, with the TZ Host solution, it is only possible to send text messages from TZ Coastal Monitoring Remote to a vessel (not the other way around). This is because, with the TZ Host solution, vessels do not see each others and do not see the supervision center.
Notification and Acknowledgment (TZ Cloud only):
Just after sending a user object or a text message via the TZ Cloud, a mail icon will appear at the top of the target(s) you sent the object/message to. The icon will be yellow to indicate that the object/message was properly sent to the server, but not yet delivered to the vessel. Once the object/message is actually delivered to the vessel, the icon will turn green, and a notification will be displayed in the status bar (and logged in the Alarm list):
When you see the delivery notification, you are guaranteed that the user object or message was delivered to the vessel. This acknowledgment is especially important in case the Internet connection is not reliable on the vessel you want to send the object or message to.
Note: If an Internet connection is not available on the vessel you want to send the user object to, the information will be kept and stored on the Fleet Tracking server until a valid Internet connection can be established with the vessel.
Receive & Control Radar & Camera (TZ Host Only)
All Fleet target data that is sent to the TZ Host can be viewed and controlled from TZ Coastal Monitoring Remote. The target will appear on the chart and the camera and radar data can be viewed/controlled from the Camera and Radar WorkSpace respectively. If the camera installed on the vessel has Pan/Tilt/Zoom ability, you will be able to control the camera directly from TZ Coastal Monitoring Remote.
Active Route Monitoring & Remote Control (TZ Host Only)
When "Allow Remote Control of Active Route" is enabled on TZ Professional form the TZ Host options (ON by default), the Active Route will be automatically sent and kept up to date on TZ Coastal Monitoring Remote:
Note: TZ Coastal Monitoring Remote supports multiple active routes from multiple fleets simultaneously.
TZ Coastal Monitoring Remote will also have the ability to remotely Cancel the Active Route by right clicking on the route.
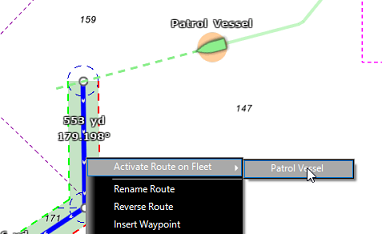
If you would like to activate a route on a specific vessel, simply right-click on a route created in TZ Coastal Monitoring remote and select "Activate Route on Fleet". This will display the list of all the fleet targets (ordered by distance):
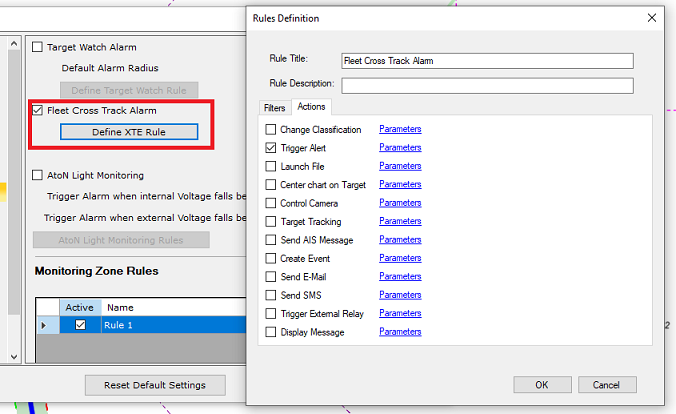
If you would like TZ Coastal Monitoring to trigger a rule when a vessel goes off-course (goes outside of its active route cross track error), simply enable the "Fleet Cross Track Alarm" from the Alarms Options and define the behavior of the rule:
Target Watch & Zone Monitoring (TZ Host only)
Target Watch
It is possible to set a Target Watch Rule on any Fleet Target on TZ Coastal Monitoring Remote. First you need to configure the Target Watch Rule from the Alarms Options. Once you configure the rule behavior, right click on any target and select "Target Watch Alarm" to drop a monitoring circle around the current target position:
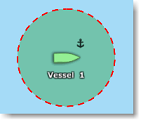
The Target Watch Rule is specifically useful when you need to monitor a temporary location defined by the current target position (such as an Anchorage or a Mooring location). For more information about how to setup the Target Watch rule behavior, please refer to the Target Watch chapter.
Zone Monitoring
It is also possible to have Fleet Targets trigger Zone Monitoring rule(s) on TZ Coastal Monitoring Remote. Rules can be attached to boundary area(s) you draw on the chart which is useful when you want to monitor a permanent fixed location such as a harbor entrance or a prohibited/restricted area. However, if you want to monitor an area relative to the Fleet target (an area that "moves" with the Fleet target), you can define a Guard Zone by right clicking on the Fleet target and select "Set Guard Zone". You can then define a rule for that guard zone and setup a behavior that allows you to monitor what is around the Fleet target. This can be useful for an autonomous vessel to trigger an alarm whenever another target (AIS or ARPA) is approaching the Fleet target or to automatically control the camera which is on the Fleet target from TZ Coastal Monitoring.
For more information about how to setup rules linked to areas or guard zones, please refer to the Zone Monitoring chapter.
Fleet Target Record and Replay
If you have the VDR module, the Planning WorkSpace allows to replay target position history by using the timeline:
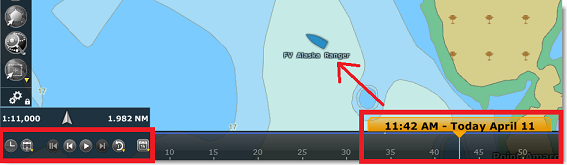
Fleet Targets that are replayed are displayed in blue and are slightly more transparent than "real time" targets. Note that you can also display a trail on replayed Fleet Targets (the trail for replayed targets is fixed to one day).
Note: Even if a target has been reset, although it will not be displayed anymore in the "Navigation" WorkSpace or when the date is set to "Now" in the Planning WorkSpace, it will be possible to see the old target data by going in the past.
Legacy Fleet Target Format (PosReport file)
TimeZero can also display and update fleet targets by using the POSREPORT format. The POSREPORT format consists of one or multiple text files located in a specific folder (selected from the Targets Options under "Vessel Tracking Data Location"). The text files contain information about other vessels (ID, Position, Date...). The text files can be created manually, or sent by email and then saved in the Vessel Tracking Data folder, or created automatically by third party software compatible with the POSREPORT format. As soon as a new text file is saved in the folder, TimeZero detects it, and displays the updated targets on screen. After TimeZero processed the file (to extract all targets information), TimeZero automatically deletes the file from the folder.
IMPORTANT: Only basic features are available when you use the POSREPORT format. For example, there is no automated way to report your position or send/receive user objects (with acknowledgment) like it is possible with the TZ Cloud Fleet service. The POSREPORT format was designed to offer basic Fleet Tracking capabilities with third party software that can generate a text file.