FLIR Configuration
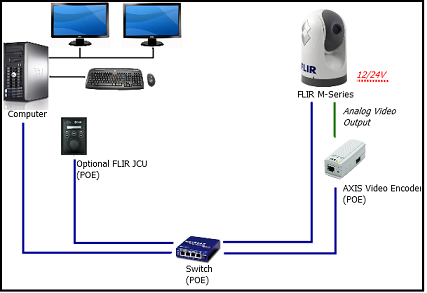
TimeZero is compatible with all FLIR M-Series and PT-Series cameras. Note that the legacy FLIR M-Series camera requires an AXIS video encoder if you want to view the video inside TimeZero. Below is an example showing a typical legacy FLIR M-Series connection diagram with an AXIS IP Video encoder to bring video inside TimeZero:
However, newer FLIR cameras have an internal IP video encoder and you don't have to use any external AXIS IP Encoder (a single Ethernet cable will provide Control and Video). The below example illustrates a typical connection diagram with a M200 (also applicable to M300/400/500):

The FLIR Joystick (“JCU”) uses one Ethernet cable for data and power. To provide power to the JCU, you can use a regular switch with a “Power over Ethernet” (POE) injector or use a POE switch that can provide power directly from its POE connectors.
Camera Configuration
You have to assign a fixed IP address to the Camera, the JCU Controller (Optional) and the computer. In this example, we will use a traditional Class C network configuration (192.168.1.X / 255.255.255.0), but you could also use the Furuno network configuration (172.31.x.x / 255.255.0.0) if you want to integrate TimeZero, NavNet Sensors and the FLIR Camera onto the same network.
Note: When manually assigning the IP addresses, make sure to not use the same IP address twice!
Example:
-
Computer = 192.168.0.50 / 255.255.255.0
-
FLIR Camera = 192.168.0.100 / 255.255.255.0
-
JCU (FLIR Joystick) = 192.168.0.101 / 255.255.255.0
-
Optional AXIS Converter (for older M-Series) = 192.168.0.102 / 255.255.255.0
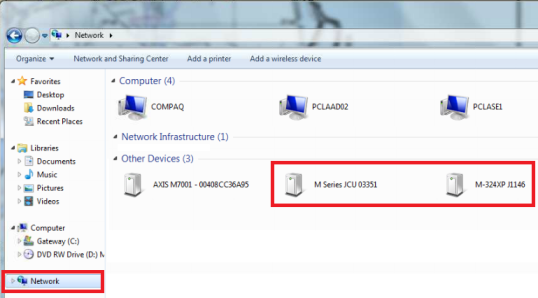
The FLIR Camera and the JCU controller are UPnP-enabled devices. You can see the list of UPnP-enabled device from your computer by opening “Network” in Windows. Note that the devices (Camera, JCU, and AXIS Converter) will only appear on your PC if they are on the same network domain.
When the computer is directly connected to the FLIR Camera or JCU via an Ethernet cable or via a Hub/Switch (without router or DHCP server on the network), the Camera and JCU automatically assign themselves an IP address of 169.254.x.x / 255.255.0.0. In order to access the configuration page of the Camera and JCU, you need to setup your PC on that network (ex: 169.254.1.2 / 255.255.0.0)
Note: If your computer is set to “obtain an address IP automatically”, it should automatically set an IP address of 169.254.x.x after two minutes. However, it is sometimes easier to manually fix the IP address 169.254.1.2 / 255.255.0.0.
Note: If the JCU and the Camera, where previously assigned another IP address, you can display the JCU IP address by pressing the COLOR button while pushing the puck. You can then assign an IP address to your PC accordingly, and thus be able to access the Camera and JCU configuration page.
Once the computer is on the same network as the FLIR Camera and JCU, with UPnP enabled, you should see the Camera and JCU icon under “Network”:
Note: If the devices don't appear, check to make sure that your computer is setup to display UPnP notifications:
- Start the Control Panel and go to Add/Remove programs
- On the left-hand side, select the Add/Remove Windows components
- From the Windows Component Wizard, scroll down to Networking Services, then highlight and select the “Details” button
- Check the box to enable the UPnP User Interface and select OK
- Select Next when returning to the Windows Component Wizard
- Select Finish
Double click on the Camera icon to open its configuration web page.
FLIR M-Series (Legacy):
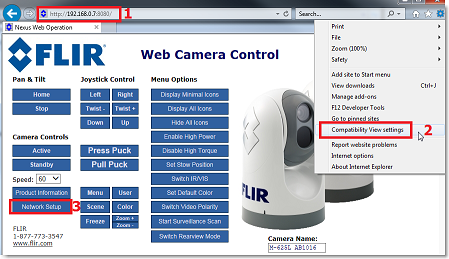
IMPORTANT: If you are configuring a first generation M-Series, make sure to use Internet Explorer in compatibility mode. Other browser (such as Chrome) might not allow you to edit properties.
To configure a fixed IP address for the FLIR M-Series first generation, click on "Network Setup":
Select the Static option rather than Dynamic. The screen will refresh, and the IP, Mask, and Gateway fields will change from grey to white, indicating that they can accept user entries:
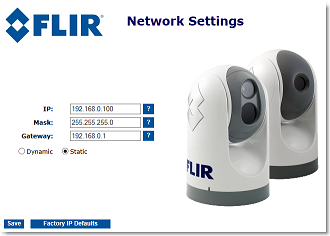
Once you have entered the appropriate IP address and subnet mask (192.168.0.100 / 255.255.255.0 in this example), click on the “Save” link. The camera should reboot and adopt the new IP address.
Note: You will not be able to access anymore the Camera configuration page after changing its IP address (until you change the IP address of your computer later in this process)
Wait one minute then restart the Camera (cycle the power).
FLIR M200, M400 and M500:
To configure a fixed IP address, select "Maintenance" at the top of the screen, then "Server" (on the left) and click on "LAN Settings". Set the IP Address Mode to "Static" and enter the proper IP address and subnet mask:
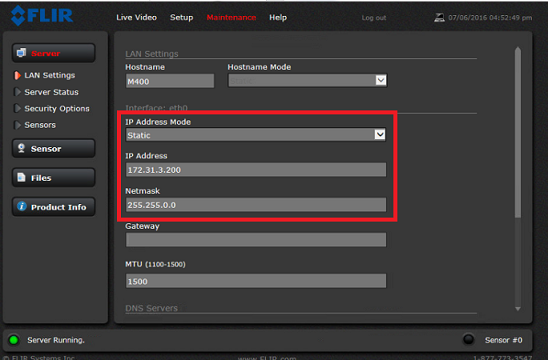
Once the parameters have been setup, scroll down and select "Save" and then "Restart Network".
Note: You will not be able to access anymore the Camera configuration page after changing its IP address (until you change the IP address of your computer later in this process)
Wait one minute then restart the Camera (cycle the power).
Note that with M200, M400 and M500 the "Georeferencence" should be disable if you have connected a GPS and Heading sensors to the camera:

FLIR M300:
To configure a fixed IP address, click on "System Settings" and then "Network". Set the IP Address Mode to "Static" and enter the proper IP address and subnet mask:
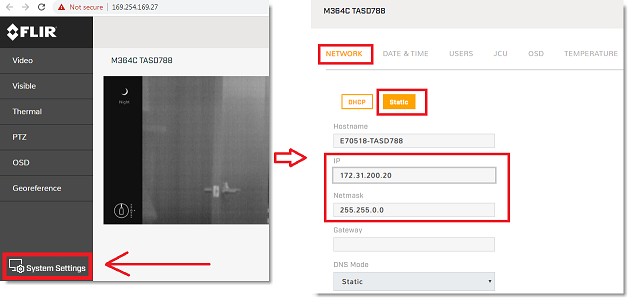
Once the parameters have been setup, scroll down and select "Save" and then "Restart Network".
Note: You will not be able to access anymore the Camera configuration page after changing its IP address (until you change the IP address of your computer later in this process)
Wait one minute then restart the Camera (cycle the power).
JCU (FLIR Joystick) Configuration
Go back to “My Network Places” and double click on the JCU to open its web page and set the IP address in the same way.
IMPORTANT: If you are configuring an older JCU, make sure to use Internet Explorer in compatibility mode. Other browser (such as Chrome) might not allow you to edit properties.
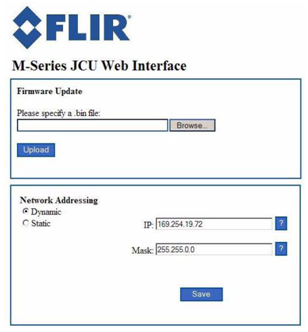
Enter the appropriate IP address and subnet mask (192.168.0.101 / 255.255.255.0 in this example), click on the “Save” link.
After changing the IP address of the Camera and JCU, you need to setup the final IP address of the PC on the new domain (192.168.0.50 / 255.255.255.0 in this example).
Once the IP addresses have been fixed on the same domain for all devices (PC, Camera & JCU), you should be able to see their icons in “My Network Place” (XP) or “Network” (Vista/Window 7).
AXIS Converter Configuration (legacy M-Series):
If you use an AXIS converter (with a legacy FLIR M-Series), use the “AXIS IP Utility” to fix the IP address of the converter. Note that the AXIS IP Utility is able to discover any AXIS device even if the computer is not on the same network domain. Leave the IP address of the PC to its final IP configuration (192.168.0.50 / 255.255.255.0 in this example) and open the AXIS IP Utility. Change the IP and the settings of the AXIS converter according to the documentation (please refer to the AXIS IP Camera & Converter chapter for more information).
TimeZero Configuration:
Open TimeZero, select the Camera Options, click on the “Add” button and select FLIR. TimeZero will scan for any FLIR cameras that are connected on the local network.
Note: If the camera is not automatically detected (which can happen if the computer is connected to multiple networks), click on the button "My camera is not in the list" in order to manually enter its IP address.
After selecting the camera from the list (or after manually entering its IP address), TimeZero will display the configuration window. The parameters you can edit will vary according to the camera capabilities (Single vs. Dual Head) and features you want to enable (Tracking and/or Augmented Reality):
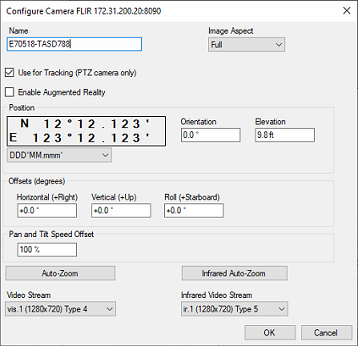
Enter a user friendly name for the camera, then select the Image Aspect:
-
"Full" will zoom the picture to fill the screen without changing the aspect ratio of the camera
-
"Fit" will display the entire picture while keeping the aspect ratio of the camera and add a black border to fill the screen if needed
If you enable "Use for Tracking" or "Augmented Reality", you will need to enter the camera position.
Enter the position of the camera using Lat/Lon (note that you can select the format just below). For the horizontal offset (orientation of the camera from North), please refer to the chapter Align the Camera which provide an easier way to enter the horizontal offset.
For the Vertical and Roll offset (mainly used for Augmented Reality), it is easier to adjust those settings from the Camera WorkSpace directly. Please refer to the "Augmented Reality Setup" paragraph of the Augmented Reality chapter for more information.
Note: If you use an AXIS video encoder with an old FLIR M-Series (legacy model which does not support Video over IP), you will need to enter manually the RTSP path of the AXIS IP Encoder connected to the analog video output of the FLIR Camera. Example: rtsp://root:pass@172.31.200.12:554/axis-media/media.amp. Make sure to use the IP address of the AXIS IP Encoder in the RTSP path.
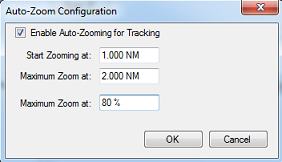
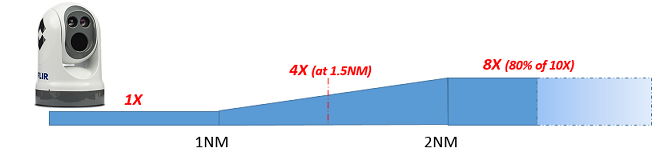
if you enabled the Tracking feature, you can configure the "Auto-Zoom" if you want the camera to adjust its zoom automatically when tracking an object. In the example below, the camera will start to zoom when the point or object to track reaches 1NM. The adjusted maximum zoom (80% of camera zoom maximum capacity) will be reached at 2NM. In between 1 and 2NM, the zoom will be adjusted linearly (in between 1X and adjusted maximum zoom):
The diagram below illustrates the zoom value according to distance with a 10X camera that has been restricted to 8X (80% of maximum zoom value):
If you have a Dual-Head FLIR Camera (VIS and IR Lens), you will be able to adjust independently the Visual and IR Auto-Zoom.