Autopilot Connection (NMEA0183)
Configuration
With the TZ iBoat Essential subscription, TZ iBoat can send autopilot navigation data when a Route or Goto is activated, using a Wi-Fi NMEA gateway configured with a TCP connection. Although TZ iBoat supports only the NMEA0183 protocol, most Wi-Fi gateways connected to an NMEA2000 autopilot network are able to convert the NMEA0183 sentences transmitted by TZ iBoat into equivalent NMEA2000 PGNs, allowing the autopilot to receive the data correctly.
Autopilot data output from TZ iBoat is supported only when using a TCP connection (UDP connections are limited to receiving data). For this reason, make sure your Wi-Fi NMEA gateway supports bidirectional TCP communication.
When a gateway is configured to use TCP in TZ iBoat, the “Pilot Output” option becomes available:
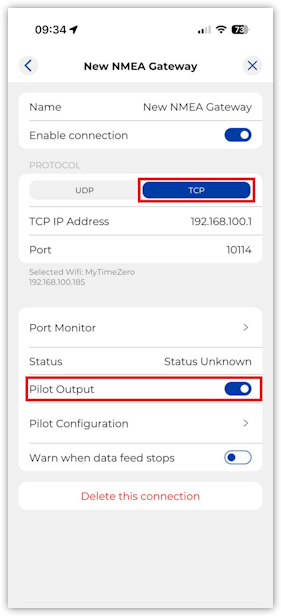
IMPORTANT: For more information on configuring a NMEA gateway in TZ iBoat, refer to External Instruments (NMEA0183) chapter.
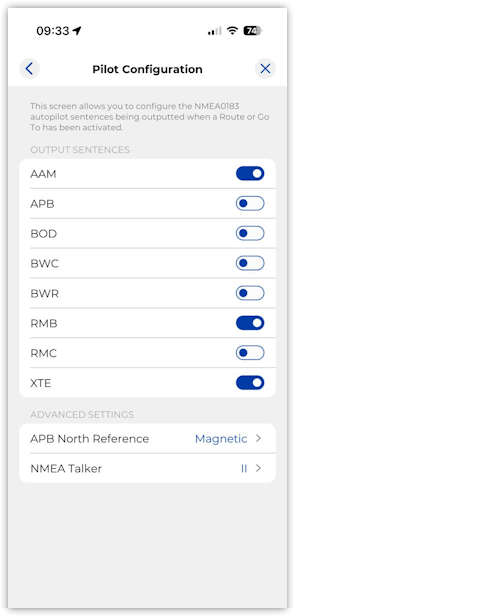
By default, when a Route or Goto is activated, TZ iBoat outputs the following NMEA0183 sentences: $IIAAM each time a waypoint is reached, and $IIRMB + $IIXTE once per second. These sentences satisfy the requirements of most autopilot configurations. If your autopilot requires a different set of sentences, you can enable or disable individual NMEA0183 sentences based on the autopilot manufacturer’s recommendations by tapping on “Pilot Configuration”:
IMPORTANT: TZ iBoat also transmits a heartbeat sentence every 5 seconds. This sentence is ignored by the autopilot and is used solely by TZ iBoat to test and maintain the TCP connection.
Using the Autopilot
Once the configuration is complete, simply activate a Route or a Goto in TZ iBoat and then engage the NAV mode on your autopilot. The pilot will receive the navigation data from TZ iBoat and steer the vessel toward the active waypoint.
When a route is active, TZ iBoat is designed to continue running in the background. However, to ensure reliable and continuous transmission of navigation data to the autopilot, it is recommended to keep the application running in the foreground and enable “Prevent Auto-Lock” in the Settings → General. This prevents the device from entering sleep mode and allows TZ iBoat to operate continuously.
Once the configuration has been done, you just need to activate a route or Goto in TZ iBoat and then enable the "NAV" mode of your pilot. The pilot will pick up the navigation data and steer your vessel following the active waypoint. Note that when a route is activated, TZ iBoat has been designed to keep running in the background, but to guarantee proper processing of the data output to the pilot, it is better to leave the App running in the foreground with "Prevent Auto-Lock" enabled from the General settings. This will prevent the device from going automatically in sleep mode and allow TZ iBoat to run continuously.
IMPORTANT: TZ iBoat automatically enters a low-power mode after 30 seconds of inactivity, reducing the frame rate to conserve battery power. When the device is mounted, it is recommended to connect it to an external power source.
Troubleshooting
Connection Issue ("Navigation" mode does not engage on the pilot)
If the autopilot does not engage its Navigation (NAV) mode, first verify the physical connection between the autopilot and the NMEA gateway. Make sure the gateway is correctly wired to the pilot, especially when using an NMEA0183 serial connection.
Next, confirm that the TCP connection is properly established in TZ iBoat. Your device must be connected to the Wi-Fi network created by the NMEA gateway, and the status shown in the Instrument Connections list next to the NMEA gateway should be green and indicate Connected, confirming that the connection is active.
Also verify the NMEA0183 output sentence configuration. The default sentences (AAM, RMB, and XTE) work with most autopilot systems, but some gateways or pilots may require additional sentences to be enabled. Refer to the autopilot or gateway manufacturer’s documentation if needed.
Test the Connection
To validate that navigation data is being transmitted correctly, add CTS (Course to Steer), XTE (Cross Track Error), and optionally DTW (Distance to Waypoint) to the NavData panel in TZ iBoat. On the autopilot, display a steering or service page showing equivalent data. Note that CTS may be labeled differently depending on the pilot, such as Bearing, BPW (Bearing to Waypoint), or BRG, while DTW may appear as Range, RNG, or DIST.
Once both TZ iBoat and the pilot display the same navigation data, activate a Route or Goto in TZ iBoat. Confirm that the values shown on the pilot match those displayed in TZ iBoat, at least for CTS and XTE. After confirming consistency, you can proceed with a sea trial.
Pilot not steering properly
Check Pilot behavior in “Auto Mode”
Begin by checking the pilot’s behavior in Auto mode. Auto mode does not rely on any external navigation data and simply maintains the heading captured when the mode is engaged. If the pilot is unable to maintain a straight course in Auto mode, it will also be unable to steer accurately in Navigation mode. In this case, adjust the pilot’s parameters until satisfactory behavior is achieved in Auto mode.
Check the Heading Sensor
If the pilot behaves correctly in Auto mode but performs poorly in Navigation mode, the issue is likely related to the heading sensor. When TZ iBoat sends a Course to Steer command, the pilot relies entirely on its own heading sensor to determine the correct direction. If the heading sensor is miscalibrated, the pilot will not correctly interpret the commanded course, resulting in erratic steering behavior.
To verify heading sensor accuracy, compare Course Over Ground (COG) from the GPS with the Heading (HDG) reported by the heading sensor. This comparison is easiest when both values are displayed side by side in TZ iBoat, but it can also be done by comparing COG in TZ iBoat with heading information shown directly on the pilot. Perform this test in calm conditions, with minimal wind, current, and waves, while steering a straight course at approximately 6–10 knots. Under these conditions, COG and Heading should match within about one degree. Repeat the test while steering in different directions. If a consistent offset greater than 2–3 degrees is observed, the heading sensor should be recalibrated.
Pilot Overshooting Waypoints
If the pilot overshoots waypoints during route navigation, check the Waypoint Switching Radius setting in TZ iBoat. This value must be large enough to allow the pilot to initiate the turn before reaching the waypoint. The Waypoint Switching Radius can be adjusted in the Settings → Routes.
Also verify that the pilot’s counter-rudder or turn-response settings are appropriate for your vessel. These parameters depend on the boat’s inertia and handling characteristics. Some autopilot systems, such as Furuno pilots, automatically learn and refine these values over time, improving performance after several turns. Refer to the autopilot manufacturer’s documentation for guidance on these settings.
Summary
When configuring an autopilot with TZ iBoat, keep the following points in mind:
- Verify that the autopilot is correctly connected to the NMEA gateway and that the wiring is properly configured (especially with NMEA0183).
- Ensure that TZ iBoat is connected to the Wi-Fi network created by the NMEA gateway.
- Select the appropriate NMEA0183 output sentences. In most cases, AAM, RMB, and XTE are sufficient, but if issues occur, you may also try enabling APB and BWR, depending on the autopilot manufacturer’s recommendations.
- Activate a Route or Goto and confirm that XTE and CTS values match between TZ iBoat and the autopilot. Display these values on the pilot and compare them with the information shown in the Route Bar in TZ iBoat.
- Make sure the heading sensor is properly calibrated. A heading offset of 2-3 degrees or more will cause the autopilot to steer the vessel with the same error.