Activating a Route
Once a route is created and checked for obstacles and other hazards, the route can be activated for navigation. This section describes the process and tools TimeZero provides to do this.
Start the Navigation
Note: TimeZero needs to be started in "Navigation" mode with a valid GPS fix for the route activation to be available.
First, select the "Navigation" WorkSpace. Right Click on the desired route to navigate; then choose "Activate Route". A route can also be activated by right clicking on a waypoint or even the middle of a leg and choosing "Activate Route from this Point". This automatically skips all previous waypoints from activation.
The "Go To" tool may also be used to activate a specific route. Select this tool from the Toolbar and click on the route to activate for navigation. If a waypoint is clicked on, this will activate the route from this point and automatically skip all the previous waypoints.
When a Route is activated:
-
The Active Route legs are displayed in red
-
The active leg (leg to the active waypoint) is drawn slightly more transparent
-
The active waypoint is surrounded by a glowing yellow circle
-
When "Display XTE Alarm lines" is enabled from the Routes Options, the Cross Track Limit Area appears delimited with two colored dashed lines: green on the starboard of the Ship icon, red on the port of the Ship icon. This value can be adjusted globally from the Routes Options ("Default Route XTE Value") or leg by leg from the Route Detail list.
-
The Active Route information are displayed in the NavData
Note: It is possible to add other type of information related to the Active Route in the NavData. Just click on the NavData "+" icon (top right), click on the "Route NavData" button and then select the Route Data you would like to display. You may repeat this operation multiple times to add multiple pieces of route data to the NavData sidebar. For more information, please refer to the NavData Chapter.
-
The Route Detail (when the Active Route is selected) displays the active route detail (no longer the planning route detail)
-
The Active Waypoint Distance, Bearing and Cross Track Error information are transmitted to the Autopilot, if configured as an output
Monitoring the Active Route
After activating a route, and as long as no other planning route is selected, the Route Detail list displays information related to the active route. The Route Detail list for the active route is very similar to the planning route detail list, with a few differences: the first line always corresponds to the active leg (completed legs are no longer displayed in the list), and the date is fixed to the route activation time and cannot be modified.
Speed used in the Active Route
When planning a route, you can either assign individual speeds to specific legs by setting speed constraints, or use a single default speed for all legs. The default speed can be configured using the “Route Planning Default Speed” setting in the Routes Options. When a route is activated, any leg that does not have a speed constraint automatically uses the real‑time speed provided by the GPS, and this speed is continuously updated. If a speed constraint was defined on a leg during the planning stage, that fixed speed is used to compute Time to Go (TTG) and Estimated Time of Arrival (ETA) instead of the real‑time GPS speed.
Note that this behavior does not apply to the active leg, which always relies on the vessel’s real‑time VMC (Velocity Made on Course) for navigation.
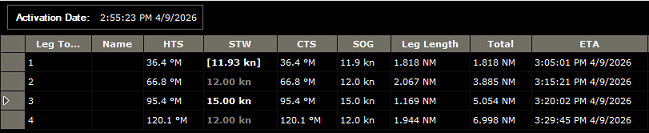
In the example below, the speed shown in parentheses on the first leg represents the VMC (Velocity Made on Course), which is the effective speed at which the vessel progresses toward the first waypoint. In this example, because the vessel is not steering exactly toward the waypoint, the VMC is slightly lower than the GPS Speed Over Ground (SOG), which is 12 knots in this simulation.
Legs 2 and 4 do not have any speed constraints applied. Their speed values appear faded, indicating that they are automatically derived from the real‑time GPS SOG. In contrast, a speed constraint has been manually applied to leg 3, setting its speed to 15 knots; as a result, the GPS‑derived SOG is not used for that leg:
Applying speed constraints during route planning (or directly from the Active Route Detail list) can be useful when you know that vessel speed may be limited in certain areas, or when the instantaneous GPS speed should not be used for ETA and TTG calculations.
If you prefer to remove a speed constraint and revert to using the real‑time GPS speed, you can clear the speed value (STW) for a specific leg directly in the Active Route Detail list. To remove all speed constraints from the route at once, select “Reset Speed to Default” from the Route Detail Action menu.
Currents computation along the Active Route
By default, TimeZero computes data along the active route using Speed Over Ground (SOG) provided by the GPS and deliberately does not take tidal or oceanic currents into account. This behavior differs from route planning and is intended to ensure that ETA and TTG values along the active route remain consistent with other onboard systems that do not support current‑aware navigation.
It is possible to enable current‑based computations for the active route by selecting “Use Currents in Active Route” in Routes Options. This option should be used with caution. For current calculations to be accurate, TimeZero requires a reliable Speed Through Water (STW) input. STW is used as the reference speed to which current effects are applied, allowing TimeZero to correctly derive an SOG that accounts for currents. If no STW sensor is connected, TimeZero falls back to using GPS‑based SOG as the reference speed. In this situation, the effects of the current are effectively applied twice: first within the GPS SOG itself, and again when TimeZero applies current effects to that value. This leads to incorrect ETA and TTG computations and can distort results. For this reason, enabling current usage on the active route is not recommended unless a reliable STW sensor is properly configured and available in TimeZero.
Using the Active Route NavData and the Navigation Bar
While the Active Route detail list can be useful when you need to vosualize all data, it can take up some space at the bottom of the screen and can be difficuly to read while navigation due to the amount of data. TimeZero provides alternative way to monitor critical route information for Navigation
Navigation Bar
The Navigation Bar is automatically displayed after activating a route in the Mavigation WorkSpace:
You can customize the data display in the Navigation Bar from the General settings by clicking on the "Navigation and Trip Bar configuration" button.
Active Route NavData
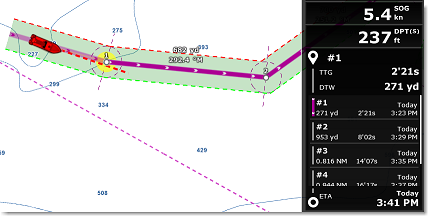
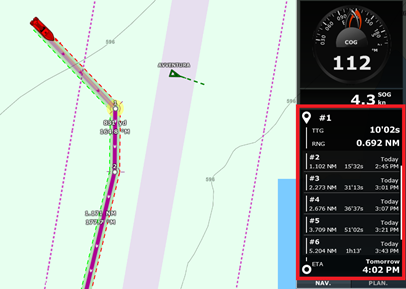
The Active Route NavData provides a good middle ground when you do not need all the detailed information available in the Active Route Detail list, while still retaining essential information about upcoming waypoints and the final destination. It displays the Distance, Time to Go, and Estimated Time of Arrival for each waypoint:
When a route contains many waypoints that cannot all fit within the NavData area, you can scroll the content to view information for upcoming waypoints. The final waypoint (the destination) is always displayed at the bottom of the list. The NavData automatically expands or contracts to fit the available space within its container.
You can right‑click on the NavData to configure the information that is displayed. In particular, you can choose to show only named and/or flagged waypoints, which is useful when you want to focus on a small set of key waypoints. To learn how to name or flag a waypoint, refer to Creating a Route, under the "Naming and Flagging Waypoints" section.
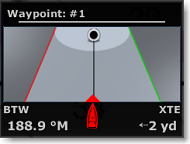
Waypoint NavData
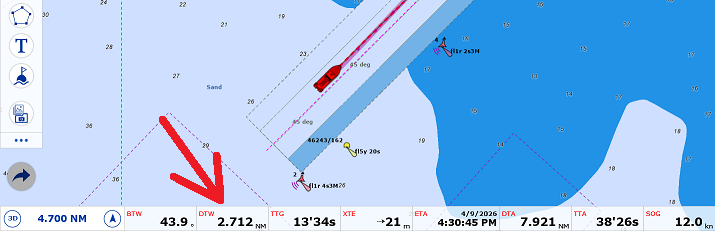
If you prefer to focus solely on the Active Waypoint (the next waypoint destination), you can use the Waypoint NavData. . It combines a “highway” display (also known as the Helmsman display) with Cross‑Track Error (XTE) and Bearing to Waypoint (BTW) information on a single screen.
Route NavData
If you prefer to focus on a single data relative tio the active route, you may choose to configure a "Route NavData". This allows you to select a single value (amoung Bearing to Waypoint, Cross Track error, and many more):
![]()
The advantage of these single‑value NavData is that they are easy to undock (removing them from the NavData sidebar) so they can be placed anywhere on the screen and easy to resize, allowing you to make them larger or smaller as needed. This flexibility makes it easy to further customize your Navigation WorkSpace to match your preferences and priorities.
Tips: For more information about the different NavData available and how to undock and manage them, please refer to the NavData Introduction chapter.
Restart the Navigation:
If the Cross‑Track Error (XTE) becomes large enough to trigger alerts, you can use the Restart function to realign the route. Select Restart from the Route button in the Ribbon, or right‑Click on the route or on the vessel and choose Restart. This action recalculates the intended course so the vessel heads directly toward the active waypoint, without returning to the original route line. Restarting a route is commonly used after deviating from the planned course to avoid another vessel or an obstacle and you want to resume navigation directly toward the active waypoint.
Create an instant "Go To" waypoint:
If you do not need to create a full route with multiple waypoints and simply want to navigate to a single destination while displaying information such as TTG and ETA, you can use the "GoTo" tool to create a temporary navigation point:
-
Select the "GoTo" tool from the Toolbar
-
Click directly on the desired destination in the chart or on an existing mark
You can also create a Go To point using the right‑click context menu by right‑clicking on the chart at the intended destination and selecting GoTo
This creates an instant Go To point that is immediately used for navigation.
Tips: If you want to create a Go To point from known coordinates, double‑click the GoTo tool. A dialog box will appear, allowing you to manually enter the destination coordinates.
Note: Any instant Go To point created with the GoTo tool is temporary and will be removed when the active route is canceled. If you want to keep the destination for future use, you can save it by dropping a mark on the active instant waypoint using the Mark tool.