Creating a Route
When creating or editing a route, it is recommended to use the Planning WorkSpace. This WorkSpace allows you to access advanced features such as displaying a route detail list, or making simulations and animations with tides, currents, and weather. TimeZero allows you to create routes using two methods:
- Assist Mode (requires TZ Maps): A new mode, where the Route Assist algorithm will connect waypoints automatically with a smart route that avoids obstructions and shallow water under the safety depth set in the Routes Options.
- Manual Mode: The legacy mode, where waypoints are connected by straight lines; in this mode, you have to take care of avoiding obstructions, shallow water, and any other danger.
Create a new Planning Route using the Route Assist mode:
IMPORTANT: This feature requires a TZ Maps chart on the area where you want to create your route.
With Route Assist, you can create a complex route with just two clicks. Set the starting and ending waypoints, and Route Assist will automatically complete the route, ensuring it avoids obstructions and adheres to safety depths, all at impressive speed.
If you want to go through a specific spot or if you are not satisfied with the proposed route, you can simply add, remove, or move waypoints, and see the route being updated in real time. Route Assist gives you the flexibility to adjust your route on the fly, making it a time saver for route planning.
Configuring Route Assist:
Route Assist helps find the shortest and safest path from one point to another; it takes in account several parameters that you can find tune from the Routes Options, under the section “Route Assist”.
- Safety Depth: Route Assist will always avoid land, but it also ensures the route adheres to the minimum safety depth you have specified in the “Safety Depth” Setting.
TIP: Feel free to increase the safety depth above your usual margin. This will cause the Route Assist algorithm to steer toward deeper waters. Some users might even decide to select the maximum safety depth value, which is 10m; With this large value, Route Assist will still be able to work even in shallow water (for example when entering/exiting marinas) by turning the legs red as a warning; but at the same time, it will continuously try to find the deepest possible routes, until 10m is reached.
- Strict Depth compliance: In some circumstances the Route Assist algorithm may create legs that are under the Route Assist Safety Depth setting. This might seem strange at first, but some harbors may be poorly charted or may not contain any depth information which would cause the Route Assist to never find a path to the destination if it was set to strictly comply with the safety depth setting. That is why, by default, the Route Assist may create legs in areas shallower than the safety depth settings. Note that this flexibility also allows Route Assist to create legs in shallow water to avoid a big detour. These legs will be clearly marked in red when that happens so that you can review them carefully. However, if you want Route Assist to strictly respect the safety depth, you can select “Strict Depth Compliance”; in this case, Route Assist will never create legs that go under the safety depth.
- Use Recommended Routes: If there is a recommended route or a recommended track on the chart, Route Assist will try to follow it. While "vector chart recommended routes" are provided by hydrographic offices and included in the charts, "crowd-sourced recommended routes" come from user-contributed data. These routes are not visible on the charts but are embedded in the underlying data, helping the Route Assist Algorithm in areas where the charts lack specific guidance.
- Boat Width and Boat Height: These two settings are not found under the Route Options, but rather under the Initial Setup Options. Your boat width is used to avoid narrow passages, while boat height is used to avoid bridges that are lower than your boat air draft.
Creating a Route using the Route Assist mode:
First, make sure to set the safety depth you want to use with Route Assist from the Routes Options (under the "Route Assist" section).
-
Click on the "Route" Tool located in the Toolbar or right click anywhere on the chart and select "New Route".
-
Place the cursor at the starting point and click on the chart; This sets the location of the first waypoint
-
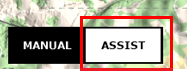
Make sure that the "Assist" mode is selected at the bottom of the screen:
-
Move your cursor towards the destination location. Watch the route being built in real-time, as it dynamically adjusts to reach your cursor. If you are satisfied with the route path and want to end the route, simply double click or right click and select "End Route Assist". If you are not satisfied with the route path, move your cursor and left click to insert waypoint(s) at the location(s) you want the route to go through. Then, double click or right click and select "End Route Assist".
Note that you can still modify the route after it has been created. Please refer to the Editing Routes chapter.
Note: If you need to move the chart when creating the route, you can click and drag the chart with your cursor. Waypoints are only created when you left click on the same position (without dragging the cursor). The arrow keys on the keyboard can also be used to pan the chart while building a route.
Remarks:
-
Route Assist can work with both vector and raster charts (as long as the vector charts data has been downloaded).
-
Routes created in Assist mode are synchronized with other TimeZero devices. However, if a device does not support the Route Assist feature, the route will be displayed and handled as a standard route.
-
A Route has a maximum of 500 waypoints. When the Assisted Route is too complex, it can exceed this number. In that case you will get a “Too Many Points” error. If that happens, you will need to create a shorter route.
-
The distance between two successive user waypoints is 500NM maximum. If you exceed this distance while creating the Assisted Route, you will get an error and the route will not be created; The best solution is to add an intermediate waypoint to reduce the distance between the waypoints.
Create a new Planning Route in Manual mode:
If you do not have any TZ Maps charts or prefer to create your route manually, you can still use the traditional way of plotting a route.
-
Click on the "Route" Tool located in the Toolbar or right click anywhere on the chart and select "New Route".
-
Place the cursor at the starting point and click on the chart; This sets the location of the first waypoint
-
If you have a TZ Maps chart installed on this area, make sure that "Manual" is selected at the bottom of the screen (to disable Route Assist). If you have no TZ Maps chart installed, proceed to the next step.
-
Move the cursor to the next desired destination and click on the chart. Continue with this procedure to add additional waypoint
-
When all the desired waypoints are added, right click to create the last waypoint and choose "End Route" or press the Esc key on the Keyboard to end the route at the last created waypoint. Alternatively, double click at the creation of the last waypoint.
While creating a route, the chart will move automatically to follow the route. To move the chart manually, click and drag the chart with your cursor. Waypoints are only created when you left click on the same position (without dragging the cursor). The arrow keys on the keyboard can also be used to scroll the chart while building a route.
Great Circle Route:
TimeZero can display great circle or rhumb line routes. The great-circle route is the shortest path between two points on a sphere, like the Earth. A rhumb line route crosses all meridians of longitude at the same angle. Since the charts displayed by TimeZero are Mercator projections, rhumb line routes appear as straight lines and great-circle routes appear as curved lines.
When the "Great Circle Navigation" option is enabled, TimeZero divides the route into shorter rhumb line segments that follow the great circle path.
Naming and Flagging Waypoints:
By default, waypoint labels on the chart follow a sequential ID, starting with 1 for the first waypoint in the route. However, you can rename waypoints for better clarity. Simply double click on a waypoint to open its properties window, or right-click and select "Rename Waypoint."
Additionally, you can flag a waypoint by right-clicking on it and selecting "Flag for Approaching Notification." This enables the Approaching Waypoint Notification, which can be configured based on either time or distance from the Alarms Options. This feature is particularly useful in situations such as flagging a waypoint near a passage with strong currents, or a waypoint near a bridge (to notify the bridge operator in advance), or a waypoint at the entrance of a VTS (Vessel Traffic Service) area, where radio contact is required.
Flagging and/or naming waypoints is also helpful for the Active Route NavData, as it allows you to filter the display to show only those specific waypoints. This helps condense the route list to the most critical points, making ETA and Time to Go information more focused and relevant.
When a waypoint is flagged, a small icon appears next to its ID on the screen as a visual indicator:
