DFF-3D Multibeam Sounder
The "DFF3D Module" needs to be unlocked prior to configure the Furuno DFF-3D in TimeZero
Introduction
TimeZero can be connected to a NavNet network that includes an MFD (TZtouch/TZtouch2/TZtouch3/TZtouchXL/TZtouchE) and a DFF-3D or TimeZero can be connected directly to a DFF-3D (without any MFD on the network).
When there is an MFD on the network, all DFF-3D initial adjustments should be done from the MFD following Furuno instructions. Once setup has been done on the MFD, start TimeZero and you only need to configure the NavNet input from the Connection Wizard (to receive position, heading, depth,...) either manually or automatically.
When there is no MFD on the network, at minimum position and high speed heading (10 times per second) must be configured in TimeZero in order to geo-referenced the DFF-3D information. The DFF-3D transducer internal motion sensor can be used for motion compensation, but it is highly recommended to use a Furuno satellite compass (SC30, SC33, SC70 or SCX20) connected to the computer via NMEA2000 (using the Actisense NGT-1 or NGX-1 USB adapter). The satellite compass will be able to provide GPS, accurate high speed heading and better motion information than the internal transducer sensor. To connect the DFF-3D to the computer, we highly recommend installing a switch (even if the DFF-3D is the only ethernet sensor):
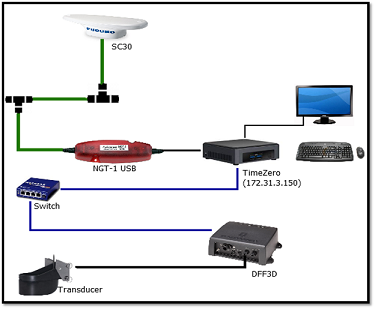
Note: When there is an MFD on the network, the position and heading sensors are connected to the MFD (Furuno satellite compass still recommended). In that case, there is no need to connect the Furuno satellite compass directly to TimeZero.
Computer Setup
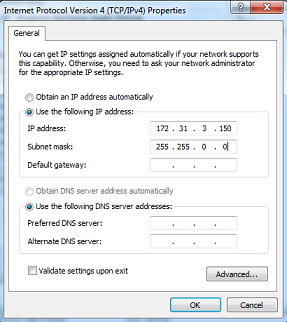
The DFF-3D (and MFD if present) connect(s) to the PC through an Ethernet connection (100 Base-T). All the Furuno NavNet components operate on the 172.31.x.x / 255.255.0.0 network. You will have to setup your computer IP address to match that network. We highly recommended using 172.31.3.150 as a fixed IP address for the computer with a subnet mask of 255.255.0.0.
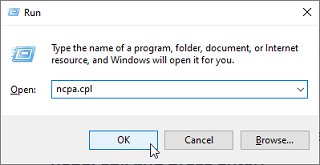
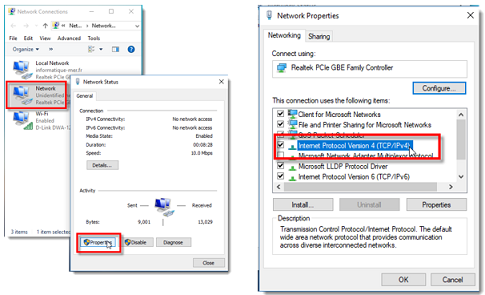
Open the "Network Connections" control panel of your computer to adjust the IP address. Under Windows 10/11 you can press the combination shortcut Windows Key + R to open the Run dialog box. Type "ncpa.cpl" and click on "OK":
Double click on the Network Adapter connected to the DFF-3D (usually “Local Area Connection”).
Note: If you have multiple Area Connections (multiple Ethernet Cards) and if you don’t know which one is connected to the DFF-3D, you can temporary disconnect the Ethernet Cable connected to the DFF-3D from the computer and look at which icon will display a red cross. This will indicate the LAN that has been disconnected from the computer, and thus the one that needs to be configured.
Select "Properties" on the "Local Area Connection Status" window. Double click on “Internet Protocol Version 4 (TCP/IPv4)”. Use the fix IP address 172.31.3.150 with a subnet mask of 255.255.0.0:
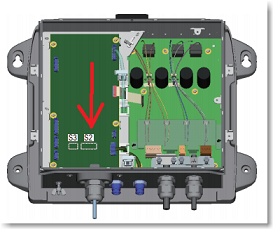
Make sure that the DFF-3D is set for the fix IP address mode. Open the DFF-3D cover and make sure that all the “S2” and "S3" DIP Switches are set to the OFF position:
Connect the DFF-3D to the computer directly or better, via a HUB/Switch.
Note: You can "Ping" the DFF-3D from the computer to make sure that the connection in between the computer and the DFF-3D is OK. The address of the DFF3D to ping is: 172.31.92.21. For more information on how to ping an Ethernet device, refer to the How To Ping chapter.
TimeZero Settings (DFF-3D directly connected to TimeZero)
Open TimeZero in Navigation mode, and open the "Multibeam Sounder" Options.
DFF-3D Transducer Setup
Scroll down inside the "Multibeam Sounder" Options page to the "Setup" category.
1) Adjust the "Transducer Draft" (distance in between the water line and the transducer location). This should always be a positive number.
2) Select "Salt Water" if you are operating in Salt Water (this adjusts the speed of sound used for distance measurement).
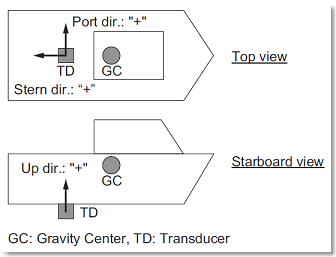
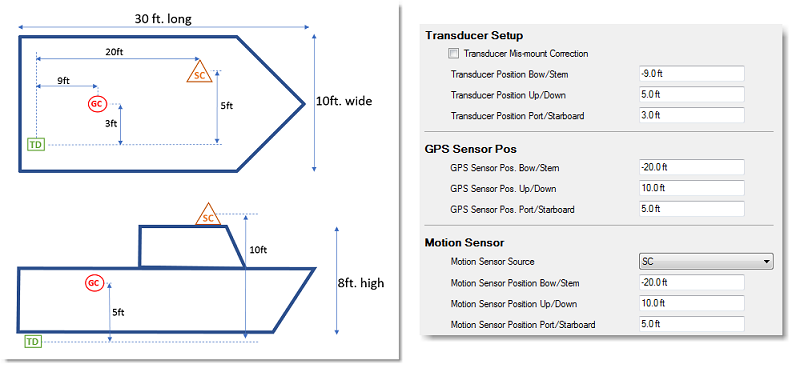
3) Click on the “Transducer Setup” button to adjust the position of the Center of Gravity ("GC"), GPS, Heading and Motion Sensor (Pitch/Roll/Heave) relative to the transducer using the coordinate system below:
-
Select "Transducer Mis-mount Correction" if the DFF-3D transducer has been installed the wrong way (reversed).
-
Enter the distance (on the bow / stern axis) in between the transducer and the ship's center of gravity in the "Transducer Position Bow/Stern" field. If the Center of Gravity is "in front" of the transducer (like the picture above), enter a negative value.
-
Enter the distance (on the down / up axis) in between the transducer and the ship's center of gravity in the "Transducer Position Up/Down" field. For upward location of center of gravity (like the picture above), enter a positive value.
-
Enter the distance (on the starboard / port axis) in between the transducer and the ship's center of gravity in the "Transducer Position Port/Starboard" field. For port location of the center of gravity, enter a positive value.
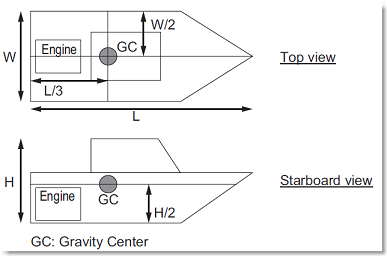
TIPS: If the location of the Center of Gravity is unknown, use the following approximation for its location:
Enter the GPS Sensor position using the same rules as the Transducer to Center of Gravity location.
Select "Internal" or "SC" for the Motion Sensor Source ("Off" is not recommended). When set to "Internal", the motion sensor built inside the DFF-3D transducer will be used. In that case, there is no need to enter the Motion Sensor position (because it is the same location as the transducer). Select "SC" when a Furuno Satellite compass is directly connected to TimeZero (preferably using an Actisense NGT-1 via the NMEA2000 bus) or if the Furuno satellite compass is connected to the MFD. In that case, enter the satellite compass position (enter the relative position from transducer to Satellite Compass location) using the same rules as the Transducer to GPS location.
Note: If you use a Furuno Satellite compass for both position and motion compensation, simply enter the same offsets for the GPS and Motion Sensor.
IMPORTANT: For the best motion compensation performance, we highly recommend using a SC33, SC30 or SCX20 connected to TimeZero via NMEA2000 (using the Actisense NGT1 or NGX1 USB to NMEA2000 adapter).
Below is an example illustrating proper offset (Furuno satellite compass is used for both GPS and motion sensor):
4) If there is no MFD on the network, adjust the Sensor Time lag (inside the "Transducer Setup" window) according to the following cases (if there is an MFD on the network, please refer to the MFD installation guide for the proper Sensor Time Lag values).
IMPORTANT: If the sensors are connected to the MFD, please refer to the MFD instructions to apply the proper time lag values. Apply the values below ONLY if there is no MFD on the network and if the sensors are directly connected to TimeZero
Motion Sensor (when using a Furuno Satellite Compass directly connected to TimeZero):
Only adjust these parameters if "Motion Sensor Source" is set to "SC" (not "Internal")
-
250ms if the SC is connected via NMEA2000 using the Actisense NGT1 or NGX1 USB to NMEA2000 adapter
-
280ms if the SC is connected via NMEA0183 (COM Port) at 38400 bps with a repeat interval of 10Hz minimum
-
380ms if the SC is connected via NMEA0183 (COM Port) at 4800 bps with a repeat interval of 10Hz minimum
Heading Sensor (when heading sensor is directly connected to TimeZero):
When using a Furuno satellite compass directly connected to TimeZero as a heading source:
-
250ms if the SC is connected via NMEA2000 using the Actisense NGT1 or NGX1 USB to NMEA2000 adapter
-
280ms if the SC is connected via NMEA0183 (COM Port) at 38400 bps with a repeat interval of 10Hz minimum
-
380ms if the SC is connected via NMEA0183 (COM Port) at 4800 bps with a repeat interval of 10Hz minimum
When using a PG700 or third party Heading Sensor directly connected to TimeZero:
-
290ms if the Heading Sensor is connected via NMEA2000 using the Actisense NGT1 or NGX1 USB to NMEA2000 adapter
-
320ms if the Heading Sensor is connected via NMEA0183 (COM Port) at 38400 bps with a repeat interval of 10Hz minimum
-
420ms if the Heading Sensor is connected via NMEA0183 (COM Port) at 4800 bps with a repeat interval of 10Hz minimum
Position Sensor (when position sensor is directly connected to TimeZero):
When using a Furuno satellite compass directly connected to TimeZero as a position source:
-
250ms if the SC is connected via NMEA2000 using the Actisense NGT1 or NGX1 USB to NMEA2000 adapter
-
280ms if the SC is connected via NMEA0183 (COM Port) at 38400 bps with a repeat interval of 10Hz minimum
-
380ms if the SC is connected via NMEA0183 (COM Port) at 4800 bps with a repeat interval of 10Hz minimum
When using a GP330B or third party GPS directly connected to TimeZero:
-
290ms if the GPS is connected via NMEA2000 using the Actisense NGT1 or NGX1 USB to NMEA2000 adapter
-
320ms if the GPS is connected via NMEA0183 (COM Port) at 38400 bps with a repeat interval of 10Hz minimum
-
420ms if the GPS is connected via NMEA0183 (COM Port) at 4800 bps with a repeat interval of 10Hz minimum
5) Transmission Power: It is recommended to leave the Transmission Power to Auto. If you are operating the DFF-3D over 100 meters, it is recommended to set it to Maximum (10).
Connection Wizard
First, make sure that TimeZero is properly configured to receive position, heading and optionally, motion data (when a Furuno Satellite Compass is used) using the Connection Wizard. It is recommended to display Position, Heading, Pitch, Roll and Heave numerical NavData to make sure TimeZero is properly receiving all the data.
IMPORTANT: The Heading value should not be displayed in yellow in the NavData (it should be displayed in white). If it is displayed in yellow, it means that COG is used as "fake heading" which is not acceptable for the DFF3D.
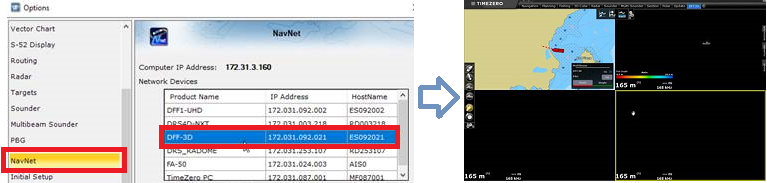
Note that the depth data from the DFF3D is sent to TimeZero via the Ethernet connection on the NavNet NMEA port. So, after connecting the DFF3D, make sure to re-run the Connection Wizard and follow the instructions below to configure properly the NavNet port:
-
Select the "Connection Wizard" that can be found under the "TimeZero" button
-
Select "Manual Port Configuration" from the Connection Wizard
-
Select "Add/Configure NavNet Connection" and click on "NMEA & AIS"
-
Make sure that "Depth" is checked for the "NavNet NMEA" port
-
Click on "Next" then "Finish" to close the Connection Wizard
DFF-3D Monitor
The DFF-3D monitor allows you to make sure the DFF-3D receives all the data on the network it needs to generate good bathy data. After configuring the DFF-3D and TimeZero, it is recommended to look at the DFF-3D Monitor that can be opened from the Multibeam Sounder Options:

Make sure that a valid Position, Heading, Tide and Heave values are displayed. If you are using a Satellite Compass connected to TimeZero as the Motion Sensor for the DFF3D (with no MFD on the network), the DFF3D Pitch/Roll indicators should match the TZ Pitch/Roll indicators (because the DFF3D should use the pitch and roll values sent by TZ over the network). If they do not match, it indicates that the Motion Source was not properly setup to "SC" (under the transducer setting window) or that there is a technical issue (the DFF3D is not receiving pitch/roll data from the network).
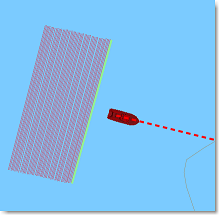
It is also recommended to check "Display DFF3D Swath on Chart" temporary while at the dock to make sure that offset have been configured properly. Selecting this option will display a green line showing the DFF3D swath:
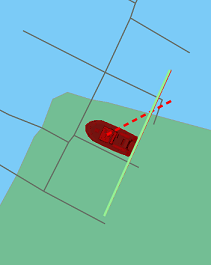
If you are stationary, the swath should be displayed at the transducer location.
IMPORTANT: In order for the boat icon to scale properly, make sure to enter the Boat Length, Boat Width, and GPS location from the Initial Setup Options. Note that the coordinate system used by TimeZero is different than the one used to enter the DFF-3D offset in the Transducer Setup.
When the boat is moving, you should see the green line (displaying the current swath) and trail of red line showing the previous 50 swath. When the boat is running a straight line on a calm day (no pitch) at a constant speed, the red line should almost equally spaced like the picture below:
Note that it is normal to have the green line "lagging" behind the boat (due to sensor lag and processing time of DFF-3D).
When making a turn, the red line should look like below:
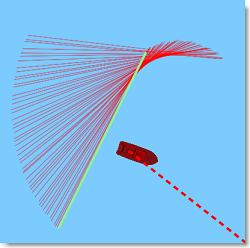
If the red lines are not evenly spaced, this might indicate that heading refresh rate is below 10Hz.
Bathymetric Data Calibration
Roll Offset
Use the chart or local knowledge to identify a spot for the roll patch test – ideally a flat area between 20-40m (shallower than 10m will make it hard to get an accurate reading). Enable PBG recording, display the PBG points (that will help you see where the DFF-3D is actually generating depth points), and run the ship along a straight line in one direction. Turn the ship in the port direction and make a return journey next to the first pass (in the exact opposite direction). If the PBG points generated from the two swath side by side indicate the same depth (flat), you have no roll offset. However, if the two swath side by side create a bump or a hole, you should introduce a roll offset.
If you are using the internal motion sensor of the DFF-3D transducer, you can adjust the roll offset from the transducer setup window. HOWEVER, if you are using a Satellite Compass (recommended), then, you need to adjust the Satellite Compass directly. This can be done from the Initial Setup Options by clicking on the "Calibration" button (displayed under "Furuno Satellite Compass").
Note: TimeZero needs to be connected to the Satellite Compass using the Actisense NGT1 or NGX1 USB (via NMEA2000).
Sound Speed Correction
The speed of sound in water is altered by both salinity and water temperature. The DFF-3D relies on the speed of sound to compute depth. An improper value will cause a flat bottom to appear with a "bump" or a "Hole" across the swath. Below is an example where the DFF-3D is mapping a "hump" because of an improper sound speed calibration:
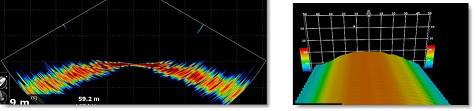
Because there is a greater distance at the edge of the swath (compared to directly below the vessel), a wrong assumption regarding the speed of sound in water has a greater impact on the edge causing this "hump". Note that the opposite might also happen (a "hole" near the center instead of a "hump"). Although the DFF3D transducer has a temperature sensor that allows it to compute the speed of sound, sometimes, it is required to introduce an offset.
If you experience a "hump" or a "hole" in the swath over a flat area, you may need to adjust the "Sound Speed Correction" from the Multibeam Sounder Options.
To decrease the "hump", the slider should be adjusted to the right (positive value). Also, the setting just below "Temperature based correction" should be enable (allowing the DFF3D to change the sound speed according to the transducer temperature sensor). Finally make sure to select "Salt Water" from the DFF-3D Transducer Setup if you operate in Salt Water.
PBG Brush Size Setting
Points recorded with the DFF-3D are recorded in a similar way as with a regular single beam sounder. The only difference is that the DFF-3D provides many points every second (up to 50) over a larger area. However, TimeZero uses the same extrapolation ("brush" parameter) as with a regular sounder. If you are collecting depth data points with the DFF-3D in areas in between 10 to 30 meters, it is recommended to decrease the "Brush Size" from the PBG Options in order to increase the resolution.
In areas deeper than 30 meters, the default brush size (19) is recommended. This is because the distance in between depth points increases with depth, and TimeZero needs a larger brush size to "fill the gap" and smooth all the depth points.
Note: Feel free to adjust the Brush size as you wish. The extrapolation is applied in real time and do not affect the way points are recorded (it only affects the way they are rendered on the screen).
Advanced Troubleshooting
"Power OFF" or "No Connection" Message
If TimeZero display “Power OFF” or "No Connection" on the DFF-3D WorkSpaces (Section, Water Column, Side Scan) it usually means that the sounder is not recognized on the network. Check the IP address of the computer (make sure the subnet mask is set to 255.255.0.0) and check the cable(s). You can "Ping" the DFF-3D from the computer to make sure that the connection in between the computer and the sounder is OK. The address of the DFF-3D to ping is: 172.31.92.21. For more information on how to ping an Ethernet device, refer to the How To Ping chapter.
No Picture (no echo) displayed on screen
If the DFF-3D replies to "Ping" commands and is listed under the "Device List" Options, but no echo is displayed on screen, this is usually an indication that the UDP network packet transporting the echo data cannot reach TimeZero or the computer:
Check Firewall:
First, try to disable the Firewall (either the Windows Firewall or any other third party firewall that may be installed on the computer) and then, restart the DFF3D and TimeZero.
Check the Network Switch:
Managed or “smart” Ethernet switches are becoming increasingly common. When used on a Furuno network, these switches can cause communication issues due to features such as IGMP Snooping. The DFF-3D relies on UDP multicast to transmit echo data, and in the absence of a proper IGMP Querier (which is not present on a Furuno network), IGMP Snooping may prevent multicast packets from being forwarded correctly to the PC. As a result, the DFF3D may appear in the device list and show a valid scale, but no echo is displayed. While some managed switches allow IGMP Snooping to be disabled, others enable this feature internally with no option to turn it off. In such cases, the only reliable solution is to replace the switch with a truly unmanaged Ethernet switch that does not implement IGMP Snooping or any Traffic Optimization / QoS.
Multicast Subscription Group
If that does not solve the issue, the problem may come from your computer having multiple network adapters (multiple Ethernet Cards and/or Wifi adapters). In some rare case, the Ethernet adapter connected to the Furuno network may not be correctly subscribed to the multicast group used by the DFF3D.
The DFF3D transmits echo data using the UDP multicast address group 239.255.0.5. On a Windows PC, you can confirm the multicast subscription by opening a Command Prompt or Windows PowerShell and running the following command: netsh interface ip show joins. Make sure that you see this multicast group linked to the Ethernet Adapater using the Furuno IP address (172.31.3.150 / 255.255.0.0). If this multicast group is missing, or if it is associated with the wrong network adapter, the PC will not receive the echo data. If this is the case, you can temporarily disable all Ethernet cards and Wi-Fi adapters that are not used to establish the connection to the DFF3D. If this resolves the problem and the additional adapters are not needed, it is recommended to leave them disabled. However, if the other adapters are required (for example, to maintain Internet connectivity), they can be re-enabled and prioritized by manually adjusting the network adapter metric values so that TimeZero uses the correct Ethernet card.
We recommend starting with a metric value of 10 for the Ethernet card connected to the Furuno network and setting higher values such as 50, 60, etc., for the other adapters (the lower the number, the higher the priority). To do this, open the TCP/IPv4 properties of each network adapter:
Click on the "Advanced" button, uncheck "Automatic metric" and enter the value manually:
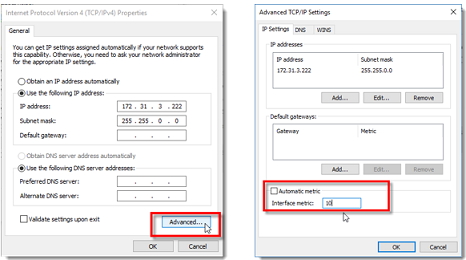
After adjusting the metric of all the network adapters, restart your computer.