
The "InSight Radar Module" needs to be unlocked prior to configure an InSight 2 series Radar in TimeZero. Please note that TimeZero is only compatible with Ethernet Based Radar (it is not compatible with older Serial 2kW dome or with the IR2BB)
TimeZero is compatible with all the MDS Ethernet InSight Radars (Koden radars with MDS5 or MDS6 control box). TimeZero is also compatible with the Ethernet 2kW Dome Radar (MDS1R and MDS8R Koden radars). The InSight Radar connects to the PC through the control box using an Ethernet connection (100Base-T). In order for TimeZero to display and control the radar, the PC and the Radar must be on the same IP network and subnet.
Direct Connection or connection via HUB/Switch:
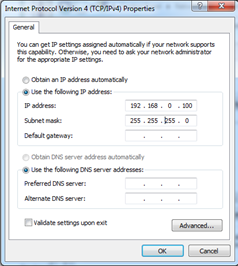
The Koden InSight Radar operates on 192.168.0.x / 255.255.255.0 if there is no router on the network. In this case the Radar will automatically assign itself an IP address of 192.168.0.1 / 255.255.255.0 and you will have to manually set the computer with an IP address on that same subnet (usually 192.168.0.100/255.255.255.00).
Connection via a Router (DHCP Server):
If you have a router on the network (with DHCP capability), the Radar and the PC will automatically get their IP addresses from the router. You should not have to configure the IP addresses.
Note: The Radar Setup Wizard will show you the IP address of the Radar (default Nickname). This can be useful for troubleshooting (ping the radar). However, there is no guarantee that the radar IP address will never change in the future (because the Router can dynamically assign new IP address). If your router can “reserve” specific IP address for specific hardware (using the MAC address), it is recommended to reserve one for the Radar. That way the radar will always keep the same IP address (easier for future troubleshooting). Please refer to the documentation of your Router.
Once the Radar and Computer are on the same network, the Radar Installation Wizard is used to detect the radar on the network. Once the Radar is detected, TimeZero can be open.
Note: The Radar initial configuration (such as Heading Align, Transmit Trigger, etc.) can be made from the Radar Installation Wizard or from TimeZero.
Important: If you want to connect to the InSight Radar and to a Furuno Ethernet Sounder at the same time, please refer to the InSight Radar & Furuno Sounder chapter (a specific IP configuration needs to be adjusted on the PC).
If you connect the radar directly to the PC (using a crossover cable) or via a HUB or Switch, you have to manually assign an IP address to the PC.
Open the "Network Connections" control panel of your computer to adjust the IP address. Under Windows 8.1 and Windows 10 you can press the combination shortcut “Windows Key” + X and select directly the "Network Connections". Under Windows 7, click on the Windows “Start” menu and search for “Network”. Under the “Control Panel” category, click on “Network and Sharing Center”. Once the Network and Sharing Center window is opened, click on "Change Adapter Settings".
Double click on the Network Adapter connected to the radar (usually “Local Area Connection”).
Note: If you have multiple Area Connections (multiple Ethernet Cards) and if you don’t know which one is connected to the radar, you can temporary disconnect the Ethernet Cable connected to the radar from the computer and look at which icon will display a red cross. This will indicate the LAN that has been disconnected from the computer, and thus the one that needs to be configured.
Select "Properties" on the "Local Area Connection Status" window. Double click on “Internet Protocol Version 4 (TCP/IPv4)”. Use the fix IP address 192.168.0.100 and subnet mask 255.255.255.0:
The IP addresses of the computer and Radar should be automatically assigned by the router (DHCP Server). Just make sure that the Router is powered ON and connected to the Computer and Radar.
Note: For troubleshooting, we recommend to write down the IP and Subnet Mask of the Computer. This way, it will be possible to compare the IP address of the PC and Radar later to make sure they are on the same subnet. Follow the instruction below to discover the IP address of the PC: Click on the Windows “Start” menu and search for “Network”. Under the “Control Panel” category, click on “Network and Sharing Center”. Under Windows 8 or 10 you can press the combination shortcut “Windows Key” + X and select directly the Control Panel. Once the Network and Sharing Center window is opened, click on "Change Adapter Settings". Double click on the Network Adapter connected to the radar (usually “Local Area Connection”). Select "Details" on the "Local Area Connection Status" window. This will display the IPv4 Address and IPv4 Subnet Mask.
Make sure that TimeZero is closed, right click on the TimeZero shortcut and select "Open File Location" (this will open the "Professional " folder located in "TimeZero" under the Program Files). Double click on the "Radar Installation Wizard" shortcut to launch the Radar Setup Wizard.
Note: TimeZero needs to be closed while the Radar Installation Wizard is opened, but note that TimeZero needs to be activated and needs to have been open at least one time before launching the Wizard. The Radar Setup Wizard will create a “RADAR.INI” file that needs to be stored in “C:\ProgramData\TimeZero\PreferencesTimeZero”. This folder is created by TimeZero the first time it is opened.
Follow the on-screen instructions of the Wizard. The radar should be automatically detected and displayed as below:
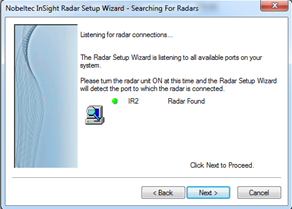
Note: If the wizard does not seem to detect the radar (after waiting a long time), just Power OFF and ON the radar. Check Ethernet Cable and HUB/Switch for traffic activity. Try to turn OFF the firewall of the computer.
The next page of the wizard, will display the IP address of the Radar (default Nickname of the Radar). It is recommended to write down that IP address for troubleshooting. On the example below, the Radar is getting its IP address automatically from the Router and we can learn by reading the default Radar Nickname that its IP is currently 192.168.1.101:
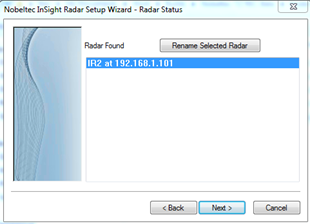
Note: If you notice that the IP address of the Radar does not match the same network as the computer, make sure to adjust the Computer IP address.
The next page will allow you to confirm that the radar is properly working. The radar will automatically start to transmit after warming up. You should see some messages exchanged in between the Radar and PC and a small radar picture in the “Radar Viewer”:
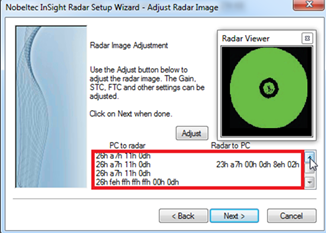
You can click the “Adjust” button to change the Range and some Parameters (Gain. Sea, etc.), however, you don’t have to setup the initial radar settings from within the Wizard as you can perform the adjustment from within TimeZero (that offers a better view of the radar).
Note: If the Radar Installation Wizard detects the radar but do not display any picture (or is stuck on the message “Warming Up”), it might be caused by multiple network adapters or by having the PC on the wrong subnet or wrong IP. First, make sure to disable any other network adapter, double check the IP address of the PC (for IP and subnet) and try again. You can also try to look and change the subnet of the "Radar.ini" file manually (see “Advanced Troubleshooting” below).
When you are done, click on “Next” then “Finish” to close the Radar Installation Wizard.
Open TimeZero in Navigation mode and select the “Radar” WorkSpace.
Note: If the radar WorkSpace is not available, make sure that the “InSight Radar Module” is activated
From the Radar Options, make sure that the Radar Host name is selected under "Radar Host":
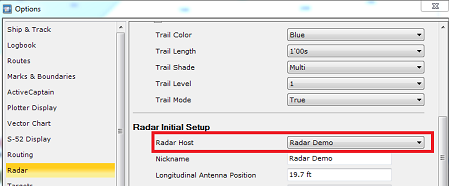
Close the Options, Transmit the Radar, then open the Radar Options again to adjust the various initial setup:

Make sure to review the Radar Options chapter to learn how to adjust the various settings.
IMPORTANT: The Radar Overlay (displaying the Radar Picture on top of the chart) is ONLY available when a GPS and Heading sensors are connected and configured.
When the Radar Setup Wizard is closed, it creates a “RADAR.INI” file located in “C:\ProgramData\TimeZero\PreferencesTimeZero” (hidden folder). This file stores the radar information and is used by TimeZero. You can open that file with a text editor such as Notepad for troubleshooting. Some interesting values are the Radar MAC Address and Subnet Mask:
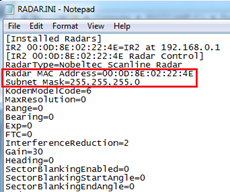
Make sure that the subnet mask matche the one of the PC. In some cases (when having multiple network adapter for example), the radar installation wizard might detect the wrong adapter and write in the file the wrong subnet mask.
Note that the radar IP address is not saved in this file (the Nickname might contain the initial IP address of the radar, but this value is not updated if a DHCP server is used). It is possible to retrieve the Radar IP address by using the command “arp –a”. This will display a corresponding list of MAC address and IP address:

Note: Most router web interface also allows you to look for the Radar IP from the MAC address table
Once you know the IP address of the Radar, you can "Ping" the radar from the computer to make sure that the connection in between the computer and the radar is OK. For more information on how to ping an Ethernet device, refer to the How To Ping chapter.
It is not always possible to install a radar so that the front of the radar is exactly parallel with the boat’s keel or center line. The Antenna Heading Align adjustment can compensate for this discrepancy. This process allows you to align the radar transceiver with the center line of the boat and only needs to be set once. Note that this is a different function than aligning your heading sensor. To adjust the Radar Antenna Alignment, it is best to display the Radar Work Space in "Head Up" mode and aim the bow of your vessel (during calm weather) at a buoy while underway. The buoy target should appear straight up on the Radar Screen.
After successfully installing the radar, transmit trigger delay should be reviewed and adjusted in order to compensate for cable transmission delays. Longer cables generally require a higher trigger delay setting. Trigger delay should be initially set to reduce the size of the ring. Trigger Delay can also affect the radar image of a linear object such as a breakwater or riverfront. These can appear deformed due to excessive or inadequate trigger delay. Properly setting the delay requires to look at a straight object (refinement of the Transmit Trigger is best viewed using radar overlay on the Chart). On the water adjustment when the boat is parallel to a straight jetty is the ideal choice.
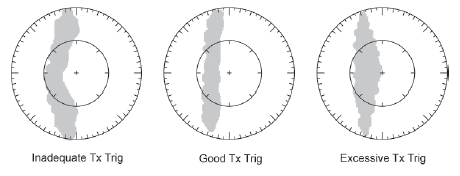
In most cases, Transmit Trigger settings remain between 125 and 160.
InSight radars are always in "Auto Tune" mode. To optimize the image, it is necessary to set the auto tune preset. Once established, you should not need to adjust the auto tune preset unless the image quality deteriorates. Generally, you should adjust the auto tune preset on average once a year to make sure you have the highest quality image.
Follow these steps:
Select the Radar Work Space and transmit the radar at 3NM. Make sure that you see a radar picture.
Open the Radar Options and scroll to the "Initial Setup" Category
Adjust the auto tune control down until you see the image start to deteriorate. Note the value of the setting.
Adjust the auto tune control up past the point where the image looks good until it starts to deteriorate. Take note of the setting value.
Set the controls at a point between the two extreme settings, where the quality of the image is at its best.
The Presets settings are used to adjust the "range of operation" of specifics value. For example, if you are using the Radar in Manual Gain and find that you have to "push" the manual gain value very high to see good targets, you may want to increase the "Manual Gain Preset". This will internally increase the manual gain value range and you will be able to reduce the manual Gain value to reach the same level of gain. Note that you have an independent Manual and Automatic Preset for Gain and the Sea Clutter (STC). The various controls will be enabled or greyed out according to the Radar current value. So if you want to adjust the Manual Gain Preset, make sure that the Radar is in Manual Gain.
Auto Gain Preset: To adjust the Auto Gain preset make sure that the Sea Clutter is set to 0 (manual Sea = 0). Set the Radar to Auto Gain (from the Radar Ribbon button) and pick a range suitable for navigation (around 3NM). Adjust the Auto Gain Preset control down if the image looks too strong or up if the image looks too faint.
Manual Gain Preset: To adjust the Manual Gain preset make sure that the Sea Clutter is set to 0 (manual Sea = 0). Set the Radar to Manual Gain at 50% (from the Radar Ribbon button) and pick a range suitable for navigation (around 3NM). Adjust the Manual Gain Preset control down if the image looks too strong or up if the image looks too faint.
Auto Sea Preset: The Auto Sea Preset is only used for range above 1NM (under 1NM TimeZero uses the Auto Harbor Sea preset instead). To adjust the Auto Sea preset, set the radar range to 12nm and select Auto Sea (from the Radar Ribbon button) to turn on that function. Set the Auto Sea preset to 10. Set the STC Curve preset to 4. From the Radar Ribbon button, manually adjust the gain until you get secondary echoes (noise) throughout the image. From the Options panel, adjust the Auto Sea preset value up until most of the weak echoes for an 8nm radius are eliminated. Adjust the radar range to 1.5nm and verify that strong echoes from nearby vessels or land are not eliminated. If land or vessel echoes are small or have been eliminated, decrease the Auto Sea preset.
Manual Sea Preset: To adjust the Manual Sea preset, set the radar range to 12NM and set the Sea Clutter to Manual at 50% (from the Radar Ribbon button). Set the Auto Sea preset to 10. Set the STC Curve preset to 4. From the Radar Ribbon button, manually adjust the gain until you get secondary echoes (noise) throughout the image. From the Options panel, adjust the Manual Sea preset value up until most of the weak echoes for an 8nm radius are eliminated. Adjust the radar range to 1.5nm and verify that strong echoes from nearby vessels or land are not eliminated. If land or vessel echoes are small or have been eliminated, decrease the Manual Sea preset.
Auto Harbor Sea Preset: To adjust the Harbor Sea Clutter Preset, set the radar range to 1NM and select Auto Sea (from the Radar Ribbon button) to turn on that function. Set the Harbor Sea preset to 10. Set the STC Curve preset to 4. From the Radar Ribbon button, manually adjust the gain until you get secondary echoes (noise) throughout the image. From the Options panel, adjust the Auto Harbor Sea preset value up until most of the weak echoes are eliminated. Adjust the radar range to 1/8nm and verify that strong echoes from nearby vessels or land are not eliminated. If land or vessel echoes are small or have been eliminated, decrease the Auto Harbor Sea preset.
Auto Tune Preset: InSight radars are always in "Auto Tune" mode. To optimize the image, it is necessary to set the auto tune preset. Once established, you should not need to adjust the auto tune preset unless the image quality deteriorates. Generally, you should adjust the auto tune preset on average once a year to make sure you have the highest quality image. Adjust the auto tune control down until you see the image start to deteriorate. Note the value of the setting. Adjust the auto tune control up past the point where the image looks good until it starts to deteriorate. Take note of the setting value. Set the controls at a point between the two extreme settings, where the quality of the image is at its best.
STC Curve: The STC Curve function allows you to control all modes of the Sea Clutter profile of the radar. By default, the STC Curve profile is set to a value of 4. For most applications, there should be no need to change this setting. However, you may want to adjust this value to get a better application of Sea Clutter if the radar is mounted higher or lower than a typical installation. To adjust the STC Curve profile, set the radar range to 12nm, set Gain and Sea Clutter to manual settings (from the Radar Ribbon button). When the STC curve profile is set to a lower number, the sea clutter is only applied in an area closer to the vessel. Setting the curve profile to a higher number causes STC to be applied to more of the image. Note that if the STC curve profile is not set correctly, adjusting the sea clutter (manual or automatic) may not have the desired impact. If you notice that increasing the sea clutter control has no impact on the image, your STC curve profile is too low. On the other hand if you notice that echoes disappear too quickly, your STC profile may be too high
Copyright © 2022 TimeZero - All rights reserved - User Guide version 4.2