Route Introduction
TimeZero lets you create up to 200 routes, with up to 500 waypoints per route, making it easy to plan and manage multiple voyages.
Note: Routes can only be created on the default TimeZero layer and cannot be moved to other layers. This design ensures that routes are always automatically synchronized across all your TimeZero devices. Other layers are available for Tracks, Marks, Boundaries, and Annotations. For more information on how layers work, refer to the Layer Introduction chapter.
Routes are created using the Route tool by clicking directly on the chart to define a series of points of passage, known as waypoints. When using a TZ Maps chart, you can enable Assist mode, which simplifies the creation of complex routes with just a few clicks thanks to the TZ Maps Route Assist feature.
Beyond basic route creation, TimeZero provides a wide range of planning tools, including ETA calculations, route safety checks, tide and current integration, and weather analysis along the route. These features are detailed in the following chapters.
When you are ready to navigate, you can select the route you want to follow and activate it. The active route is displayed in red and is given priority by the navigation system. Upon activation, the first waypoint becomes active and is highlighted in yellow. If a pilot is connected and properly configured, TimeZero automatically sends the route’s bearing and cross-track error to the pilot to assist with steering.
In the image below, the route shown at the bottom is the active route:
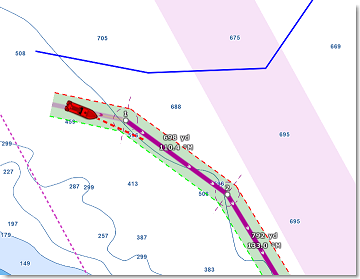
When enabled, the route safety is automatically analyzed by TimeZero. Safe legs are shown with a green background, while legs identified as dangerous are highlighted in red. For more details on how this analysis is performed, refer to the Route Safety chapter.
Route Synchronization
Routes are automatically synchronized with all the compatible TimeZero Platforms (TZ Navigator, TZ Professional, TZ iBoat, and compatible Furuno MFDs) that are connected on the same local network. You can display a list of all the detected TimeZero platforms from the Device List Options. Note that for the synchronization to work, TZ Navigator, TZ Professional and TZ iBoat all need to be logged with the same My TIMEZERO account (for security). But note that the synchronization with Furuno MFDs does not require to be logged when connected directly to the NavNet network (172.31.x.x).
The route activation will also be automatically synchronized on all the platforms at the same time. Note that it is recommended to use the same Waypoint Switching Mode settings to have a common visual reference on every devices, but if the settings are different, the first platform to arrive at a waypoint will indicate all the other one to switch as well.
If you do not want a platform to synchronize automatically on the local network, you can turn OFF the LAN Synchronization from the Device List Options.
Routes can also be synchronized and saved automatically to the TZ Cloud (when connected to the Internet). For more information, please refer to the TimeZero Cloud chapter.
Hiding Individual Routes
You can hide individual routes from the Route list by selecting or not the visible checkbox:

Note: It is not possible to hide the Selected (Planning) and Active Route. The Planning and Active Route will always be displayed on the chart even if the route has been hidden. If you want to hide the planning route, right click anywhere and select "unselect all".
Note that you can select multiple routes from the list (using the SHIFT or CTRL key) and then use the right click on the selection to change the visibility of multiple routes at the same time.
Using Filters to Hide or Show a group of Routes
If you want to selectively hide or show multiple routes, you can create and use a Filter. For example, you could use a filter that only show routes that have been created in between two specific dates or route that contains a specific string in their name.
An easy way to group multiple routes for a specific trip is to prefix all the route name (for example "Alaska"). Then you can create a filter that only show routes whose name contains "Alaska":

For more information on filters and how to manage and use them, please refer to the Filters chapter.