Creating a Routing
The "Routing Module" needs to be unlocked to access this feature
Before creating a routing, it is recommended to update the weather for the corresponding area. Please refer to Requesting a Weather File for more information. Make also sure to load the corresponding Polar file in TimeZero. Please refer to the Polar chapter for more information.
Select the "Planning" WorkSpace and display the weather data on the chart (to make sure that the weather file covers the area). Please refer to Displaying Weather Data for more information.
Select the "Launch Routing" tool available in the Toolbar: 
-
Move the cursor over the charts (at the departure location) and click once to set the starting point
-
Move the cursor over the charts (a rubber line will appear) and click a second time to set the arrival point
Note: If you are connected to a GPS and receive a live position, you can double click with the "Launch Routing" tool on your destination. This will launch a routing in between your current location and the destination.
In some cases, when moving the cursor to set the departure and arrival points, you might see a text tooltip appearing warning you of specific conditions:

-
"Outside Weather Coverage": the cursor position is outside the area covered by the weather forecast.
-
"No Bathymetric Data": there is no detailed bathymetric data available under the cursor position. Note that it is normal to have this warning in open water, where detailed bathymetric data is not available. However, if you see this warning near the coastline, this is an indication that you should install 3D data (files ending with ".dbt").
-
"Over Safety Depth": the cursor position is over land or above the minimal depth defined in the Routing Options.
-
"Strong Winds" / "Big Waves": the weather maximum criteria (maximum wind, maximum wave) defined in the Routing Options are exceeded at the cursor position
As soon as the departure and arrival points are defined, TimeZero will open the Routing Wizard window:
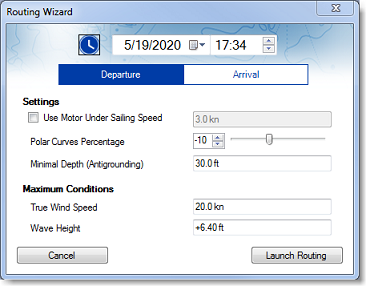
First, select if you prefer to set a departure time or arrival time (by clicking on "Departure" or "Arrival"), then, select a date and time. Note that you can click on the clock icon to use the current time:

Tips: Make sure the selected date & time fall within the weather forecast range. If the weather forecast is not "long" enough for the trip (for example a 5 days trip with only a 3 days forecast), TimeZero will use the last forecast available for the reminder of the trip (fixed value).
Before launching the Routing, the Wizard allows you to adjust some parameters:
-
Use Motor Under Sailing Speed: This parameter allows you to specify a minimum speed for which you will decide to start your engine. Note that the speed you achieve under power can be adjusted from the Routing Options.
-
Polar Curves Percentage: This setting allows you to apply an overall factor on your polars. For example, if you want to see what would be the route if you only achieve 90% efficiency, you can set the slider to -10%.
-
Minimal Depth: Set the minimum depth allowed for the routing. You would usually use a value corresponding to the draft of your vessel plus a margin. When computing the optimum route, TimeZero will avoid areas that are shallower than this value.
-
Maximum Downwind True Wind Speed: Sets an upper limit for downwind speed considered in the route calculation. By setting this value, the software will adjust the routing to avoid areas with strong downwind conditions, ensuring safer navigation.
-
Maximum Upwind True Wind Speed: Sets an upper limit for upwind speed considered in the route calculation. By defining this value, the software will avoid areas with strong upwind conditions, providing a safer route for the crew.
-
Maximum Wave Height: Set a maximum wave height constraint. When computing the optimum route, TimeZero will avoid areas that have wave height over this value.
Note: Other (more advanced) parameters can be setup from the Routing Options. For example, you can set a minimum wind speed or shift/alter the weather data.
After reviewing and/or adjusting the routing parameters, you can click on "Launch Routing". TimeZero will launch the routing computation and display a route summary window:
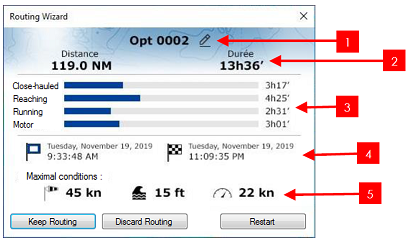
1: Click here to change the name of the route
2: Total Distance and total Duration of the route
3: Total time under specific sail or motor configuration
4: Departure and arrival date / time
5: Maximal conditions reached along the route
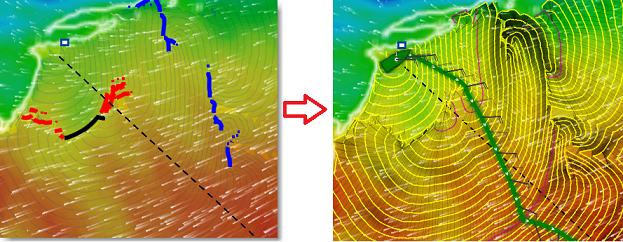
Note that when TimeZero computes the optimum route, you may see black, red or blue lines. Those lines represent areas where a constraint has been reached (preventing the optimum route to cross this path). Red highlights areas where a maximum wind constraint has been reached. Black highlights maximum wave height and blue highlights minimum wind constraint. In the example below, you can see that the resulting computation has avoided those areas:
To close the Routing Wizard, you can choose to discard the routing, restart a new computation (for example if you want to change the date of departure), or keep the routing.
Tips: By default TimeZero will automatically erase previous routings to only keep the last one. If you prefer to keep all routings (if you want to compare multiple scenarios), you can uncheck "Only Keep the Last Routing" from the Routing Options.
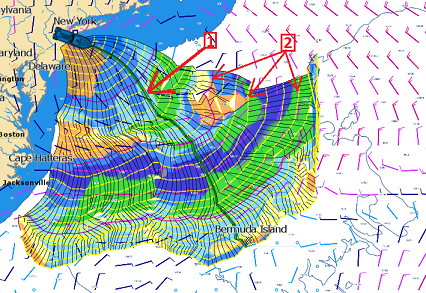
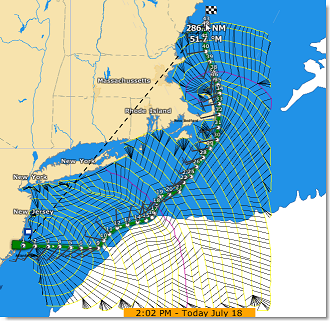
After closing the Wizard (when "Keep Routing" has been selected), the optimized route (1) will be displayed in green, the "isochrons" (2) in yellow/purple lines, and the SailSets in various colors:
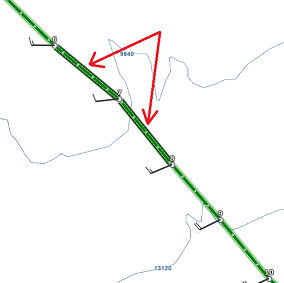
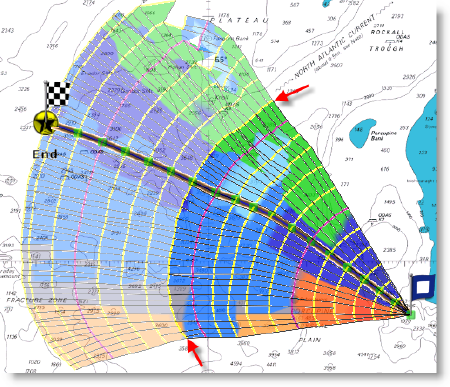
Note that the length of weather forecast should cover the entire time required for the trip. If this is not possible (for a very long cruise), TimeZero will use the latest forecast available as an estimation, and display the isochrons in semi-transparent color. In the following example, TimeZero is using the same fixed weather forecast (latest available) from the location pointed by the red arrow:
If you would like to focus on the route generated by the routing, you can uncheck "Routing" from the Weather button located in the ribbon:
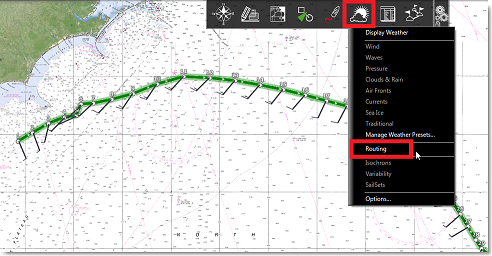
This will reveal the route (displayed in green by default) which will include a wind feather icon on each waypoint showing the wind direction and strength that is forecasted at the location for the date/time predicted by the routing algorithm.
Note: Once the optimum route (routing) has been generated, it cannot be edited. You cannot move waypoints nor adjust the departure time or speed after it has been computed. If you would like to edit the routing like a route, you can right click on it and select "Convert to route".
How to interpret isochrons
Each isochron represents a group of points that the sailboat can reach in a fixed amount of time. For example, if the isochron interval is 3 hours, then the first isochron represents the point the boat can reach in 3 hours, the second isochron is the point the boat can reach in 6 hours, the third one is the point the boat can reach in 9 hours, and so on. The isochrons are drawn as yellow curves on the chart. Every 24 hours, a purple color is used for the isochron (to quickly visualize a day worth of sailing on the chart).
The shape of the isochrons indicates global tendencies. For example, if a group of isochrons is "compacted" in the North (red circle below), and other group is "expanded" in the South (green circle), this indicates that the South holds the better options for travel:
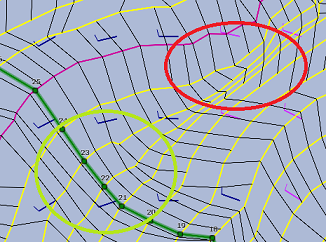
Isochrons that are farther apart means faster speed (because a longer distance can be achieved in the same amount of time).
TimeZero automatically analyzes these patterns, computes the best route possible and displays it in green on the chart.
How to Interpret SailSets
SailSets display the Sail configuration to be used in color on the chart. The color scale is defined in the SailSets table of the Polar WorkSpace.
Note that the default color scale pre loaded in TimeZero allows you to graphically visualize quickly on the chart the "type of navigation" that you can expect for various areas. Red colors are used for Close Hauled navigation or Downwind, green for Broad Reach and blue for Close and Beam Reach. The darker the color, the stronger the wind.
In the example below, the navigation will start Close-Hauled with medium wind speed (orange), then the wind speed will drop around waypoint #6 (pale orange), then the configuration will change to reaching with low wind around waypoint #10 (pale blue), then the wind speed will increase around waypoint #12 (darker blue):

SailSets are great to identify alternate route that may offer easier navigation (if reaching your destination in the shortest time is not your primary goal). In the example below, the fastest route forces you to sail in an area with lots of Close Hauled at the beginning (orange color). You could define an alternate route (south) which would adopt a much easier navigation (in the blue area).

Avoid Land and Shallow Water
By default the Routing will avoid land (minimum depth is set to 0), but you can adjust the safety depth from the Routing Options using the "minimal depth" setting:
Please make sure to install the detailed 3D database files (files ending with ".dbt") that came with your charts. If no detailed 3D data is available, the routing will use the lower resolution worldwide 3D database that can lead to unexpected results.
Note: In some extreme circumstances, the routing module will not be able to find a "path". In these cases, you can try to split the routing in multiple steps by creating a route first. Please refer to the Manual Constraints chapter.
Minimum Speed ("motoring")
You may enable the "Use Motor Under Speed" setting from the Routing Options if you would like to indicate to the routing algorithm that you are willing to use your engine in areas where you speed (under wind power) would fall below a threshold. Note that you can setup the threshold and the speed that you will reach under engine power independently. For example, you may setup the threshold at 5Kn (meaning that if your speed goes under 5kn you will start your engine), and use a different value for your speed while "motoring" (for example 8kn).
If you enable this option, TimeZero will highlight the legs where you need to start your engine with a black outline:
