Navigation
Navigation Mode
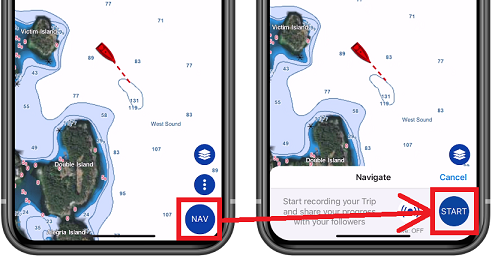
If you want to navigate on TZ iBoat (without a predefined Course or planned Route), simply tap on the "NAV" button located at the bottom right of the screen and tap on "START":
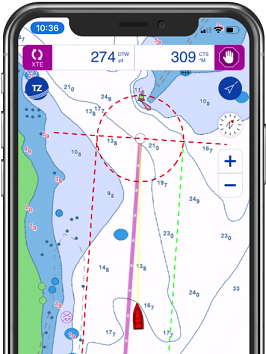
TZ iBoat will automatically switch in Head mode and display some useful information at the bottom of the screen (Trip duration, Trip Length and current Speed).
TIP: You can change the data displayed at the bottom of the screen from the General settings under the "Trip Bar" section.
When the navigation mode is enabled, your Trip is automatically recorded. For more information about this feature, please refer to the Trips chapter.
Note: when enabling the Navigation mode, TZ iBoat will automatically switch to the "Head Up" mode. If you prefer to navigate in "North Up", you can disable "Navigate in Head Up" from the Plotter settings.
Quick Goto
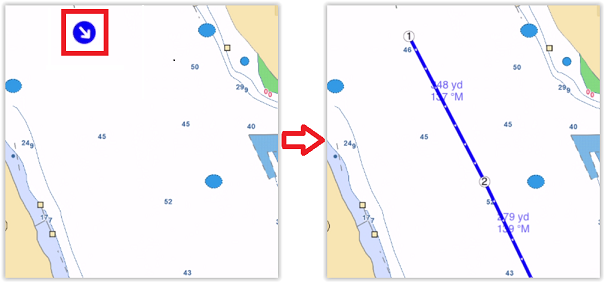
When you need to navigate to a point (straight line) and want to be able to follow a course with some information (such as Time to Go, Distance,...), you can create a quick “Goto” by tapping anywhere on the chart or on a mark and selecting “Goto” from the Pop-Up menu. TZ iBoat will create a temporary active route to that point and display navigation data in the header located at the top of the screen:
When you arrive at your destination (or if you manually press on the “Stop” button located in the header), the Goto will disappear.
Note: when activating a Goto point, TZ iBoat will automatically switch to the "Head Up" mode. If you prefer to navigate in "North Up", you can disable "Navigate in Head Up" from the Plotter settings.
Activating a Route
For navigation that consists of multiple waypoints, you can activate a route. If the route is not already selected, find the collapsed route icon (located by default at the first waypoint) and then tap on it to expand and select the route:
TIP: You can also search for your route from a list by tapping on the "TZ" button and selecting "Search".
To activate the route from the very first waypoint you can tap on the “Activate” button located on the selected route header:

You can also tap on the route itself and select “Activate” to start the navigation from the very first waypoint. Note that you can also activate a route further down if you have already crossed one or multiple waypoints and forgot to activate the route from the start. Just tap on any waypoint or even on any leg and select “Activate Here”.
When activated, the route will be displayed in red, the XTE (Cross Track Error) will be displayed on the active leg, and the route header will be updated with navigation information.
TIP: You can tap on the route header to cycle among various types of information.
Note: when activating a route, TZ iBoat will automatically switch to the "Head Up" mode. If you prefer to navigate in "North Up", you can disable "Navigate in Head Up" from the Plotter settings.
Note: It is possible to add other types of information related to the Active Route in the NavData panel. Just open the NavData panel (swipe from the left), tap on “Add” (top left), and then select the navigation data you would like to display. You may repeat this operation multiple times to add multiple pieces of navigation data to the NavData panel. For more information, please refer to the NavData Chapter.
Restart the Navigation
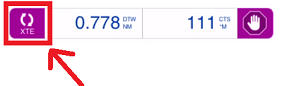
If the cross-track-error ("XTE") gets large enough to start causing alerts, select the "Reset XTE" button from the Active Route header located at the top of the screen:
This will realign the intended course and head directly to the active waypoint without reverting to the original course. Restarting a route is a typical action if you have to take an action to avoid another vessel or an object and just want to head directly toward the active waypoint.
Waypoint Switching Mode
Upon arrival at a waypoint, the switching is automatically triggered, and the next waypoint is activated. Waypoint arrival parameters are determined by the "Waypoint Switching Mode" selected in the Routes settings.
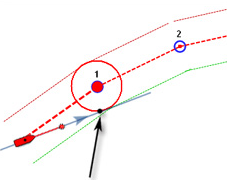
Circle:
In this mode, the next waypoint is automatically switched when your boat icon enters the active waypoint's arrival circle. The value of the arrival circle is set from the Routes Options ("Switching Circle Radius"):
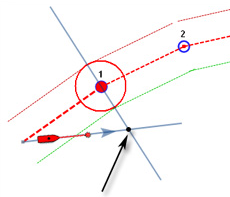
Cross line (also known as "Perpendicular"):
In this mode, the next waypoint is automatically switched when your boat crosses the line through the waypoint that is perpendicular to the leg line.
Circle and cross line:
This is the default selection. In this mode, the next waypoint is automatically switched when the boat enters the active waypoint's arrival circle or crosses the line through the waypoint that is perpendicular to the leg line.
Note: Upon arrival at the last waypoint, the route is automatically cancelled (de-activated).
Switching Waypoint Manually
In some situations, you may want to manually switch to the next waypoint. This action can be done by taping on the route leg and selecting “Skip Next” from the Pop-Up menu.
Active Route Synchronization
The active route is automatically synchronized on the local network with all the compatible TimeZero devices (TZ Navigator, TZ Professional, TZ iBoat, and Furuno TZT2/TZT3) that are connected on the same local network.
This means that if you have an iPad and an iPhone connected to the same Wi-Fi network, you can activate the route from the iPad and then monitor the progress from your iPhone. Any changes you make on the active route (restart the route, skip waypoint, move a waypoint) are immediately synchronized and updated on all your device that are connected to the same local network.