WASSP
The "PBG Module" and "WASSP Module" need to be unlocked to access these features.
WASSP is a multibeam sounder capable of transmitting 112 beams (224 for WASSP generation 3) on a wide 120° port-starboard swath of the seafloor in one ping. TimeZero can take all these depth points and perform seabed profiling at up to 100 times the speed of conventional single-beam sounders with high accuracy. The WASSP system can also transmit "BackScatter" data (hardness) that can be displayed in TimeZero using a Color Scale similar to the Depth Shading.
With the latest WASSP Generation 3 (WASSP S3 or WASSP F3), echo and water column data can be displayed in TimeZero (using the Section, Multi-Sounder, Side Scan, and Water Column display).
Note: WASSP Generation 3 may require additional modules (that need to be unlocked inside the WASSP DRX) to access some type of data. Please contact your WASSP dealer for more information.
Echo Adjustments
This section only applies to WASSP Generation 3
Range vs. Zoom
The range of the multibeam sounder can be set to Automatic or Manual from the "Mode" button located in the Ribbons. When the mode is set to "Manual", the range can be increased or decreased using the "Range In" and "Range Out" buttons available in the Toolbar.
Note that it is also possible to Zoom on the echo by using the scroll wheel of the mouse or by adjusting the "Zoom" slider under the "Display" button located in the Ribbons. Adjusting the zoom, will not change the range at which the multibeam sounder operates. Instead the zoom function performs a "digital zoom" by expanding or contracting the picture sent by the sounder.
TIPS: It is highly recommended to leave the range to "Automatic" and use the Zoom if you want to adjust the picture. Using the range in manual mode can cause the multibeam sounder to lose track of the bottom and operate at a range that is not optimal.
Gain, Clutter and Dynamic Range
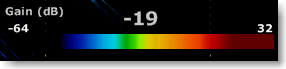
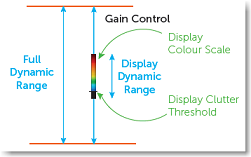
WASSP S3/F3 has a total dynamic range of over 150 dB. This means that the sounder can receive both very strong and very weak targets without saturating and losing valuable information. In order to represent this massive range of echo returns on the display, the display dynamic range limits this range and can both be adjusted in the range of target types that can be viewed (Display Dynamic Range) and the strength of targets being displayed (Gain Control). Targets stronger than the display range on the screen will appear at max color strength and targets weaker than the display range on screen will disappear.
The Gain can be adjusted from the "Adjustment" button located in the Ribbons. You can also put your cursor over the color scale displayed on the bottom left and use the mouse wheel to increase or decrease the gain value:
Turn the gain higher to make weak echo appears stronger.
The Clutter can be adjusted from the "Adjustment" button located in the Ribbons, just below the Gain. Low level noise and clutter from sediments, system noise etc can appear on the screen as dots. These can be suppressed using the clutter control. Clutter control will blank out any returns below the specified return strength on the slider.
The "Dynamic Range" is used to adjust the span at which the color scale (used to render echoes) will operate. A large dynamic range will render on screen echo strength from weak to strong (dark blue to bright red). If you want to "focus" and restraint the color to a smaller interval, you can decrease the dynamic range:
PBG with WASSP
Once the WASSP has been configured in the Connection Wizard, click on the "PBG" button in the Toolbar to enable depth recording:

When depth (and backscatter) data are being recorded, the "PBG" Button turns yellow:

Note that the "Multibeam" NavData allows you to Transmit/Standby the WASSP DRX (WASSP Generation 3 only), enable or disable PBG recording, and select the depth data source. By clicking on either "Multi" or "Single" you can select the type of data that will be recorded (PBG):
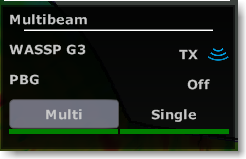
When set to "Multi", the bathymetric data from WASSP will be recorded. When set to "Single", the depth data setup in the Connection Wizard (single beam) will be recorded. It can be useful to switch to "Single" in deep area where the WASSP might not be able to detect bottom but where a traditional single beam sounder would.
Once you have collected data, you can view depth information in 3D by using the 3D Cube WorkSpace, or in 2D by using Depth Shading or Contour lines from the Fishing WorkSpace.
Note: TimeZero merges existing data with newly received data to generate the most accurate reading. If "Overwrite Previous Data" from the PBG Options is enabled, existing data will be replaced. This option is disabled by default.
BackScatter with WASSP
BackScatter data (hardness) can be displayed on the chart similar to the depth shading. The seafloor backscatter is defined as the amount of acoustic energy being received by the multibeam sounder after a complex interaction with the seafloor. This information can be used to determine bottom type, because different bottom types “scatter” sound energy differently. For example, a softer bottom such as mud will return a weaker signal (lower dB value) than a harder bottom, like rock (higher dB) value. By default a harder bottom is displayed in black while a softer bottom is displayed in white.
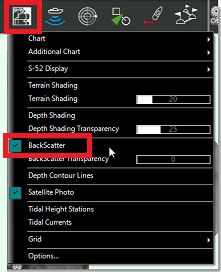
To display the BackScatter on the chart, click on the "Chart" button located in the Ribbon and select "BackScatter":
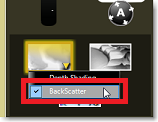
You can also right click on the "Depth Shading" button available on the lower right corner of the Fishing WorkSpace and change the color mode to "BackScatter":
The BackScatter color scale can be adjusted and set to "Automatic", "Manual" or "Discrete". You can change the mode from the Fishing WorkSpace.
TIPS: When the backscatter is displayed, it is possible to show depth contour lines on top of the backscatter. By default the contour lines will be displayed in color. The color of the contour line will use the same color palette as depth shading. Please refer to the Fishing WorkSpace for more information on how to adjust color and contour lines.
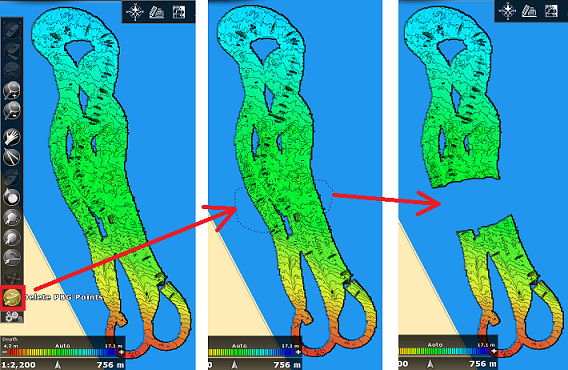
Deleting WASSP Data
To delete WASSP recorded data, make sure that only the "PBG Database" is enabled from the PBG button in the ribbon. This will allow you to focus on the recorded data (not the 3D data from the chart, or the one that was imported).
Turn OFF the PBG recording, select the "Delete PBG Points" from the Toolbar, draw around the area you want to delete and then release the mouse: