Pelco-D Camera
Introduction
TimeZero can control a camera that supports the Pelco-D protocol (two-way communication). Pelco-D is a popular control protocol used in the CCTV industry. In order for TimeZero to successfully control the camera, specific Pelco-D sentences must be supported. Please refer to the Pelco-D Protocol Requirement chapter to make sure the camera is compatible.
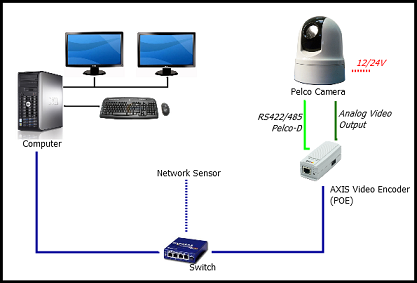
Note that the Pelco-D protocol does not "transport" video: it is only used by TimeZero to send commands to the camera (PTZ Commands) and used by the Camera to report its status (provide feedback on its Pan/Tilt/Zoom position). The video has to be encoded in H264 (RTSP) to be displayed in TimeZero. If the Pelco-D camera does not have an internal IP video encoder, you can use an external AXIS IP video encoder that would connect to the analog video output of the camera. Also note that the Pelco-D sentences are only sent and received by TimeZero over TCP (network). If the camera only provides a serial port (either RS485 or RS422) and does not provide a network port, you can use the AXIS IP encoder as a Serial to Ethernet adapter:
AXIS Port Configuration
Pelco-D sentences are sent and received over a single TCP port. If the camera does not support Pelco-D over TCP, you can use the included AXIS Encoder Serial Port to perform the conversion.
Note: If the camera has an Ethernet output, you can skip this part. Just make sure to configure and write down the IP address of the Camera and its TCP control port.
Configure the AXIS IP Encoder as described in the AXIS IP Camera & Converter chapter. Once the IP address and initial settings have been setup, you can proceed to the port configuration. Open a web browser, type the IP address of the encoder and select "Setup", "System Options", and then "COM Port" (under "Ports & Devices"). Enable the port for "Generic TCP/IP". Select the "listener" mode and enter a port number:
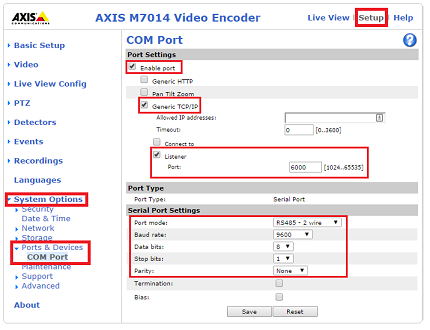
Configure the serial port settings as per the camera serial output specification. Please note that if RS422 is used, 4 wires are required to send and receive commands (usually, RS485 only needs two wires for bidirectional communication).
Camera Configuration
Open TimeZero, select the Camera Options, click on the “Add” button and select "PELCO". Enter the IP address of the camera and the TCP control port number (where TimeZero will connect to send and receive the Pelco-D sentences).
Note: If the Pelco-D camera has two independent optics or lens (such as independent Visible and IR lens), please refer to the Pelco Dual Head chapter.

Enter a user friendly name for the camera, then select the Image Aspect:
-
"Full" will zoom the picture to fill the screen without changing the aspect ratio of the camera
-
"Fit" will display the entire picture while keeping the aspect ratio of the camera and add a black border to fill the screen if needed
If you enable "Use for Tracking" or "Augmented Reality", you will need to enter the camera position. Enter the position of the camera using Lat/Lon (note that you can select the format just below). For the horizontal offset (orientation of the camera from North), please refer to the chapter Align the Camera which provide an easier way to enter the horizontal offset.
For the Vertical and Roll offset (mainly used for Augmented Reality), it is easier to adjust those settings from the Camera WorkSpace directly. Please refer to the "Augmented Reality Setup" paragraph of the Augmented Reality chapter for more information.
You will also have to enter the horizontal Field of Views of the camera. You will have to enter two values: the Maximum FOV (when the camera is zoomed out) and the minimum FOV (when the camera is zoomed in). Those values can be found from the camera manufacturer.
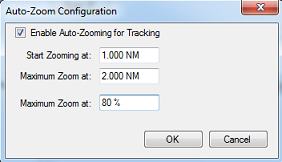
Click on "Auto-Zoom" if the camera supports continuous zoom. In the example below, the camera will start to zoom when the point or object to track reaches 1NM. The adjusted maximum zoom (80% of camera zoom maximum capacity) will be reached at 2NM. In between 1NM and 2NM, the zoom will be adjusted linearly (in between 1X and adjusted maximum zoom):
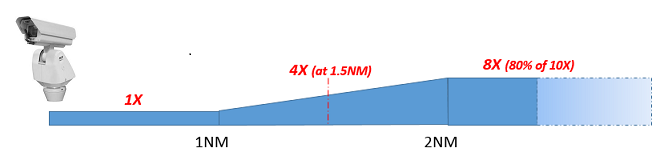
The diagram below illustrates the zoom value according to distance with a 10X camera that has been restricted to 8X (80% of maximum zoom value):
Finaly, you will need to enter the RTSP path of the camera Video Encoder. If you are using an external AXIS IP encoder, enter the AXIS RTSP Path. Example: rtsp://root:pass@172.31.200.12:554/axis-media/media.amp.
Pelco Advanced Configuration
Click on the "Pelco Configuration" button to adjust the Pelco protocol settings:
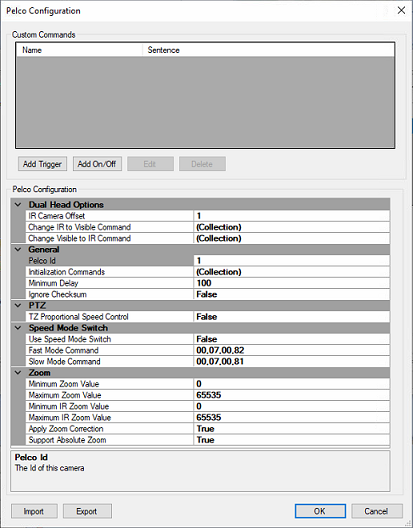
The top part of the window allows you to configure custom actions that can be performed by the camera. Any action(s) configured on this page become available under the "Camera Control" button in the ribbon (when the corresponding camera is active) or when right clicking on the video of the camera. "Trigger" (command) and "On/Off" (checkbox) actions can be configured. A trigger will only send one command and will not remember its state. Triggers are usually used for "one shot" actions that do not require any status to be displayed in TimeZero. "On/Off" requires two Pelco sentences (one for the "ON" state and another one for the "OFF" state). TimeZero remember the ON/OFF state (checkbox) and this can be used to control Auxiliary sensor (or relay).
The bottom part of the window allows to configure advanced Pelco parameters:
Dual Head Options:
Not used for single lens Pelco Camera (only used for Dual Head Pelco Camera)
General:
-
Pelco ID: For most cameras, the Pelco ID should be set to 1. However, if you have a camera that "listens" to a different Pelco ID, you can enter this value here.
-
Initialization Commands: You can define multiple Pelco commands that will be sent to the camera when starting TimeZero. This is useful if you want the camera to start in a specific state when opening the software.
-
Minimum Delay: The minimum delay in milliseconds used by TimeZero to send two consecutive Pelco-D commands. The official Pelco protocol recommends a 300ms delay, but most camera can support a delay of 100ms or less. Increase this delay if the camera exhibits abnormal behavior. Keep in mind that increasing this delay will also increase the camera latency (for tracking). If possible, it is recommended to keep the delay as small as possible.
-
Ignore Checksum: By default, TimeZero enforces the Peclo-D checksum. However, some cameras may compute the checksum incorrectly causing all position feedback send by the camera to be ignored by TimeZero. You can set this option to "True" for TimeZero to disregard the checksum.
PTZ:
-
TZ Proportional Speed Control: When this setting is enabled, TimeZero automatically reduces the pan and tilt speed when the camera is zoomed in. If the camera already includes this behavior (proportional speed according to zoom), leave this setting to false.
Speed Mode Switch:
-
Use Speed Mode Switch: On some cameras, a preset or command can be sent to reduce the Pan motor speed (slow and high gear). If your camera supports this feature, it is recommended to enable this option and enter the two sentences to send to the camera for high gear and low gear in the next two settings.
-
Fast/Slow Mode Command: Enter the two Pelco-D commands that are used to switch the motor Pan speed to high and low speed.
Zoom:
-
Minimum/Maximum Zoom Value: The Pelco values that are sent by the camera at minimum and maximum zoom level.
-
Minimum/Maximum IR Zoom Value: Not used for single lens Pelco Camera (only used for Dual Head Pelco Camera).
-
Apply Zoom Correction: Usually, the field of view is (approximately) linear according to the zoom value. On some cameras, a square operation needs to be added to have a correct relationship between zoom value and Field of View. Change this setting if the camera is not correctly centering on the screen when left clicking to a point on a picture.
-
Support Absolute Zoom: Set it to True if the camera support absolute Zoom command (set Zoom Position).
Tips: You can display the "Camera Info" under the "Camera Control" button located in the Camera WorkSpace. This will display the raw Pelco values sent by the camera to TimeZero. This can be useful to learn the raw zoom minimum/maximum Pelco values.
Once you have configured all the Pelco settings, it is recommended to "Export" the configuration. You can then load the same configuration when configuring the same camera in the future.